Booking System
Overview
The platform includes a built-in appointment booking system that lets your AI agent schedule meetings, consultations, and events directly within conversations. When a contact wants to book a time, the AI checks your availability, offers open slots, and confirms the appointment — all without you lifting a finger.
Who is this for? Any business that takes appointments or reservations. For example:
- A hair salon that books styling appointments through WhatsApp
- A real estate agency that schedules property viewings via Instagram DMs
- A restaurant that takes table reservations through a chat widget
- A consulting firm that books discovery calls straight from a chat
- A medical clinic that lets patients schedule appointments via SMS
The booking system integrates with Google Calendar for two-way sync (see Google Calendar Integration) and with external booking platforms: Formitable, Zenchef, OpenTable and TheFork for restaurants, and Trafft for appointment businesses such as salons, clinics and consultants.
Google Calendar is optional. The built-in booking system works entirely on its own. You set the hours you are available on an event type, and the AI offers and books those hours without any calendar connected. Connecting Google Calendar adds three things on top: every booking also lands on your calendar, anything already on your calendar is treated as busy so it is never offered, and Google Meet links can be created for you. Skip it and everything else on this page still works exactly as described.
Prefer to see it? Click through the whole flow:
Tip: You can set up AI-powered booking during the guided onboarding wizard — it includes steps for choosing your booking option, connecting Google Calendar, and setting your availability, so you can be ready to accept appointments from day one. See Guided Onboarding.
Setting up bookings takes three steps, and this page walks through each one with a screenshot:
- Create an event type — the kind of appointment people can book (for example, “Free 30-Minute Consultation”).
- Turn on bookings for your AI — so it offers those appointments in chat.
- Watch bookings arrive on the Appointments page (and on your Google Calendar, if connected).
Step 1 — Open the Appointments Page
Click Appointments in the sidebar, under the Engage group. The page has two tabs:
- Upcoming Appointments — every appointment that’s been booked, with stat cards for Total, This week, Confirmed, and Pending, plus search, a time filter, and a status filter.
- Event Types — the bookable services your AI can offer.
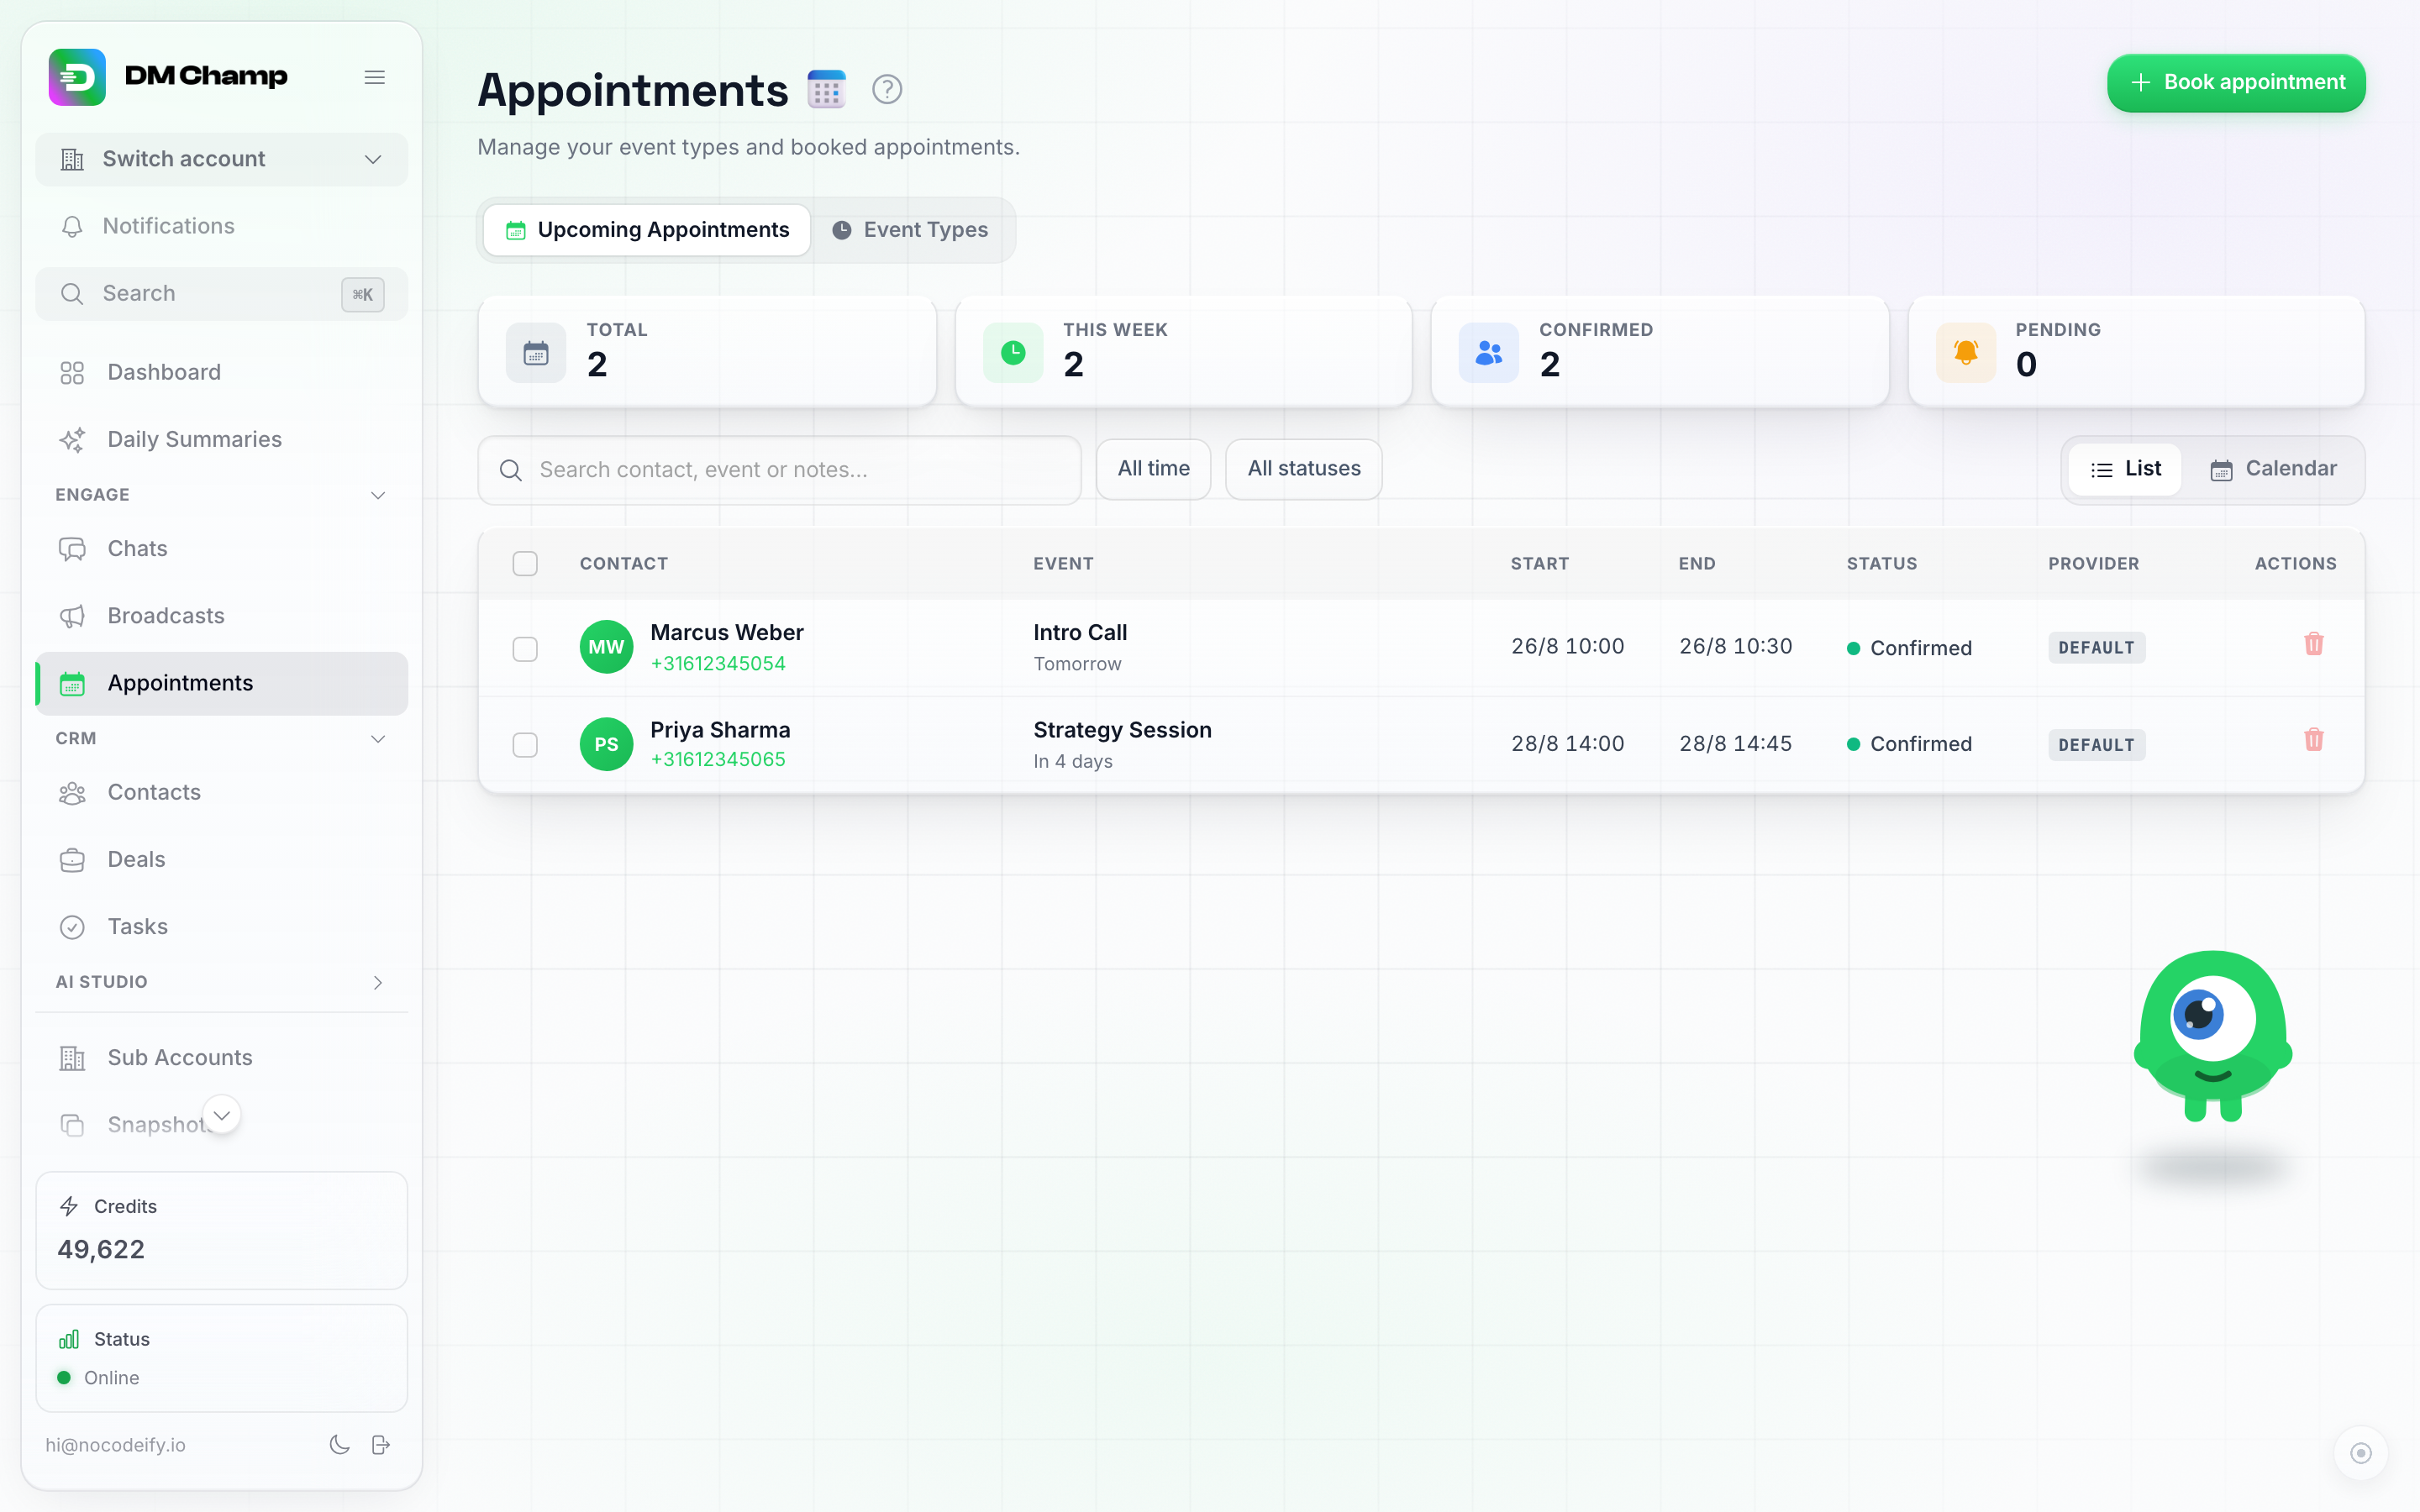
The Upcoming Appointments tab. Each booking shows the contact, the event, start and end time, status, and the booking provider.
Seeing your schedule as a calendar
The Upcoming Appointments tab can show your bookings two ways — switch with the List / Calendar toggle on the right of the filter row:
- List — the table shown above: one row per booking, best for scanning what’s next and for bulk actions.
- Calendar — a week or month grid, best for seeing your day or week at a glance and spotting open slots.
In calendar view you get a Week / Month switch (week is the default), arrows to move backward and forward in time, and a Today button to jump back to the current week or month. Each appointment appears in its day as a small card with the time, the contact’s name, and a colored status dot. Your search and filters apply here too, so you can, for example, show only confirmed appointments on the calendar.
- Click an appointment to open the same detail panel as in list view — reschedule, cancel, open the chat, or delete from there.
- Click an empty spot in a day to book a new appointment on that day — the booking form opens with the date already filled in.
- In month view, a busy day shows the first few appointments and a +N more line — click it to zoom into that day’s week.
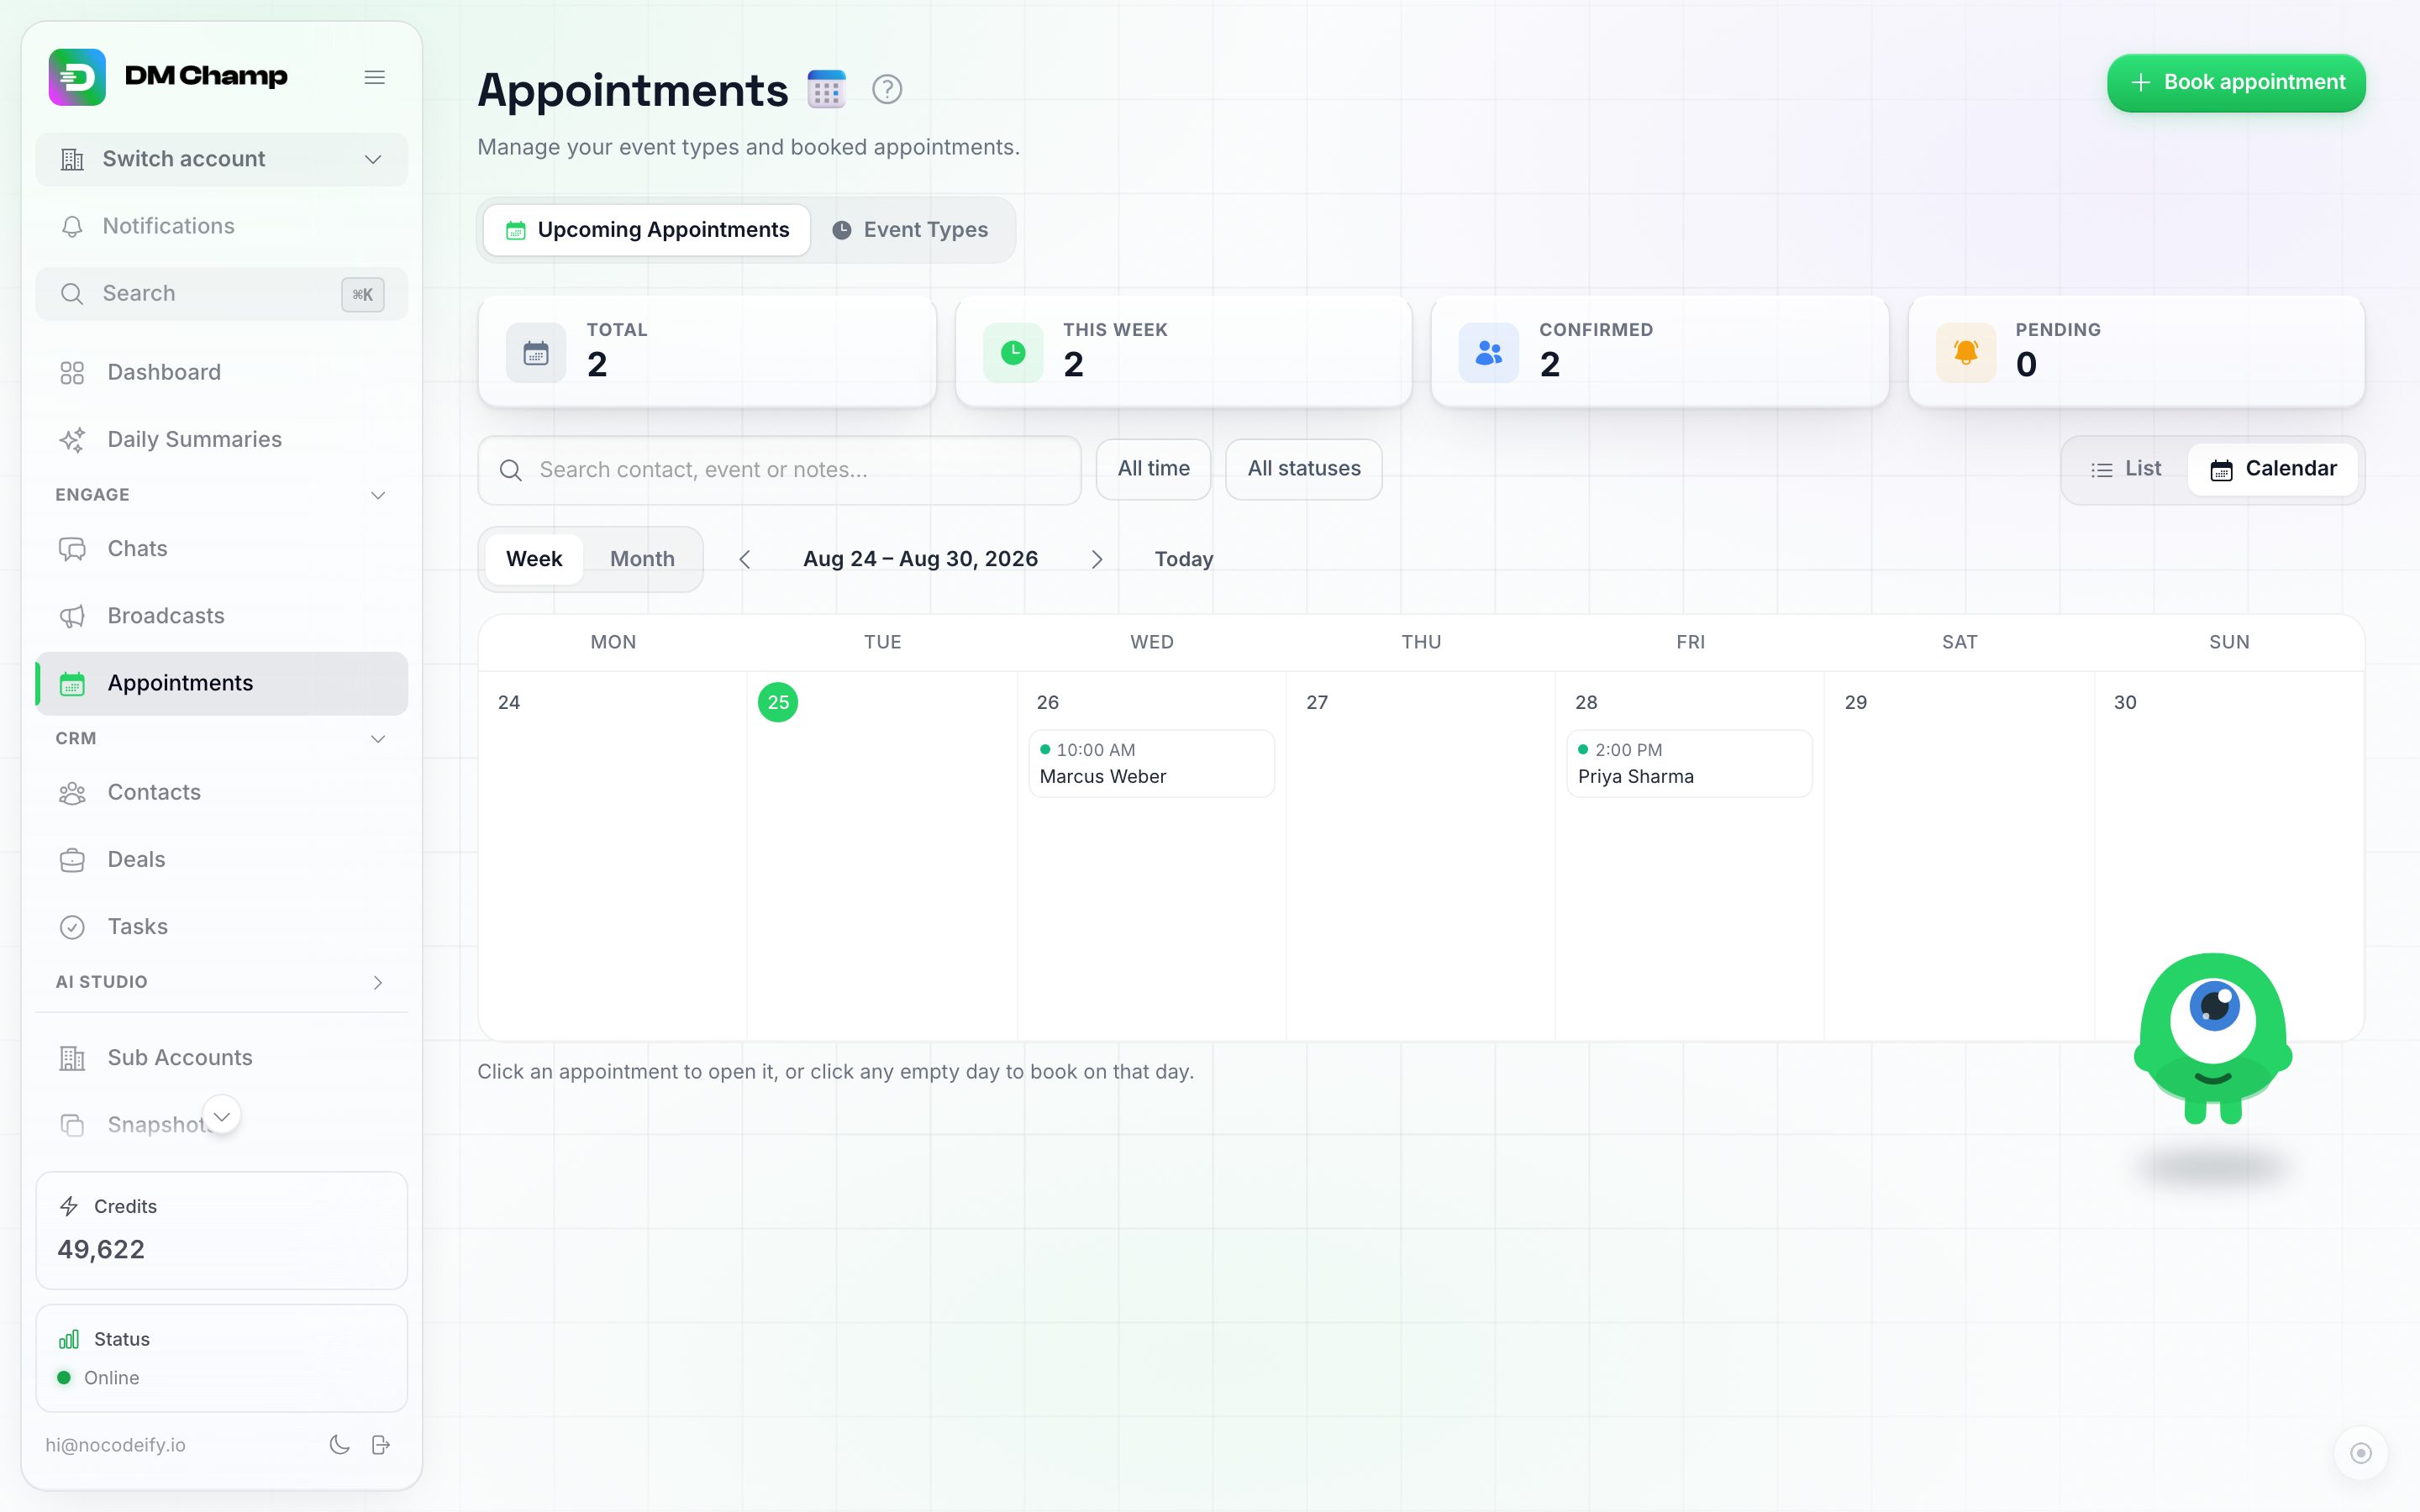
Calendar view in week mode. Click an appointment to open it, or click an empty spot in a day to book one there.
Booking an appointment yourself
Most appointments are booked by your AI in chat, but you can also book one by hand — a phone call, a walk-in — with the Book appointment button at the top right of the page (or by clicking an empty day in calendar view). Pick the contact, the event type, a date, and one of the available time slots; availability is checked the same way as when the AI books, so you can’t double-book a slot.
Click any row to open that appointment’s detail panel, read-only, showing the contact, the event, the date and time, the meeting location, and buttons to open the chat, reschedule, cancel, or delete:

Click a row to open this panel. Reschedule opens a date/time picker inline, Resend sends the contact their booking confirmation again, Cancel keeps the appointment marked Cancelled, and the trash icon deletes it.
Cancel or delete? Click Cancel at the bottom of the panel and confirm with Cancel appointment when the appointment isn’t going ahead but you want to keep a record of it. It stays in your list marked Cancelled, it’s removed from your Google Calendar, and anything set up to react to a cancellation (such as an automation on the Appointment cancelled trigger, or its reminders) behaves just as if the contact had cancelled. The trash icon deletes the appointment instead: it disappears from the list completely. Cancel only shows for upcoming appointments made in your own calendar. It’s hidden once an appointment has passed or is already cancelled, and for bookings made through a restaurant or booking system (Zenchef, Formitable, OpenTable, TheFork, Trafft), which you cancel in that system.
Resending the booking confirmation
When a contact says their confirmation never arrived, went to spam or got deleted, open the appointment and click Resend at the bottom of the panel. The contact gets the same confirmation email they got when they booked and, if the appointment is on your Google Calendar, the Google Calendar invitation again. Both go to the email address saved on the contact, and a message at the bottom of the screen tells you what was sent and where.
- The contact needs an email address. If there is none, add it on the contact first, then click Resend.
- Nothing is sent when the event type has Send appointment email to contact switched off.
- Resend shows for the same appointments as Cancel: upcoming ones made in your own calendar. A booking made through Zenchef, Formitable, OpenTable, TheFork or Trafft gets its confirmation from that system, so resend it there.
Developers can do the same through the API: see Resend the booking confirmation.
Deleting several appointments at once
On the Appointments tab, each row has a checkbox and the header checkbox selects everything currently shown. Select the appointments you want to remove and a bar appears at the bottom with a Delete button — you confirm once, and they’re removed together along with their linked calendar events. Press Escape to clear a selection.
Step 2 — Create an Event Type
Event types define the kinds of appointments your contacts can book. Think of each event type as a different service you offer — “30-Minute Free Consultation”, “Product Demo”, “Haircut Appointment”, “Restaurant Reservation for 2”.
- On the Appointments page, switch to the Event Types tab.
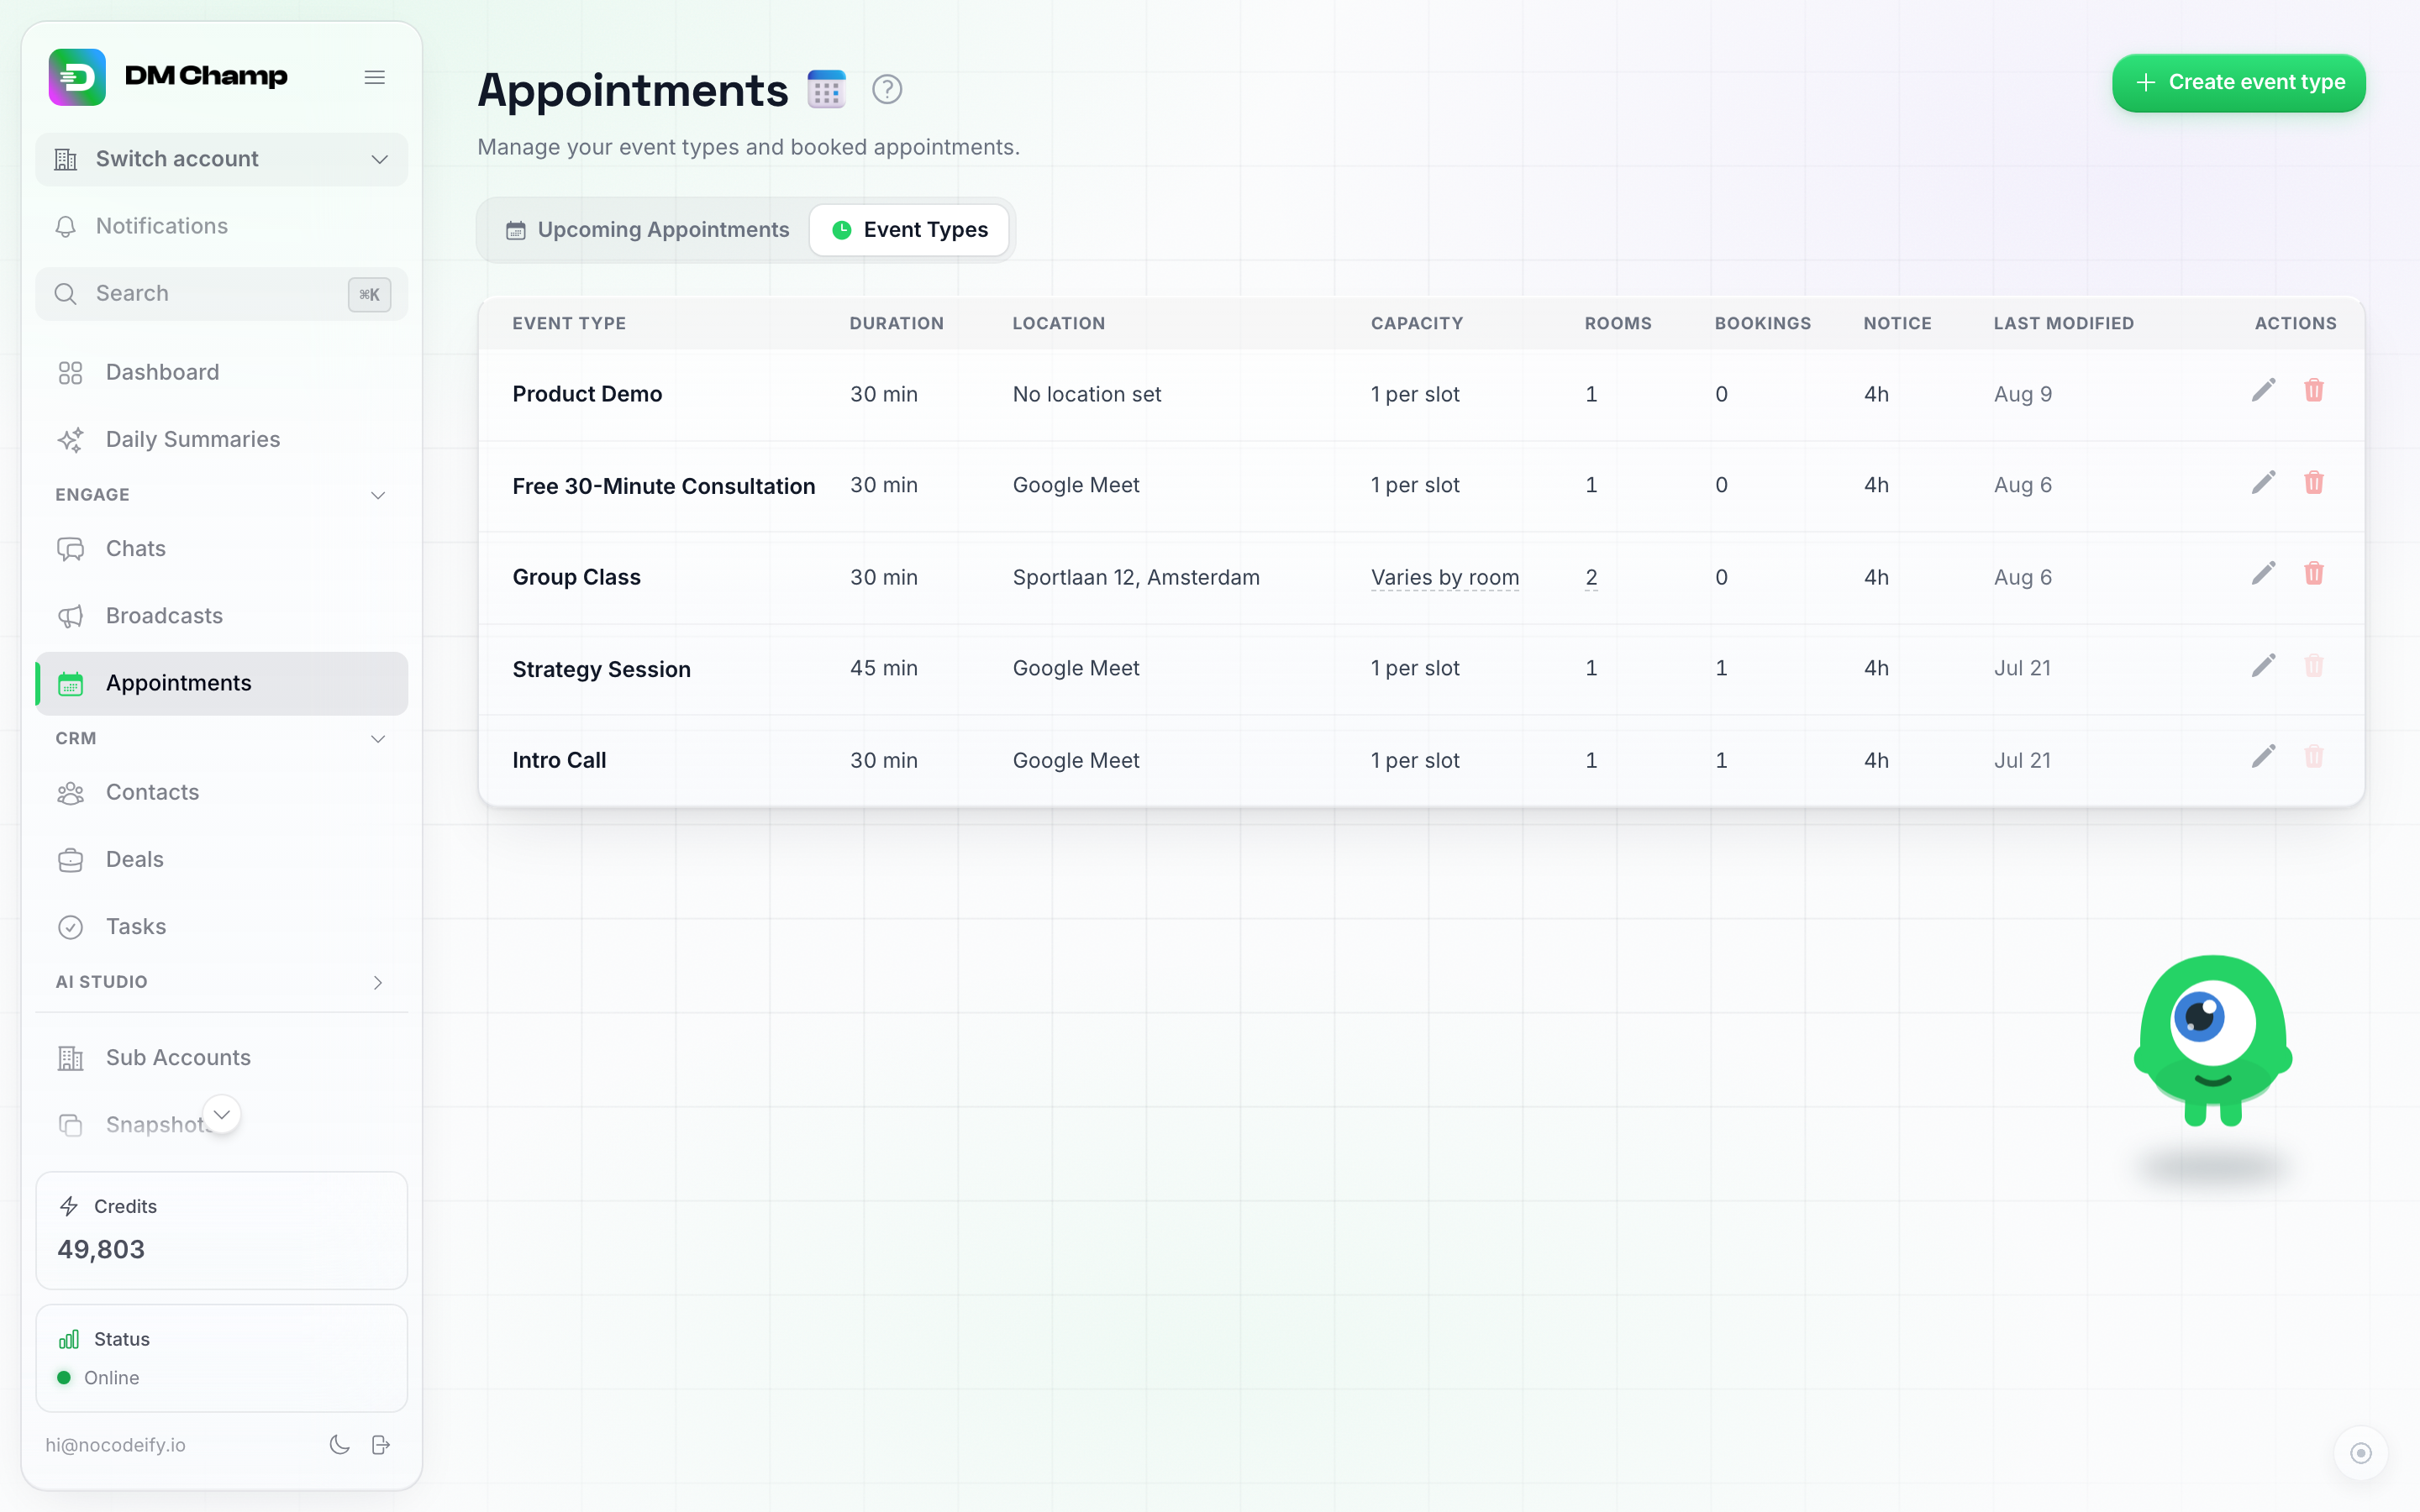
The Event Types tab. Each row shows the event's duration, meeting type, how many bookings it takes at the same time, how many bookings it has, its notice period, and when it was last changed. Capacity reads 1 per slot unless you've raised it, or Varies by room when the event's rooms have different numbers. A Rooms column appears once any event type has more than one room. Each row's edit and delete buttons sit at its right-hand end.
- Click the green Create event type button in the top right. A window titled New event type opens:
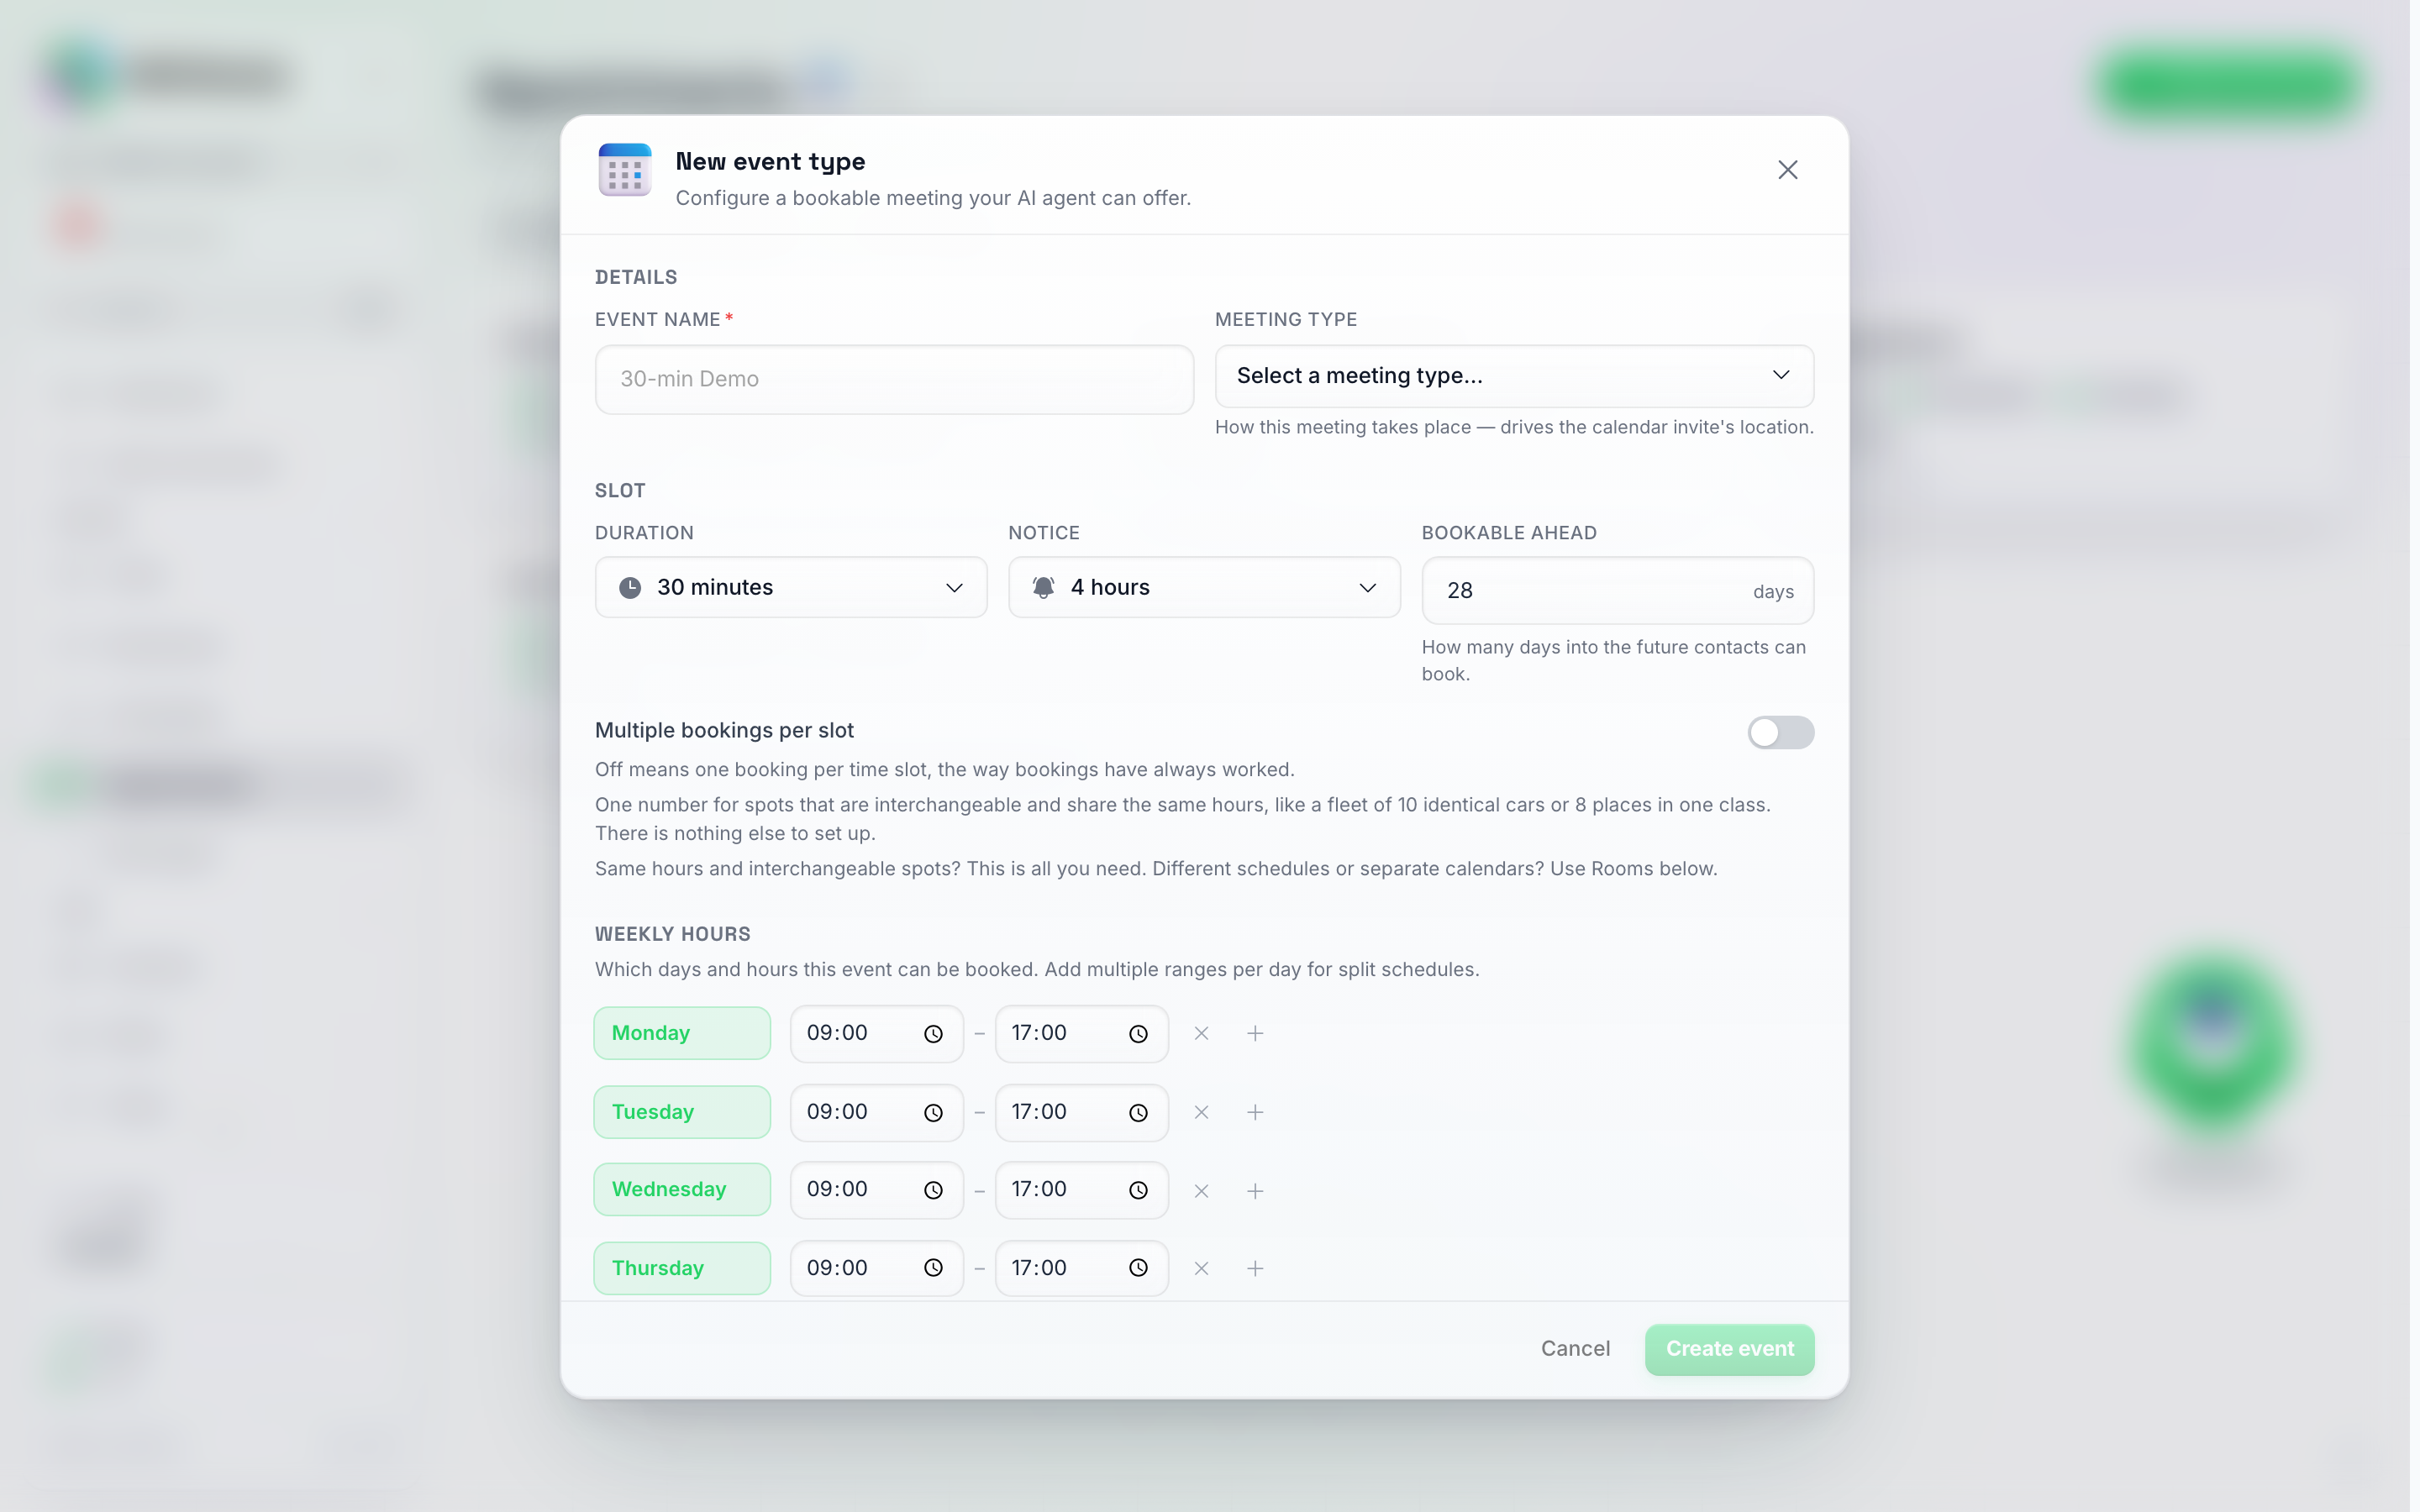
The New event type window. Everything on one form: details at the top, slot settings in the middle (including the Multiple bookings per slot switch, off by default), weekly hours below, then Rooms and Notifications further down.
- Under Details, type an Event name. Give it a customer-friendly name — your contacts may see it during booking, so “Free 30-Minute Strategy Call” is better than “Initial Consult v2”.
- Pick a Meeting type — how the meeting takes place. This drives what appears as the location on the calendar invite:
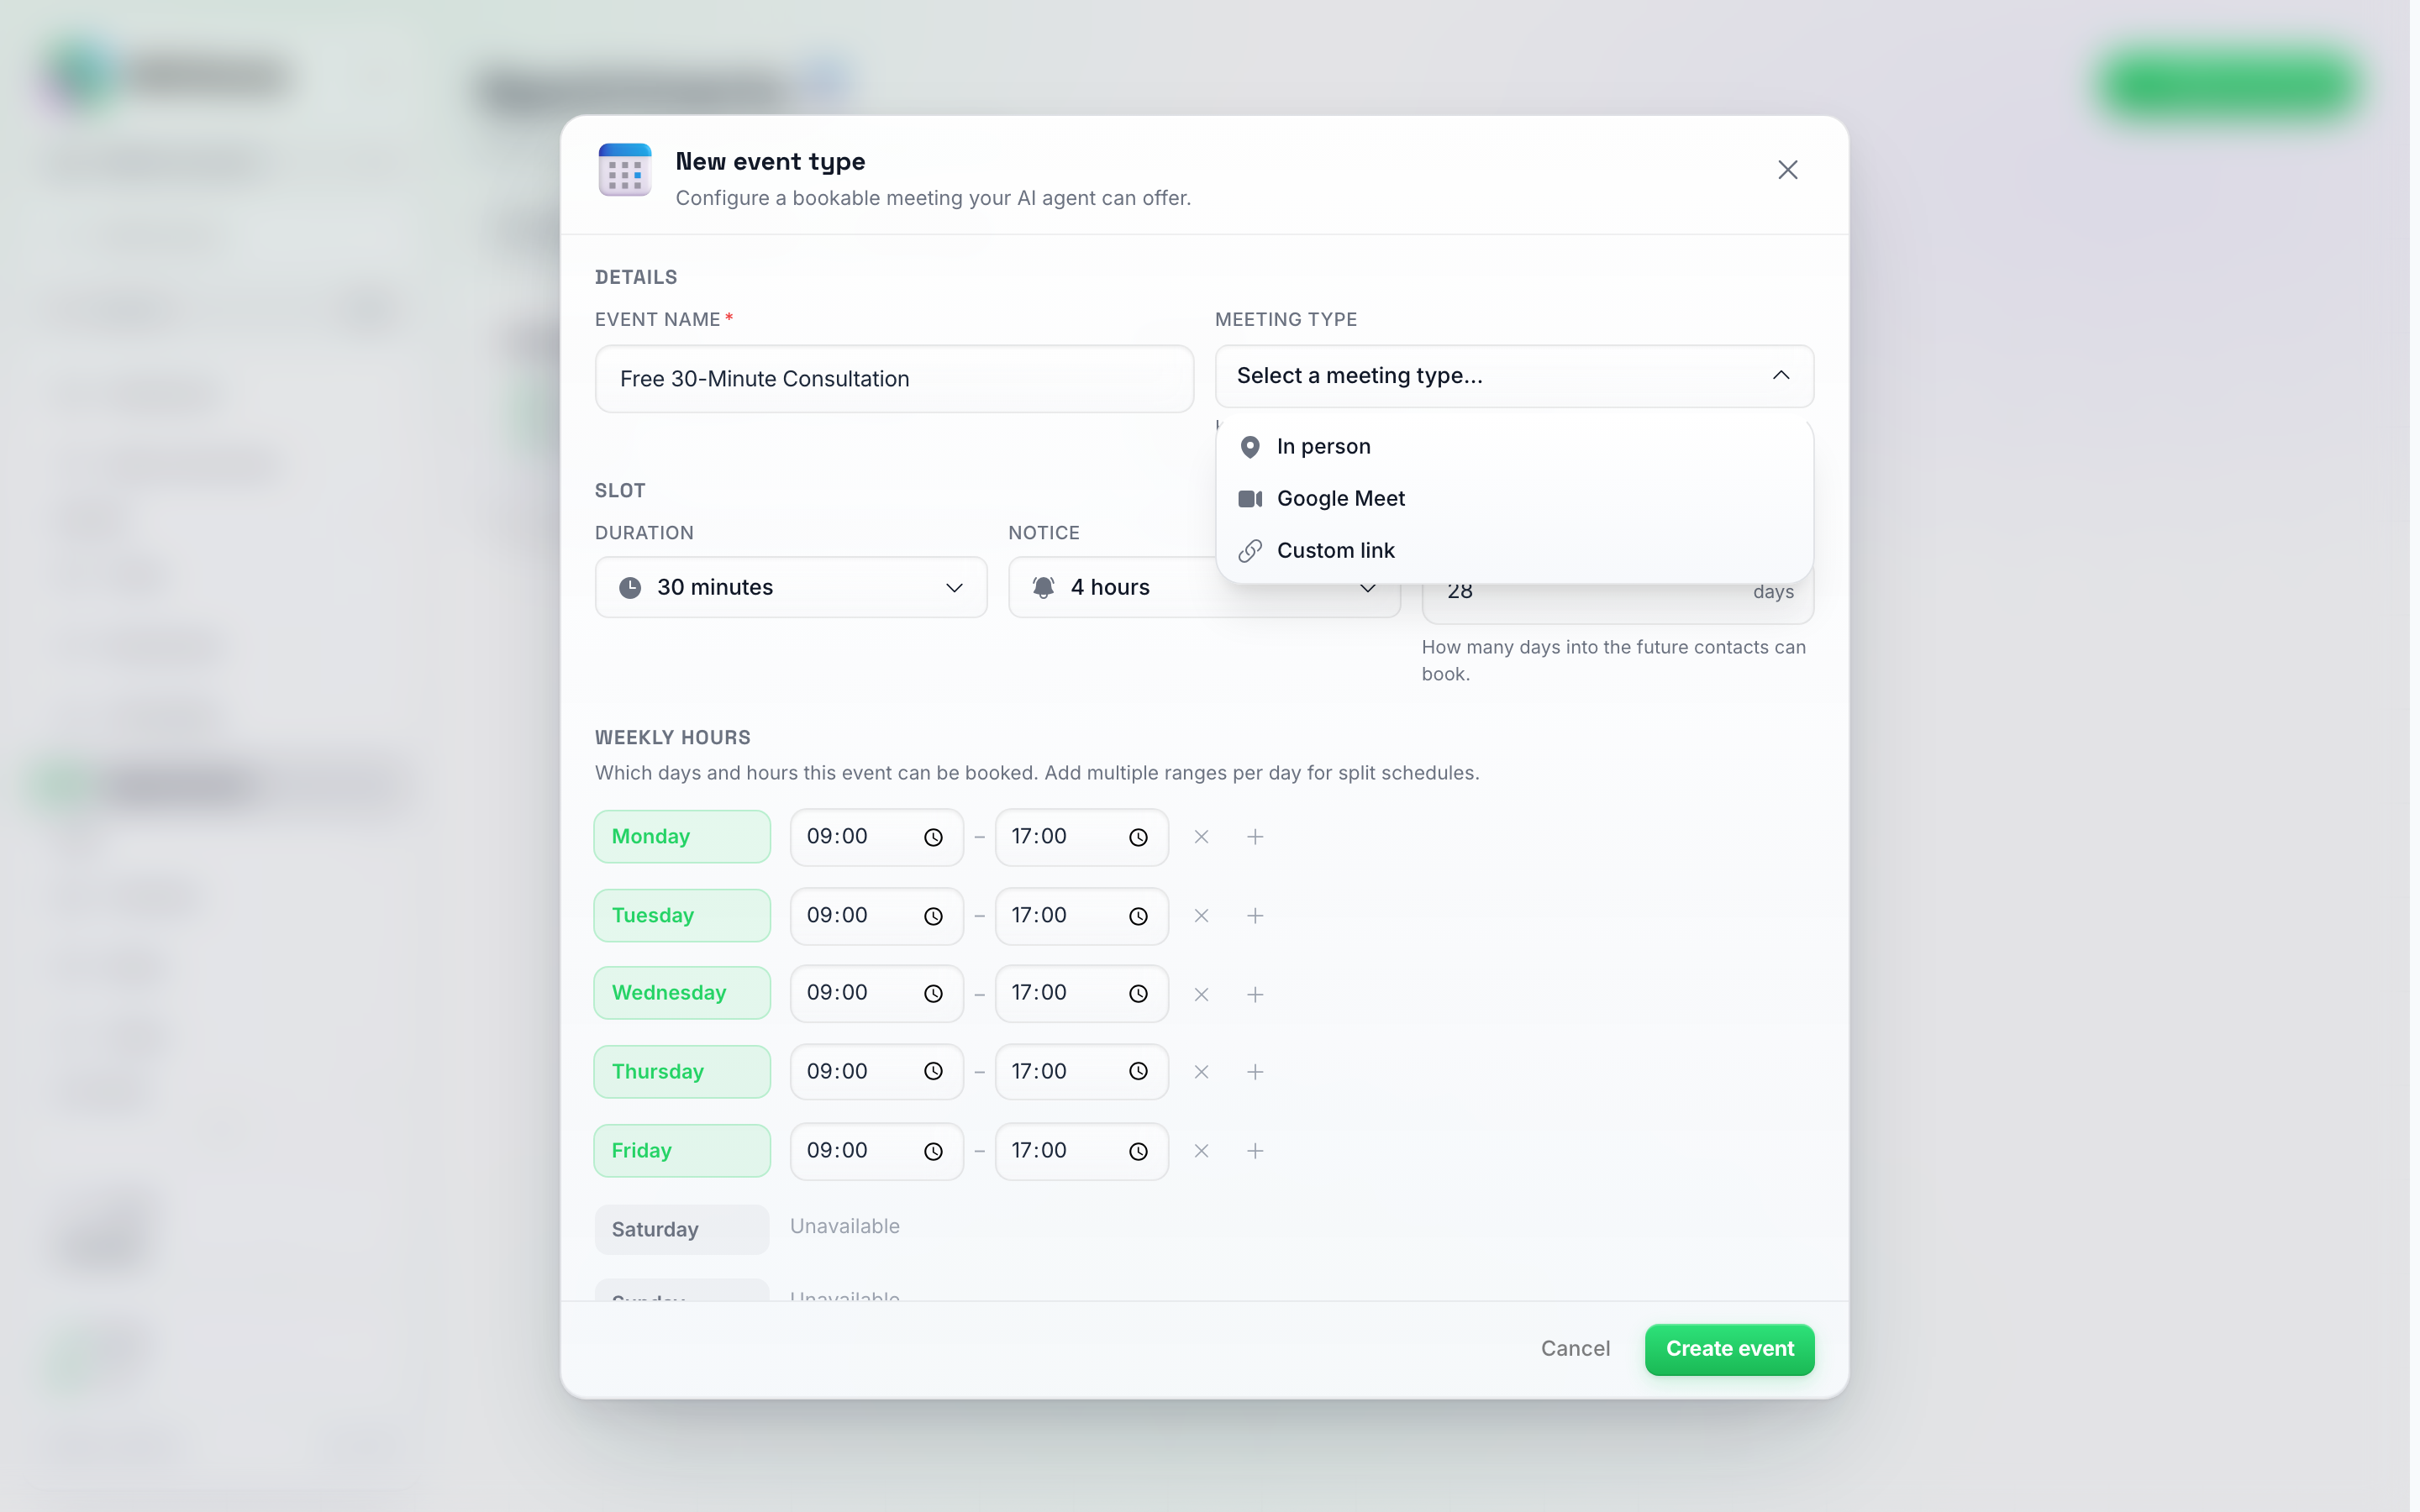
The three meeting types: In person, Google Meet, and Custom link.
- In person — the appointment happens at a physical place. You type the address, and that address appears on the calendar event (for example, “123 Main Street, Suite 4”).
- Google Meet — a Google Meet video link is created automatically for each booking and added to the calendar event. The contact is also added to the event as a guest, so if their email address is known (for example, the AI asked for it during the conversation), they receive the Google Calendar invitation with the Meet link by email. Chat channels such as WhatsApp and Instagram do not carry an email address, so add a line to the agent’s instructions asking for it before booking; without a real email on file the event is created without a guest and nobody is invited. This needs your Google Calendar connected — if it isn’t yet, the form shows a warning with a Connect Google Calendar link right there (see Google Calendar Integration).
- Custom link — you paste your own meeting link once (for example, your personal Zoom room link), and that same link is used for every booking of this event type. The link appears as the location on the calendar event and on the Google Calendar invitation the contact receives, it is shown in the booking confirmation email, and your AI agent can share it in the chat when a contact asks where to join. Paste the link people use to join the call, not a booking page such as Calendly or Cal.com: the appointment is already booked by the time the contact sees the link, so a booking page would ask them to book a second time. The form shows a warning when the link looks like a booking page.
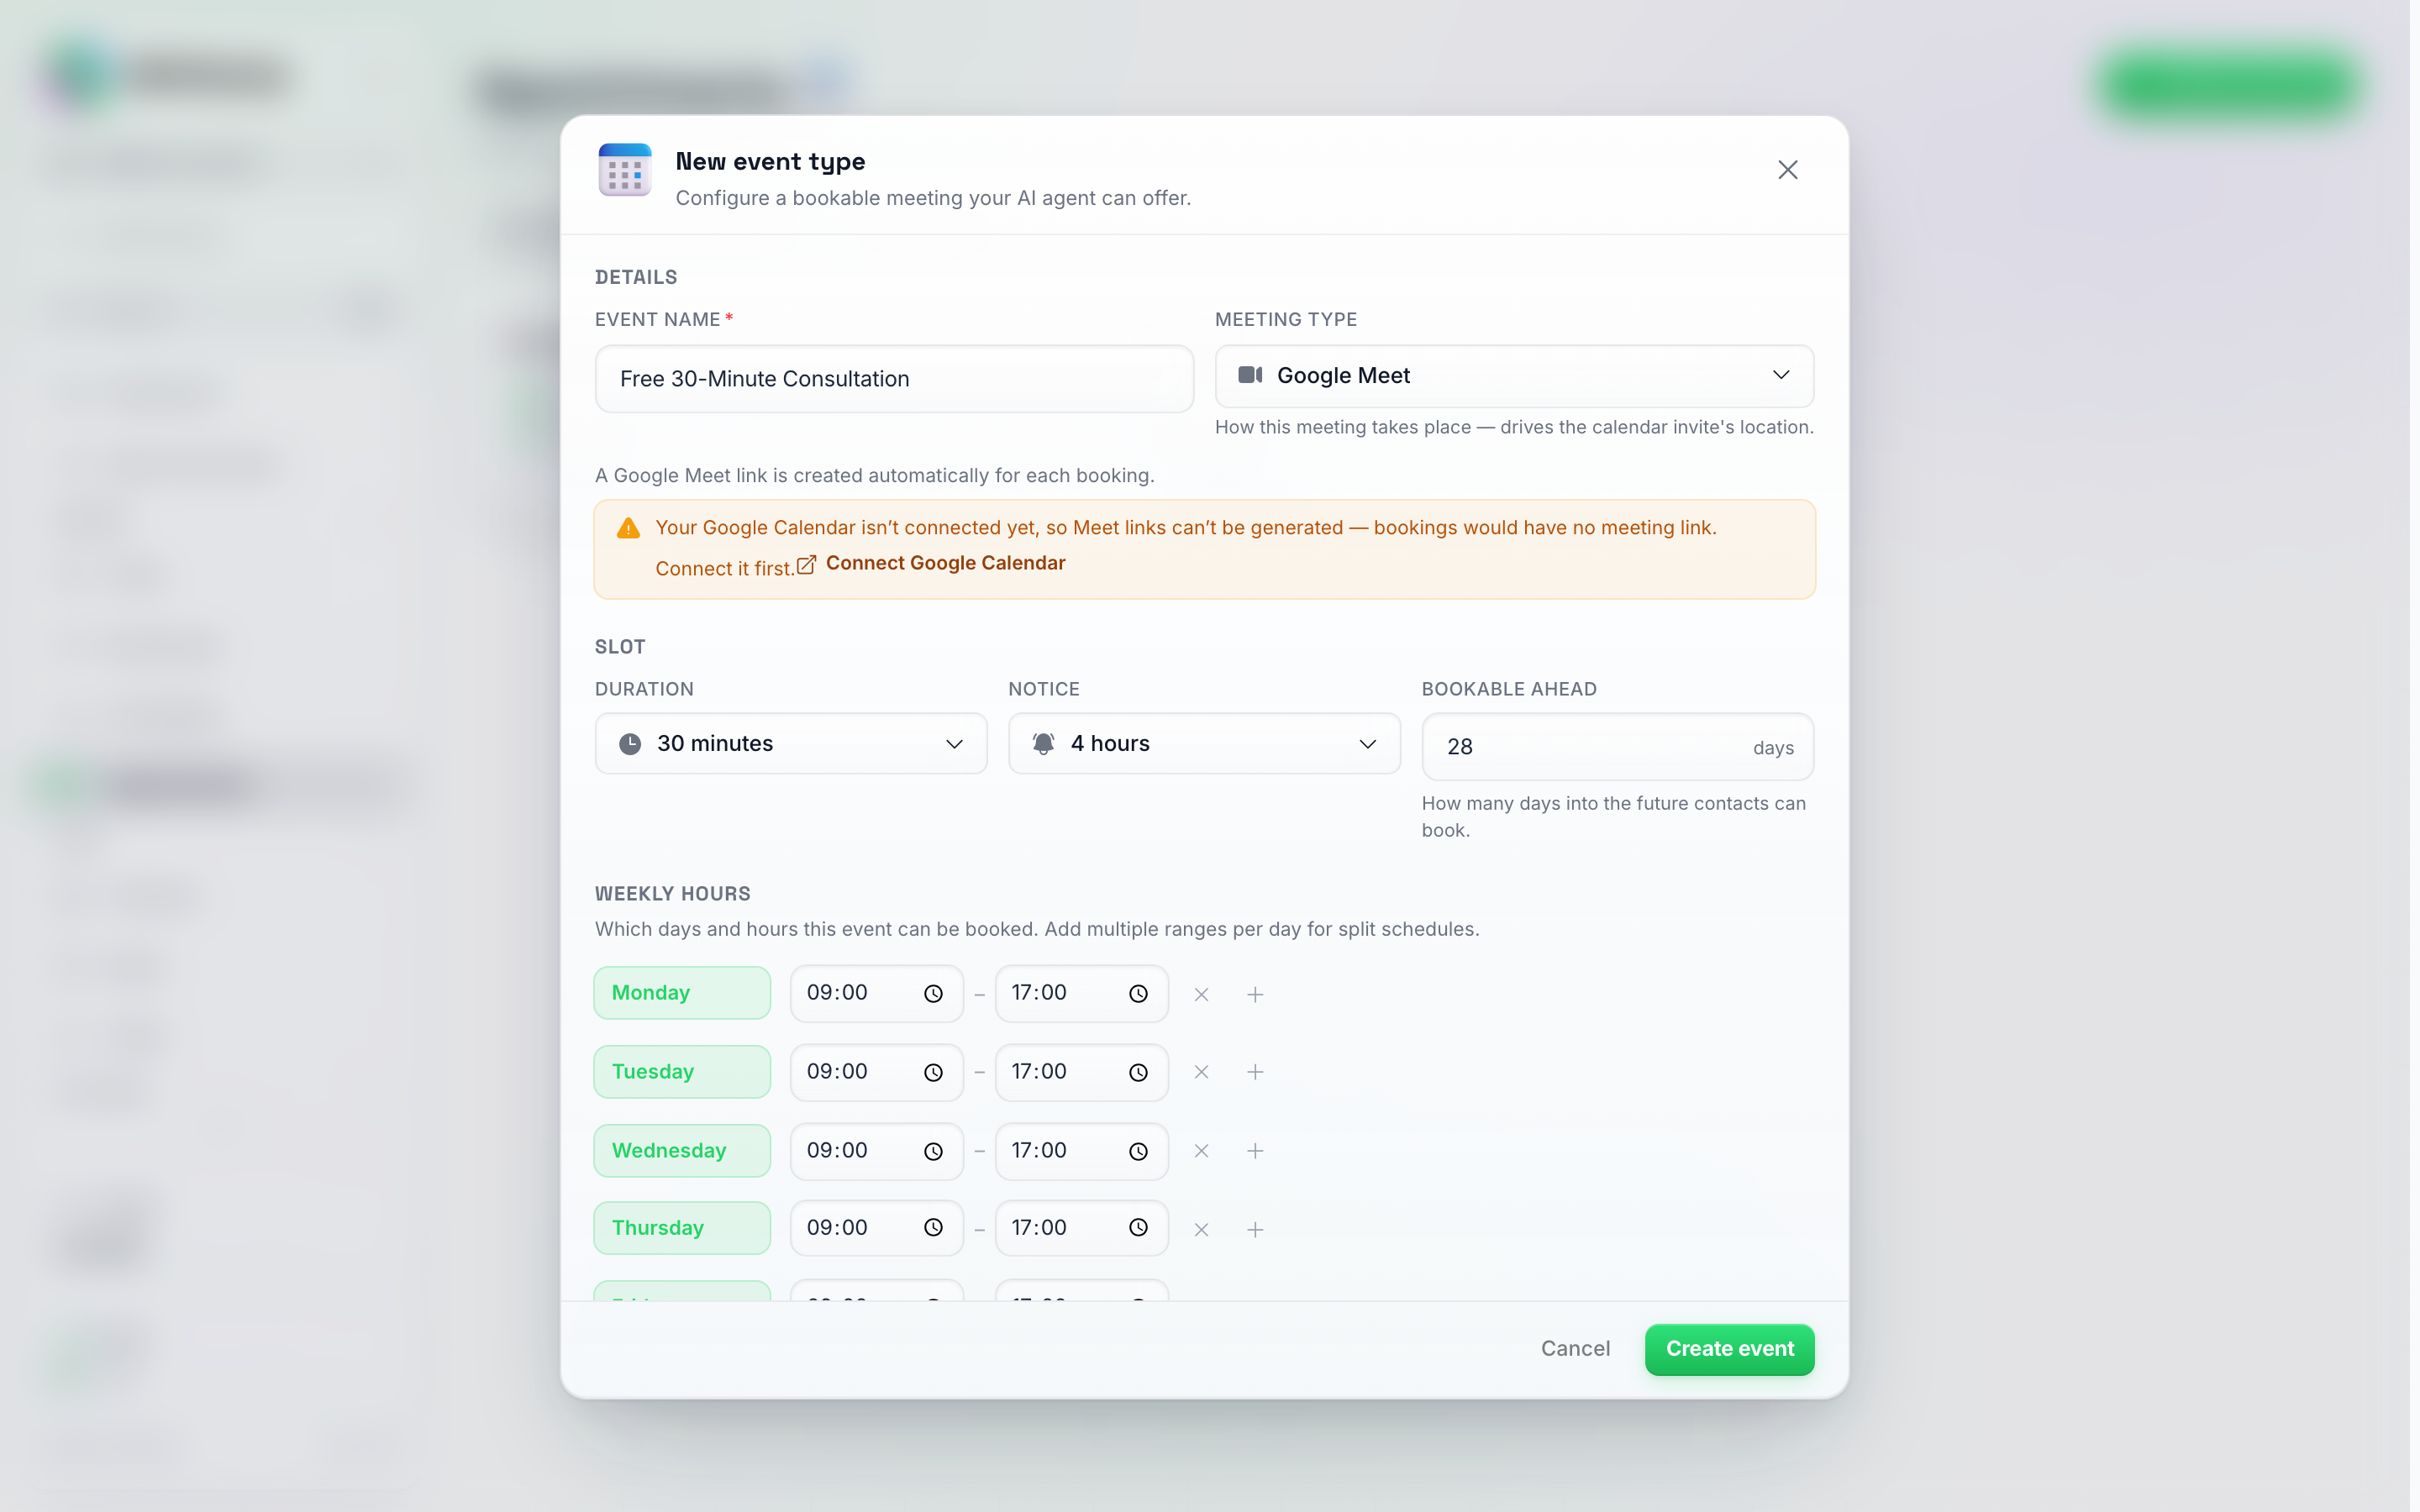
Chose Google Meet without a connected calendar? The form warns you and gives you a one-click Connect Google Calendar link.
- Under Slot, set how your time slots work:
- Duration — how long each appointment lasts, from 15 minutes up to 12 hours (for example, 30 minutes for a call, or 5 hours for a full-day service). Want a built-in gap between appointments? Set the duration a little longer than the actual job (a 4-hour job with an hour to clean up becomes a 5-hour event); there is no separate buffer setting.
- Notice — the minimum advance warning you need before a booking can start (for example, 4 hours means nobody can book an appointment starting in 30 minutes). Choose from no notice, 30 minutes, 1, 2, 4, 6, 24 or 48 hours, 5 days or 10 days.
- Bookable ahead — how many days into the future contacts can book (for example, 28 days).
- Multiple bookings per slot — off by default. As the description under it says, “Off means one booking per time slot, the way bookings have always worked.” Switch it on when the same time can hold more than one booking, and a Bookings per slot number appears. It is meant for spots that are interchangeable and share the same hours; if your resources have different schedules or their own calendars, use Rooms instead. See Letting multiple people book the same slot and Rooms below.
- Under Weekly hours, set which days and hours this event can be booked. Each green day is bookable in the hours shown; click the × next to a time range to make that day unavailable, and the + to add a second range to the same day (for split schedules like 9:00–12:00 and 14:00–17:00).
Tip: Set your hours slightly narrower than your actual working day. This gives you breathing room at the start and end.
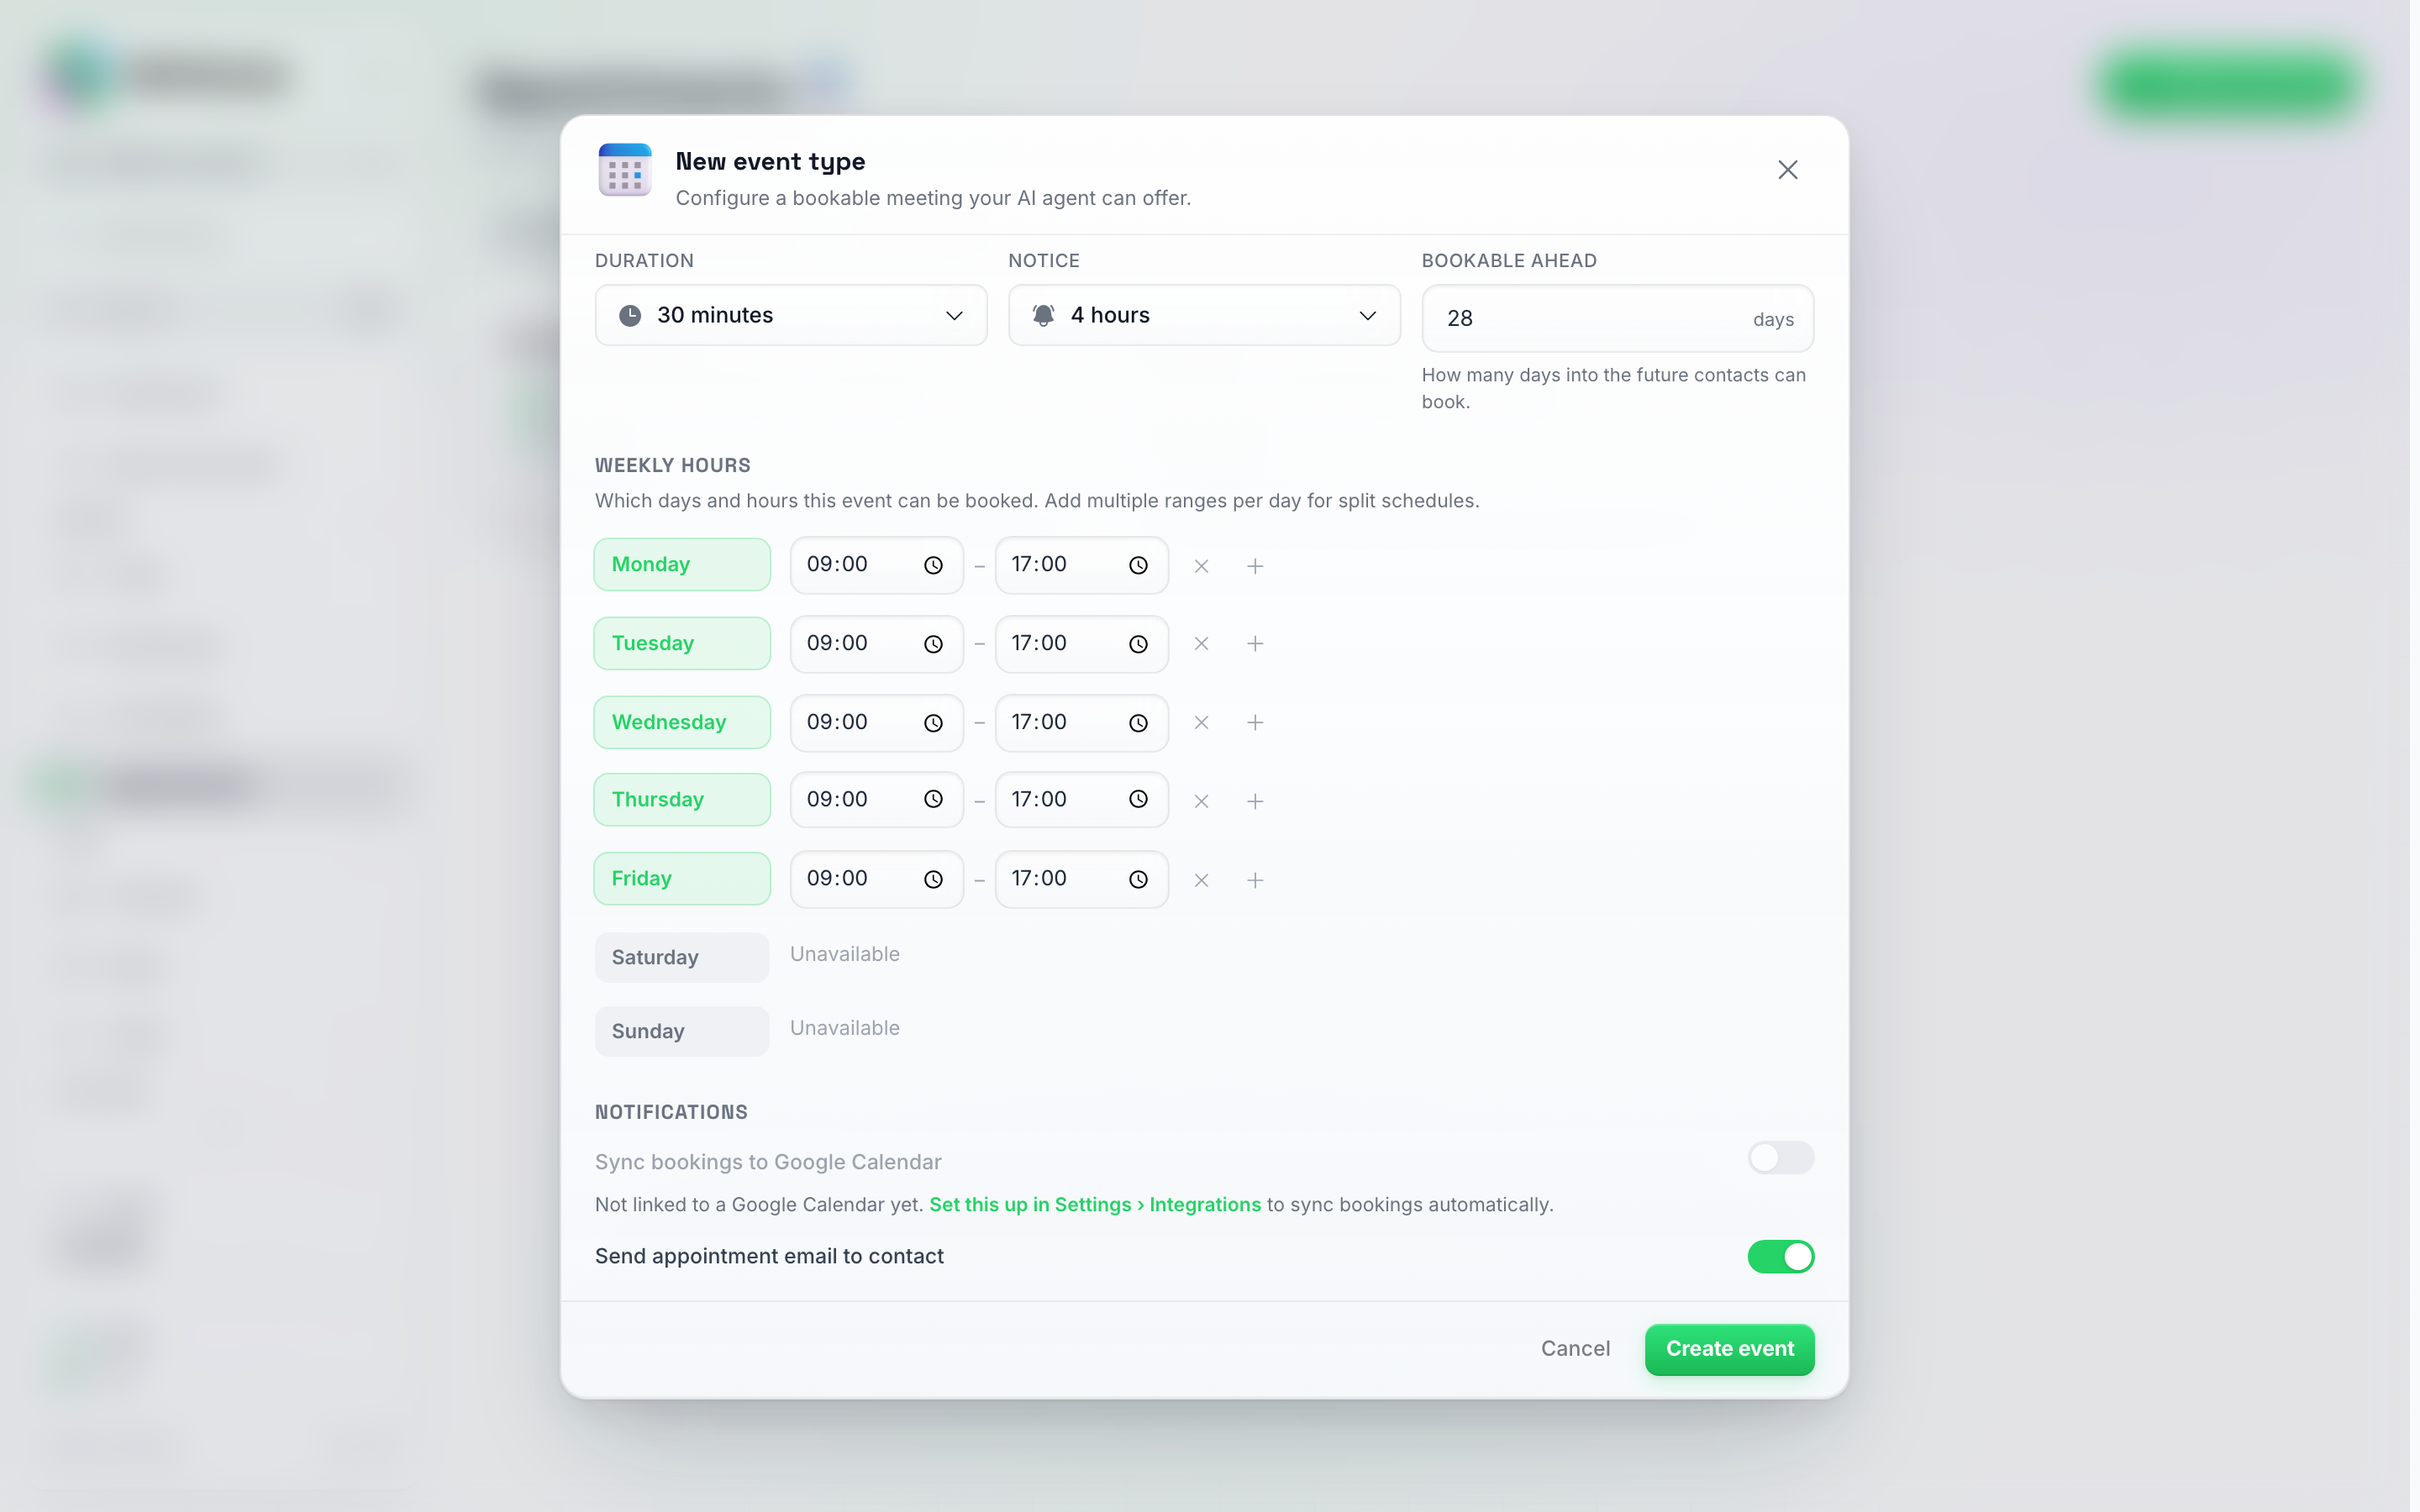
Weekly hours and the two toggles at the bottom: sync to Google Calendar, and the confirmation email.
- Under Rooms, leave it alone unless you have more than one bookable resource. Every event type already has one room, and it uses the weekly hours you just set. If two people, chairs or cars work different hours, add a room for each. See Rooms below.
- Under Notifications, three switches:
- Sync bookings to Google Calendar — puts every booking on your Google Calendar and checks it for conflicts. Grayed out until your Google Calendar is connected (the note underneath links you to the right settings page).
- Send appointment email to contact — on by default. Emails the contact a confirmation when an appointment is booked. When the booking also syncs to Google Calendar, the same switch controls the Google Calendar invitation the contact gets as a guest on the event. Turn it off if you don’t want the contact emailed at all.
- Offer times only, don’t book: off by default. When on, your AI still checks and shares available times for this event type, but never books it. See Offering times without booking below.
- Click Create event. You’ll land back on the Event Types tab with your new event added as a row and a confirmation message:
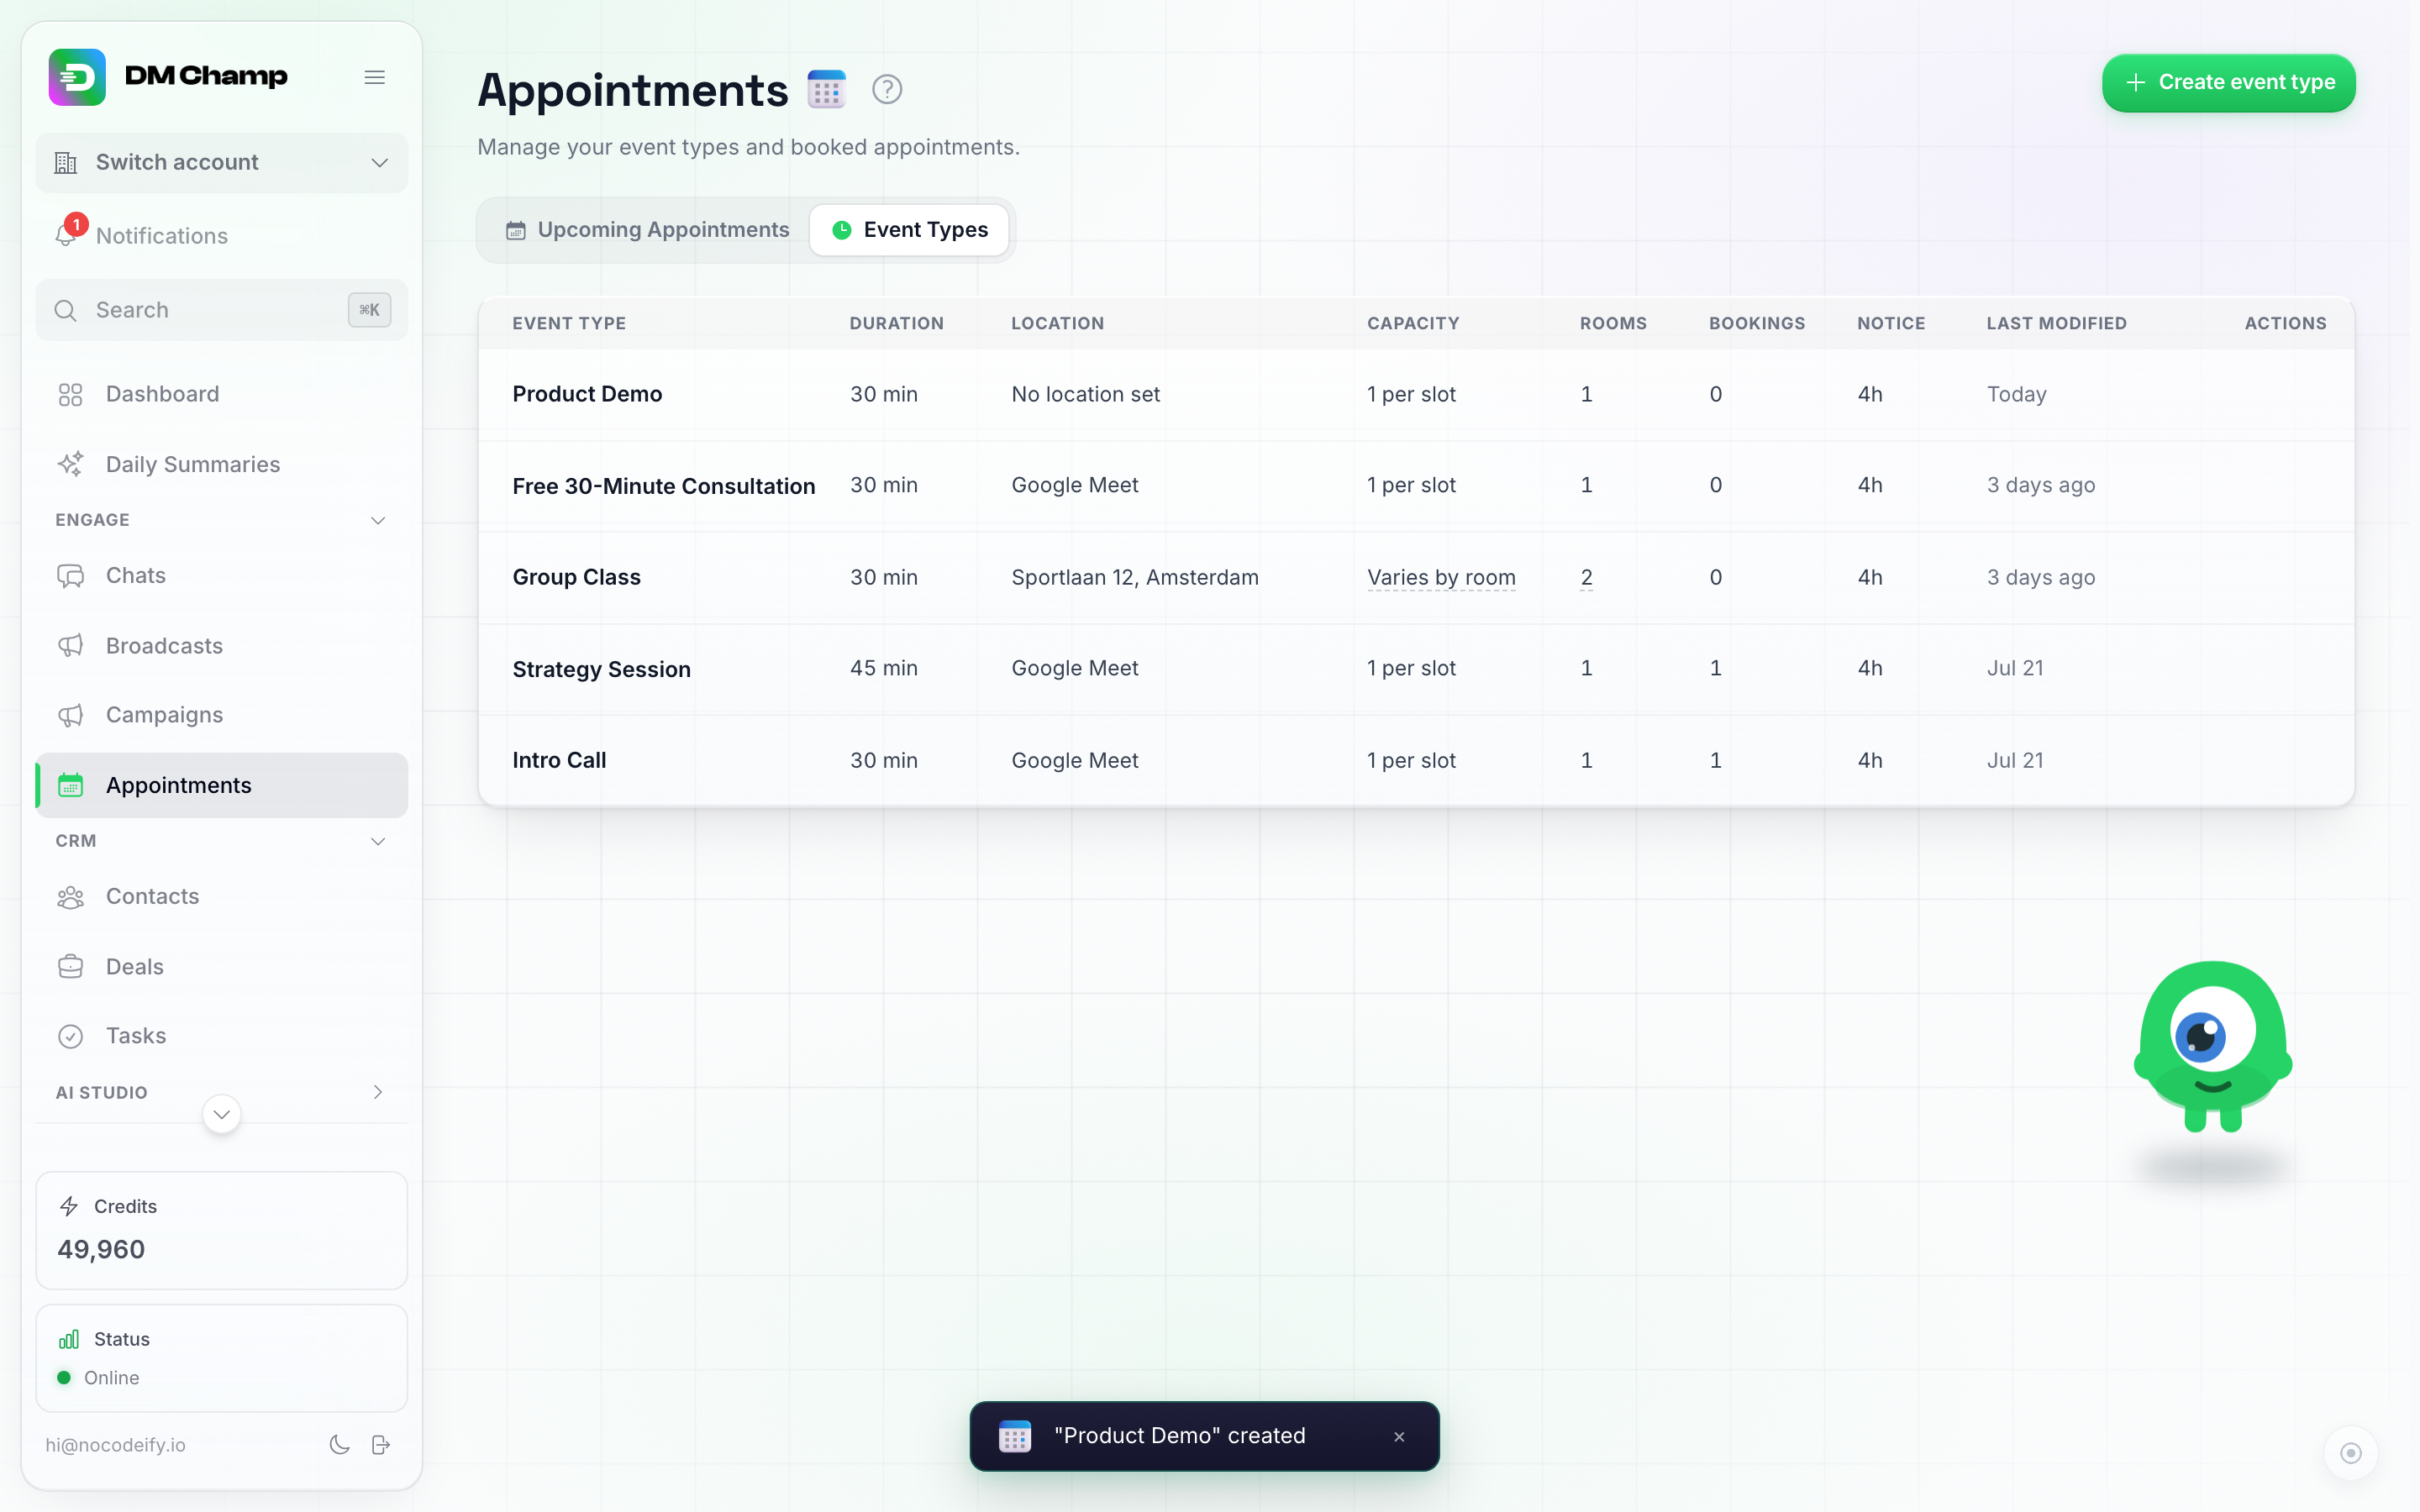
Done — the new event type appears in the list, ready for your agents to book against.
To change an event type later, click its row — or use the pencil icon at the right-hand end of the row:
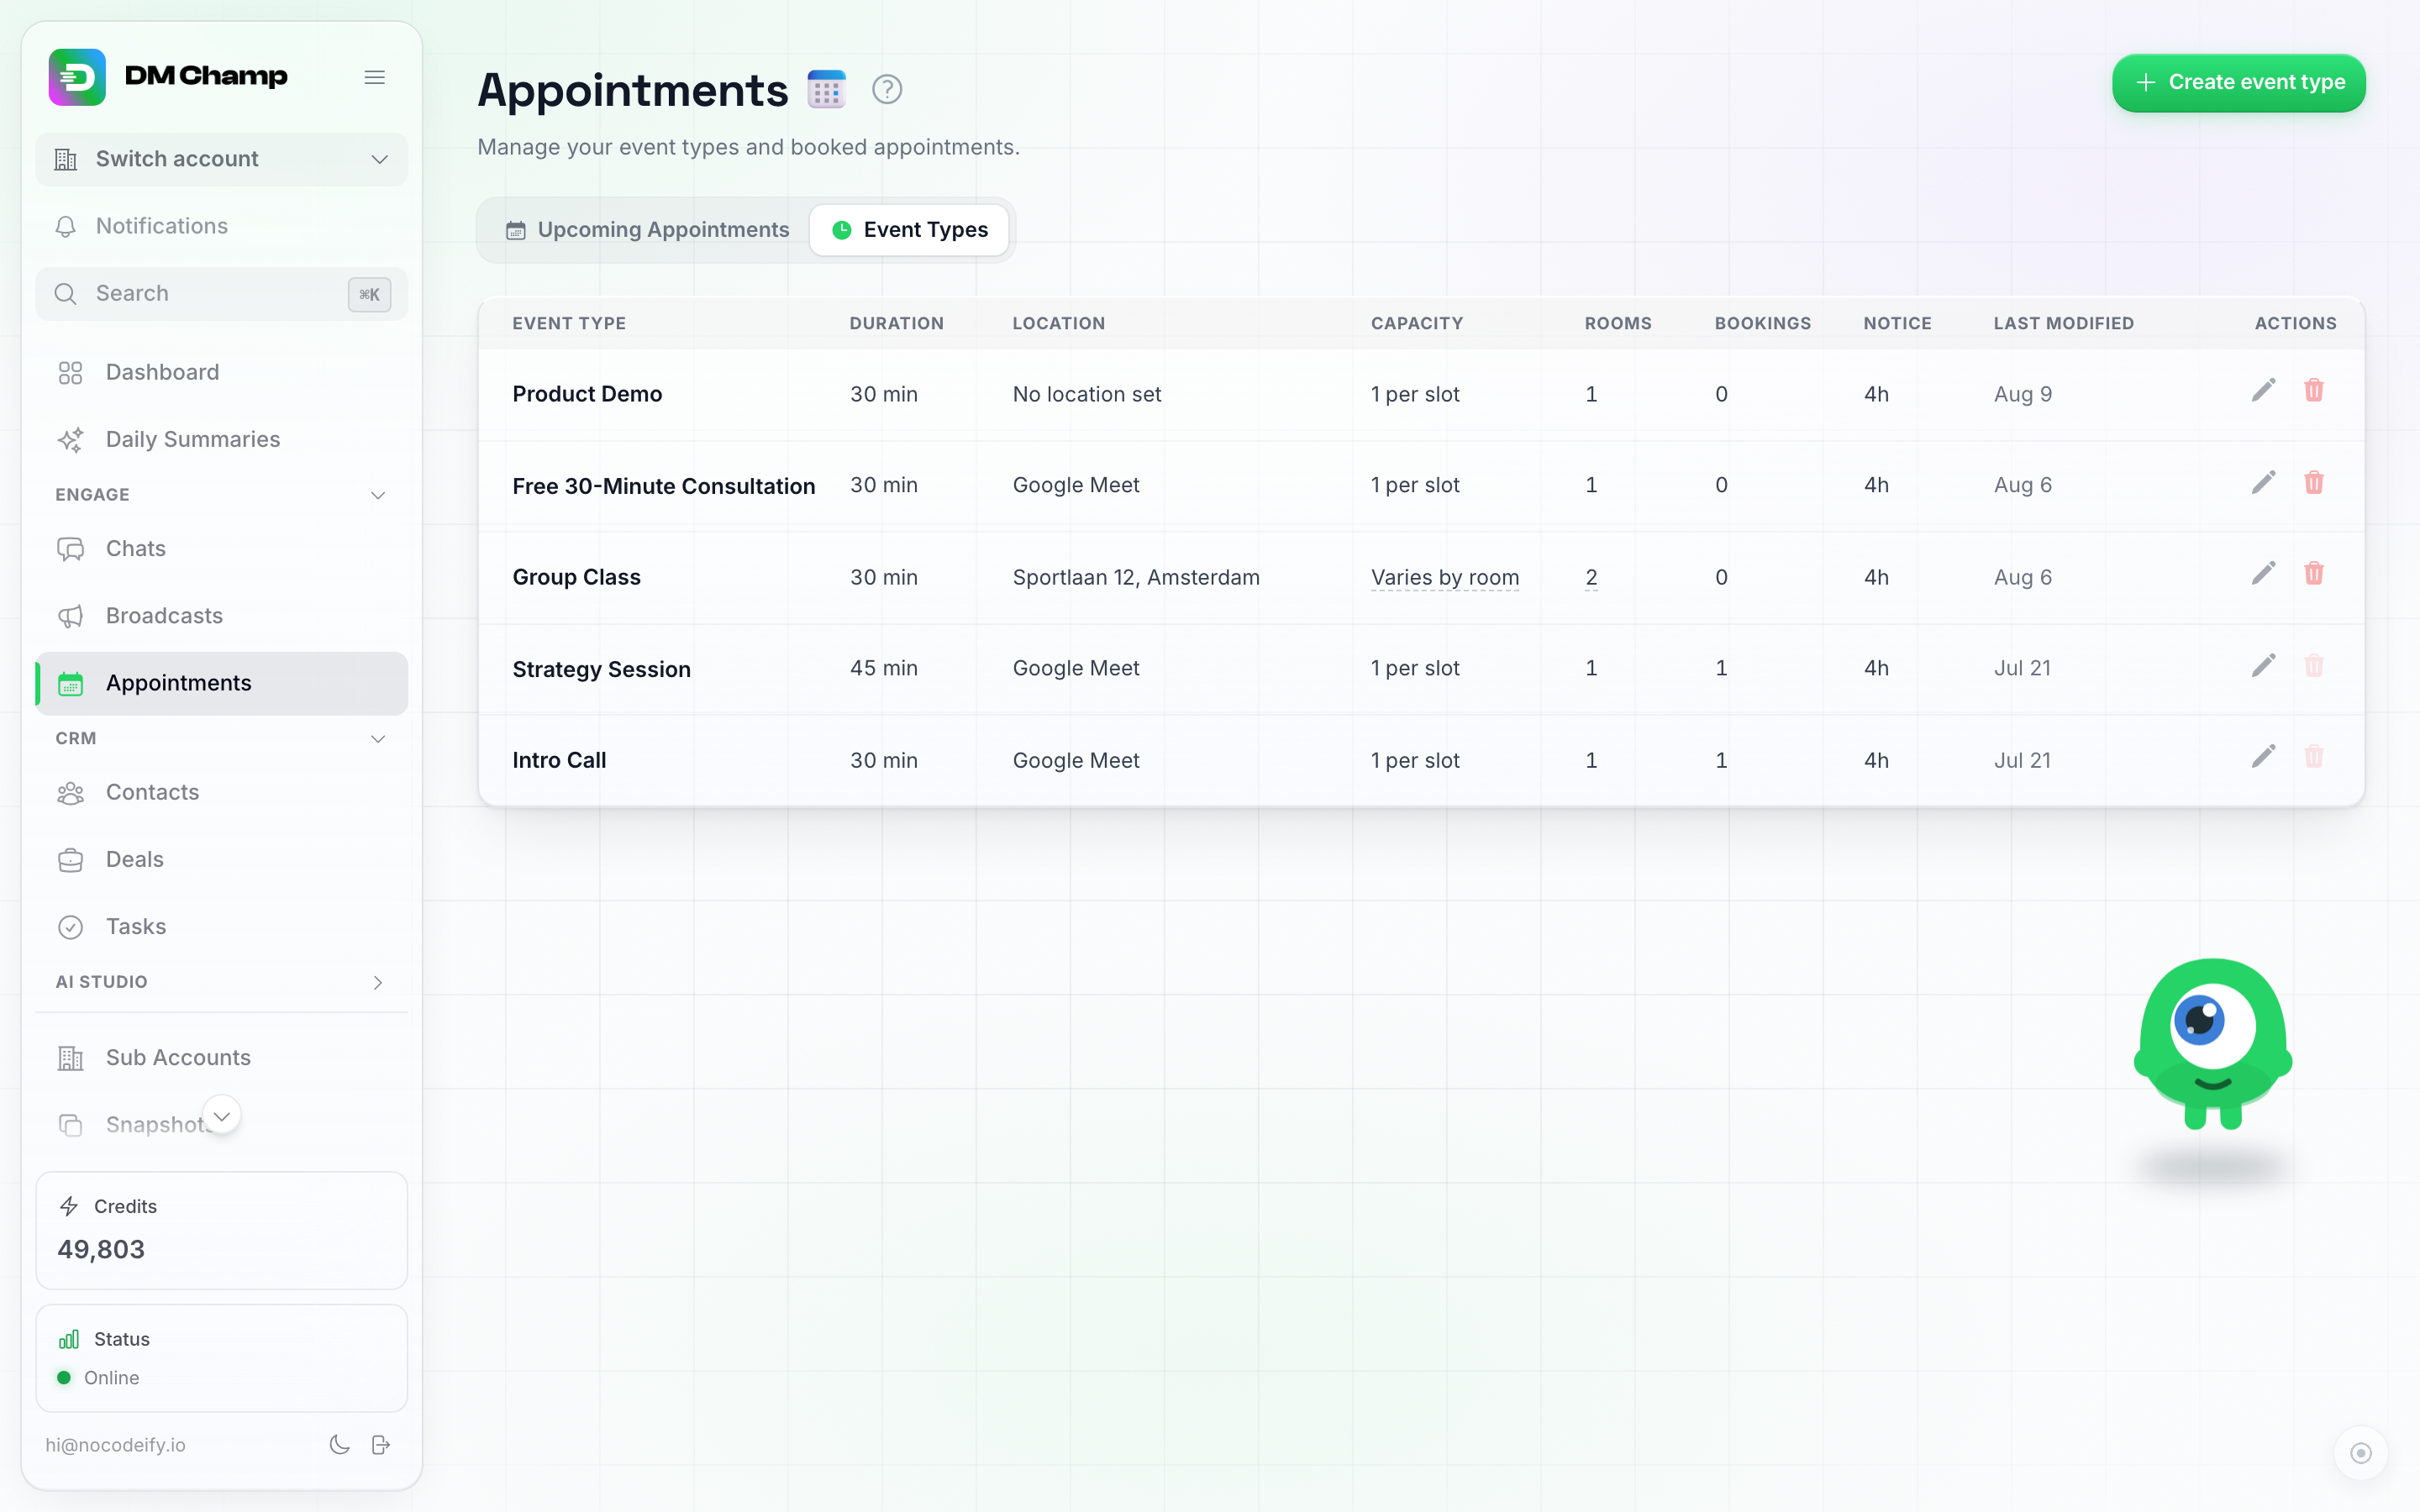
Every row shows its edit and delete icons on the right. Clicking anywhere on the row opens it for editing too.
Either way you get the same form pre-filled with the event’s current settings, titled Edit event type this time, with a Save event button instead of Create event. The weekly hours section is left exactly as stored unless you change it:
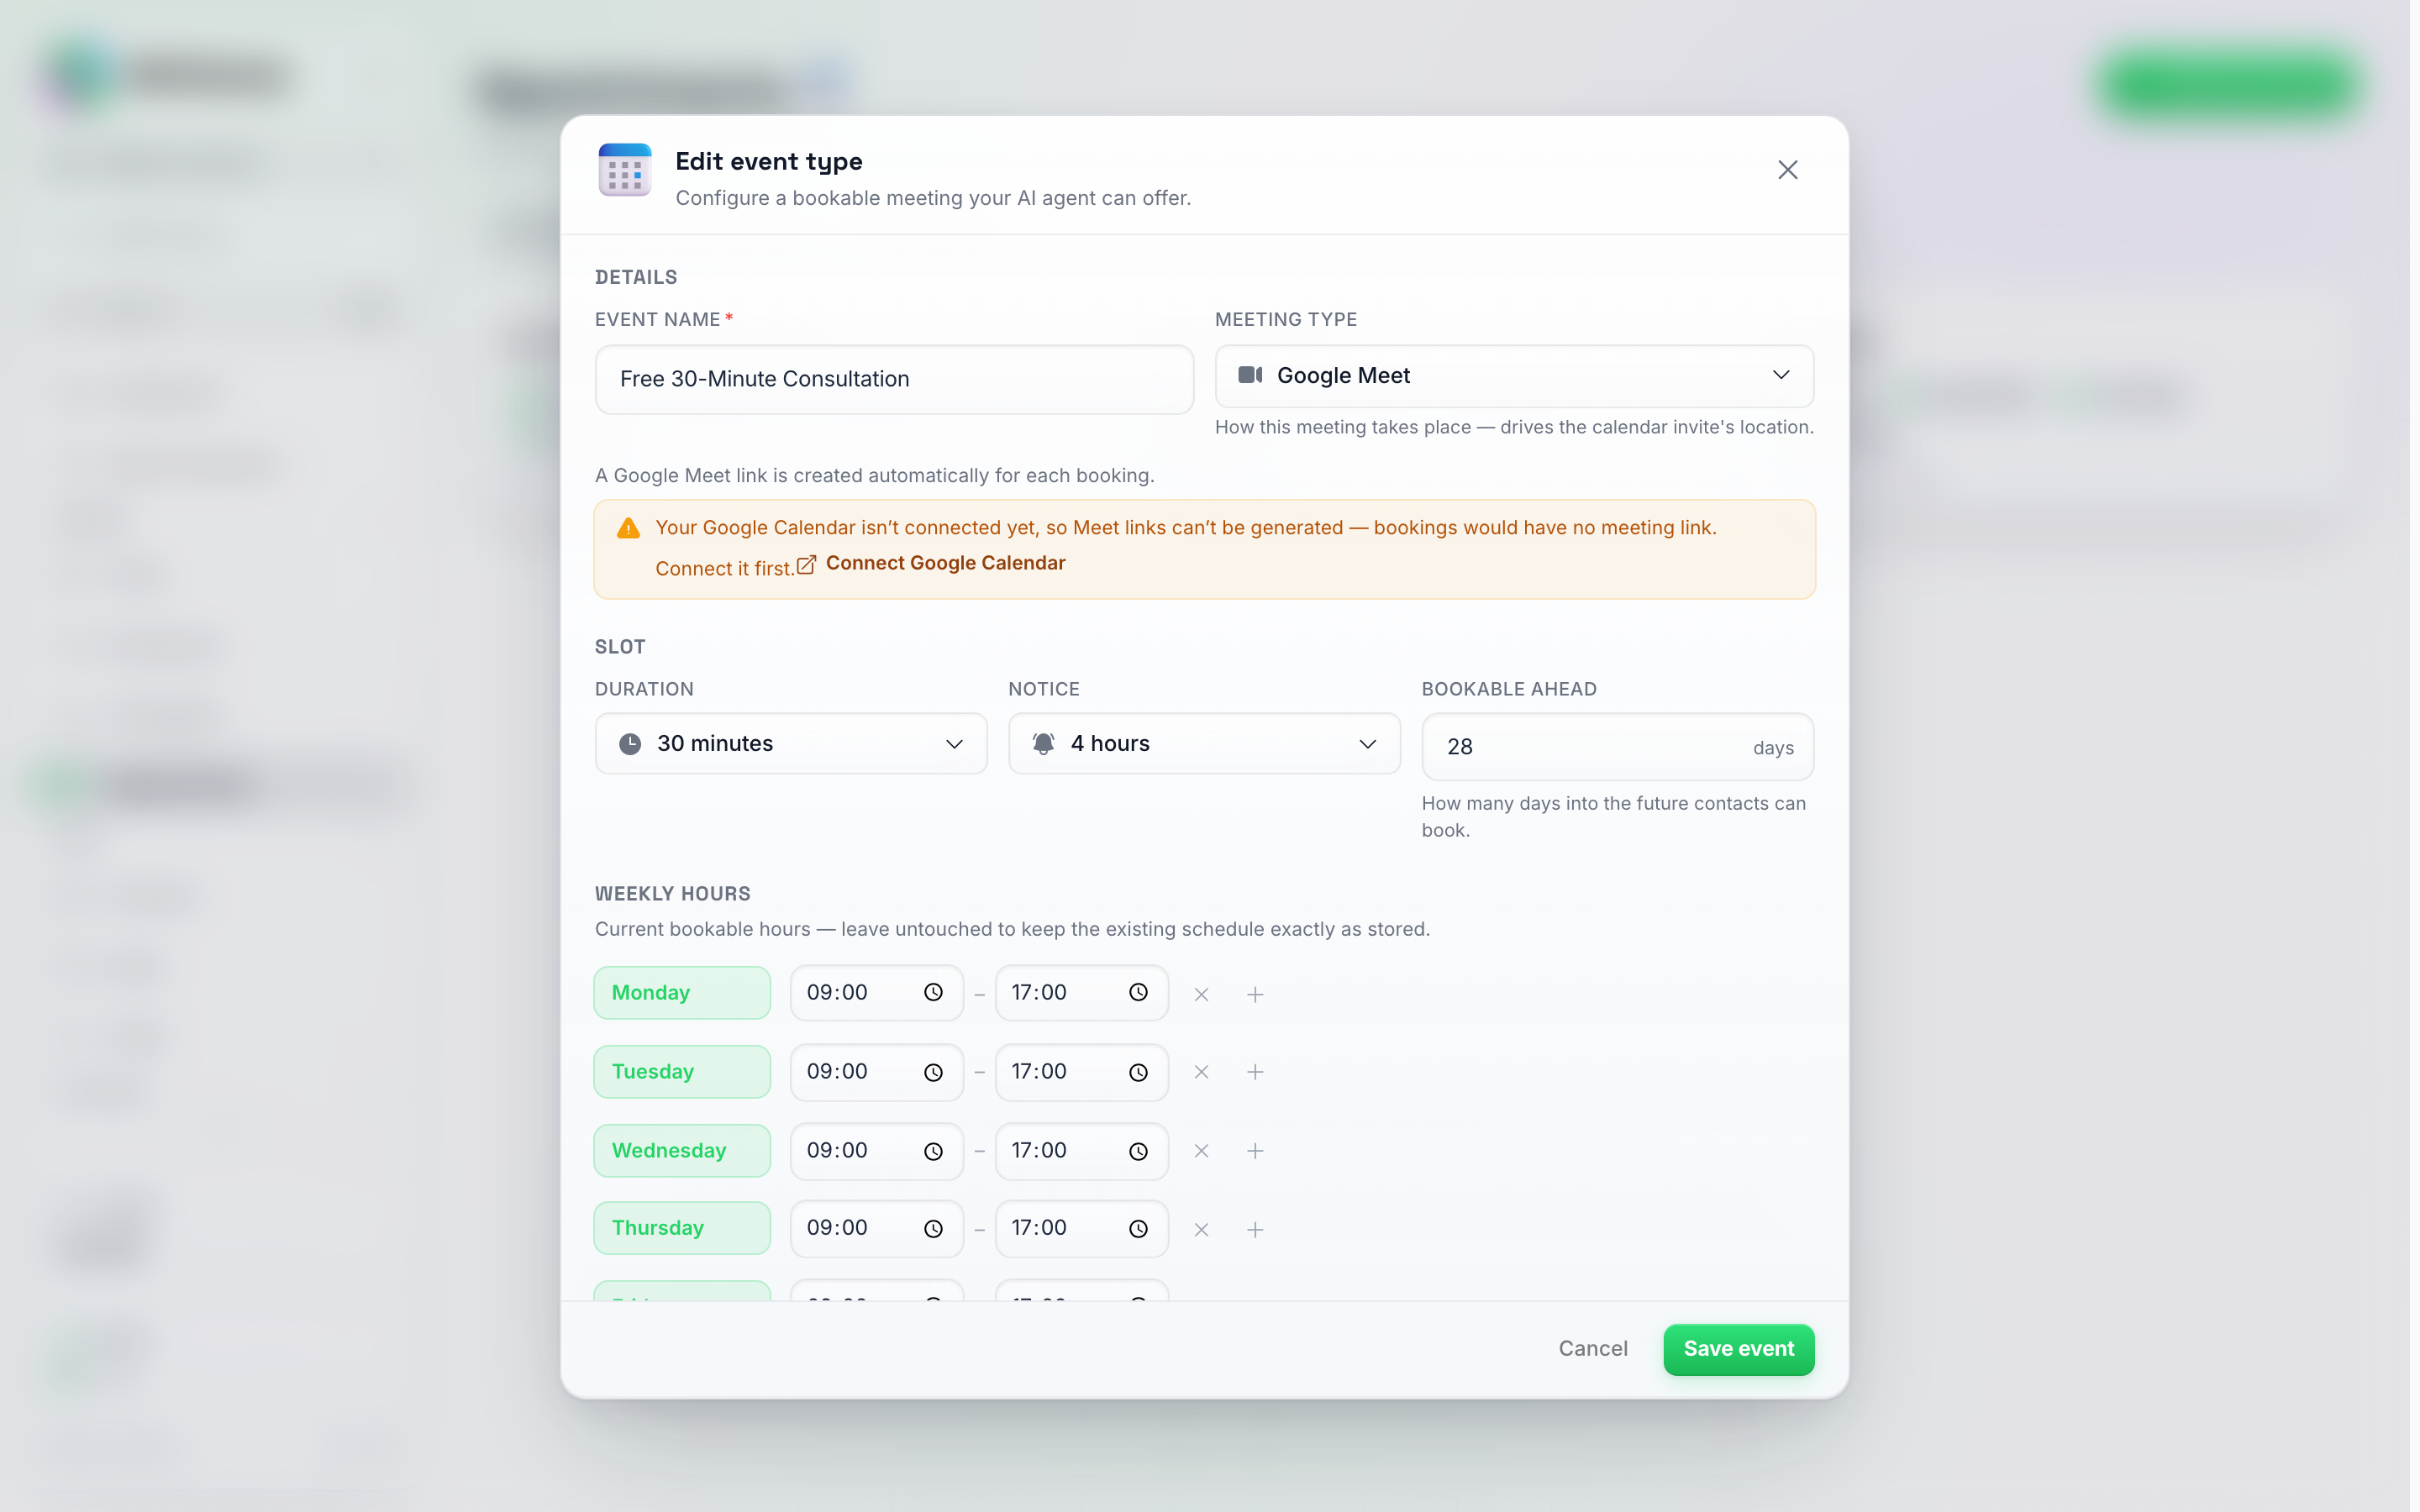
Editing "Free 30-Minute Consultation". Same form as creating, prefilled, with Save event instead of Create event.
Finding the event type ID. The edit window also shows the event type’s Event type ID with a Copy ID button, under the booking page settings. You only need it if you book through the API: that ID is what the API calls event_id.
Deleting is only possible while the event has no bookings attached.
If one of your AI agents books with this event type, the delete window tells you which agents use it before anything is removed, so you are never surprised. You can still go ahead, but those agents stop taking bookings until you pick another event type for them under Bookings.
About time zones: your hours are read in your account time zone, set in Settings → Security & General (the Time Zone dropdown). If your offered slots come out at odd hours, check that setting first.
Prospects in another time zone: the AI is told which time zone your business runs in, but it does not work out a contact’s zone on its own. If you book people abroad (say, you sit in Madrid and sell into the US), enter your hours in your own time and add one line to the agent’s instructions, for example: “Prospects are in the US. Ask which time zone they are in, quote every slot in their zone and confirm the time in both.” A prospect who picks 9:00 Eastern then lands at 15:00 in your Madrid calendar. The conversion is done by the AI, not by a setting, so test it in Try Out with a contact in each zone before going live. The public booking page converts by itself and shows slots in the visitor’s zone.
Step 3 — Turn On Bookings for Your AI
Creating an event type doesn’t make the AI offer it yet. It’s one switch, on the agent.
-
Click AI Agents in the sidebar and open your agent.
-
Go to the AI Abilities step.
-
Find the Bookings panel and turn on Let this agent book appointments.
-
Leave the provider on Built-in calendar (anyone booking through Formitable, Zenchef, OpenTable, TheFork or Trafft picks theirs here), then say what people can book under Choose what people can book.
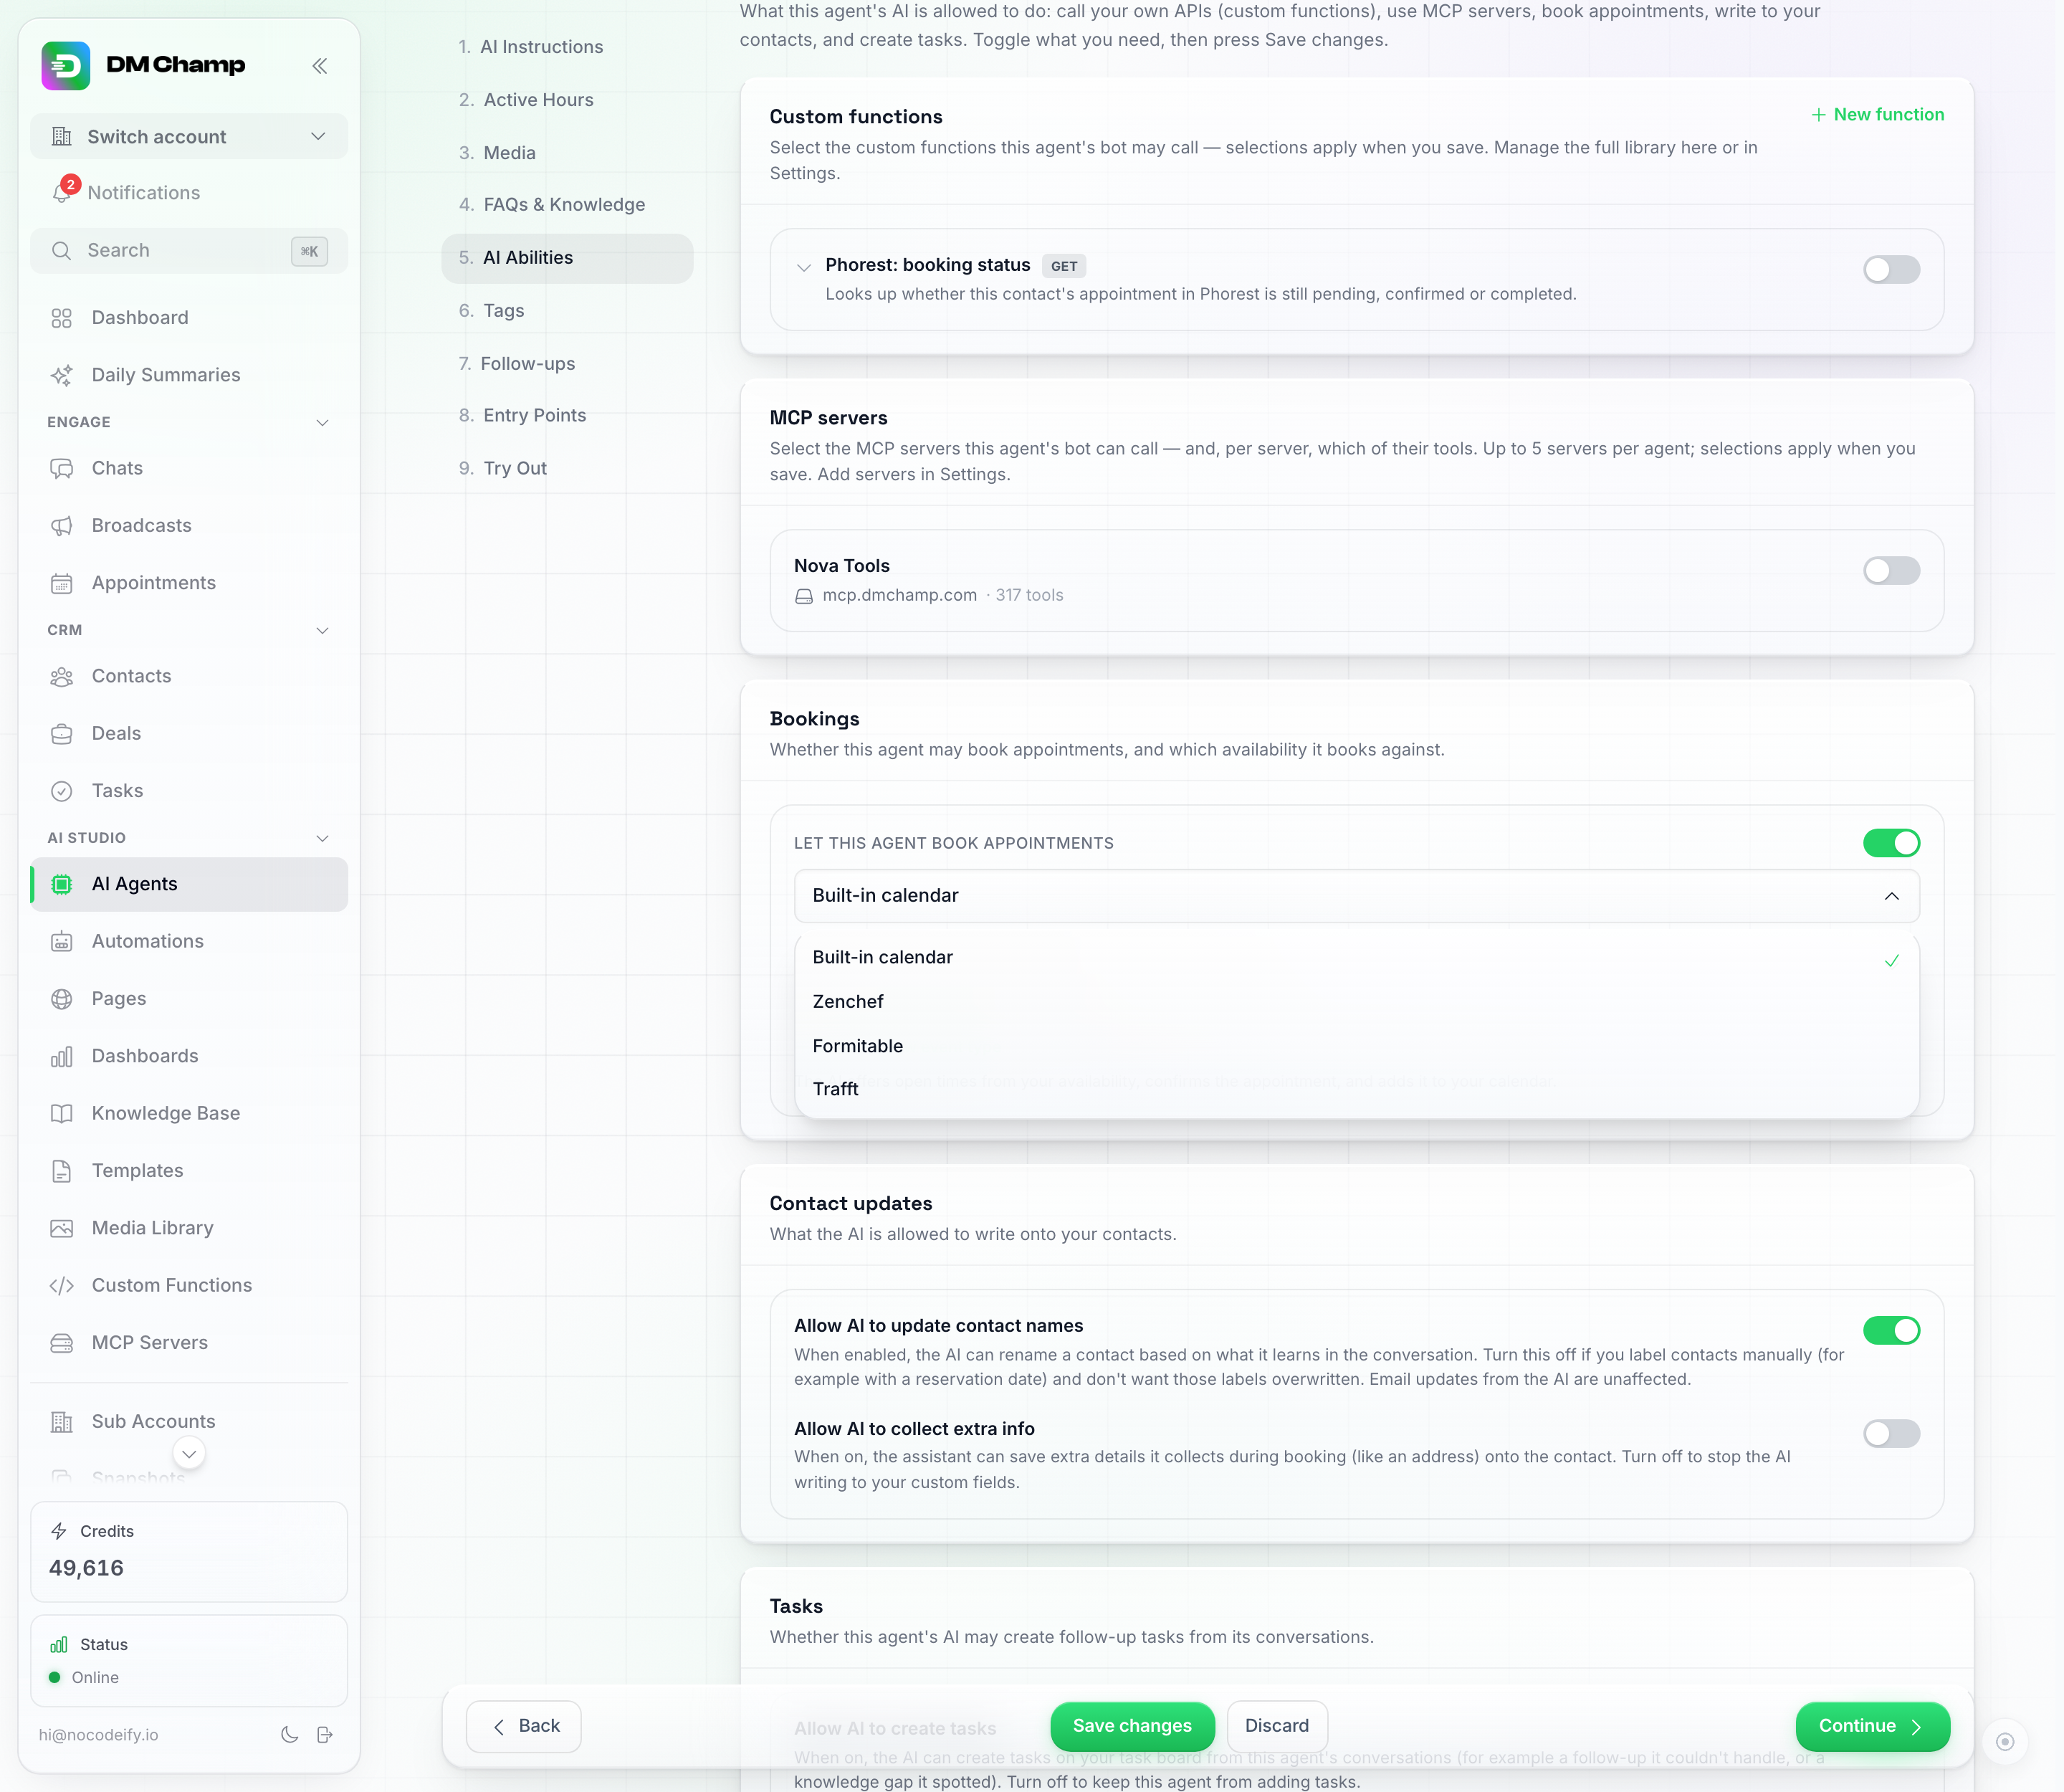
The Provider picker: Built-in calendar for normal appointments, Zenchef or Formitable for restaurant reservations, Trafft for a schedule you already run there.
You can pick more than one. Click the picker and choose an event type — it drops below as a small chip with the event’s name. The picker then reads Add another event type, so keep going until every service this agent should be able to book is on the list. The first one you pick is the agent’s default, and once two or more are linked it wears a default pill so you can see which one that is. To take one off the list, click the × on its chip. No event type yet? Create a new event type right there without leaving the page — whatever you create is added to the list straight away.
The line under the picker sums up what that gets you: “The agent can book any of the selected event types in the chat. Name the staff or rooms inside each event type so the AI can book with a specific person.”
-
Click Save changes.
Booking is a live setting — it applies as soon as you save, and does not wait for Publish the way instruction and knowledge edits do.
If the picker is empty or nothing is selected, the AI has no times to offer and will fall back to telling the contact that someone will be in touch. Pick at least one event type before you rely on it.
What that looks like in a conversation. The AI knows every event type you linked, by name and by how long it lasts. When somebody asks to book, it asks which service they want (or works it out from what they’ve already said — “I need a colour” picks the colouring appointment), then checks the times for that one and books it. Rescheduling and cancelling work on whatever the contact actually booked, so there is nothing extra to explain to them.
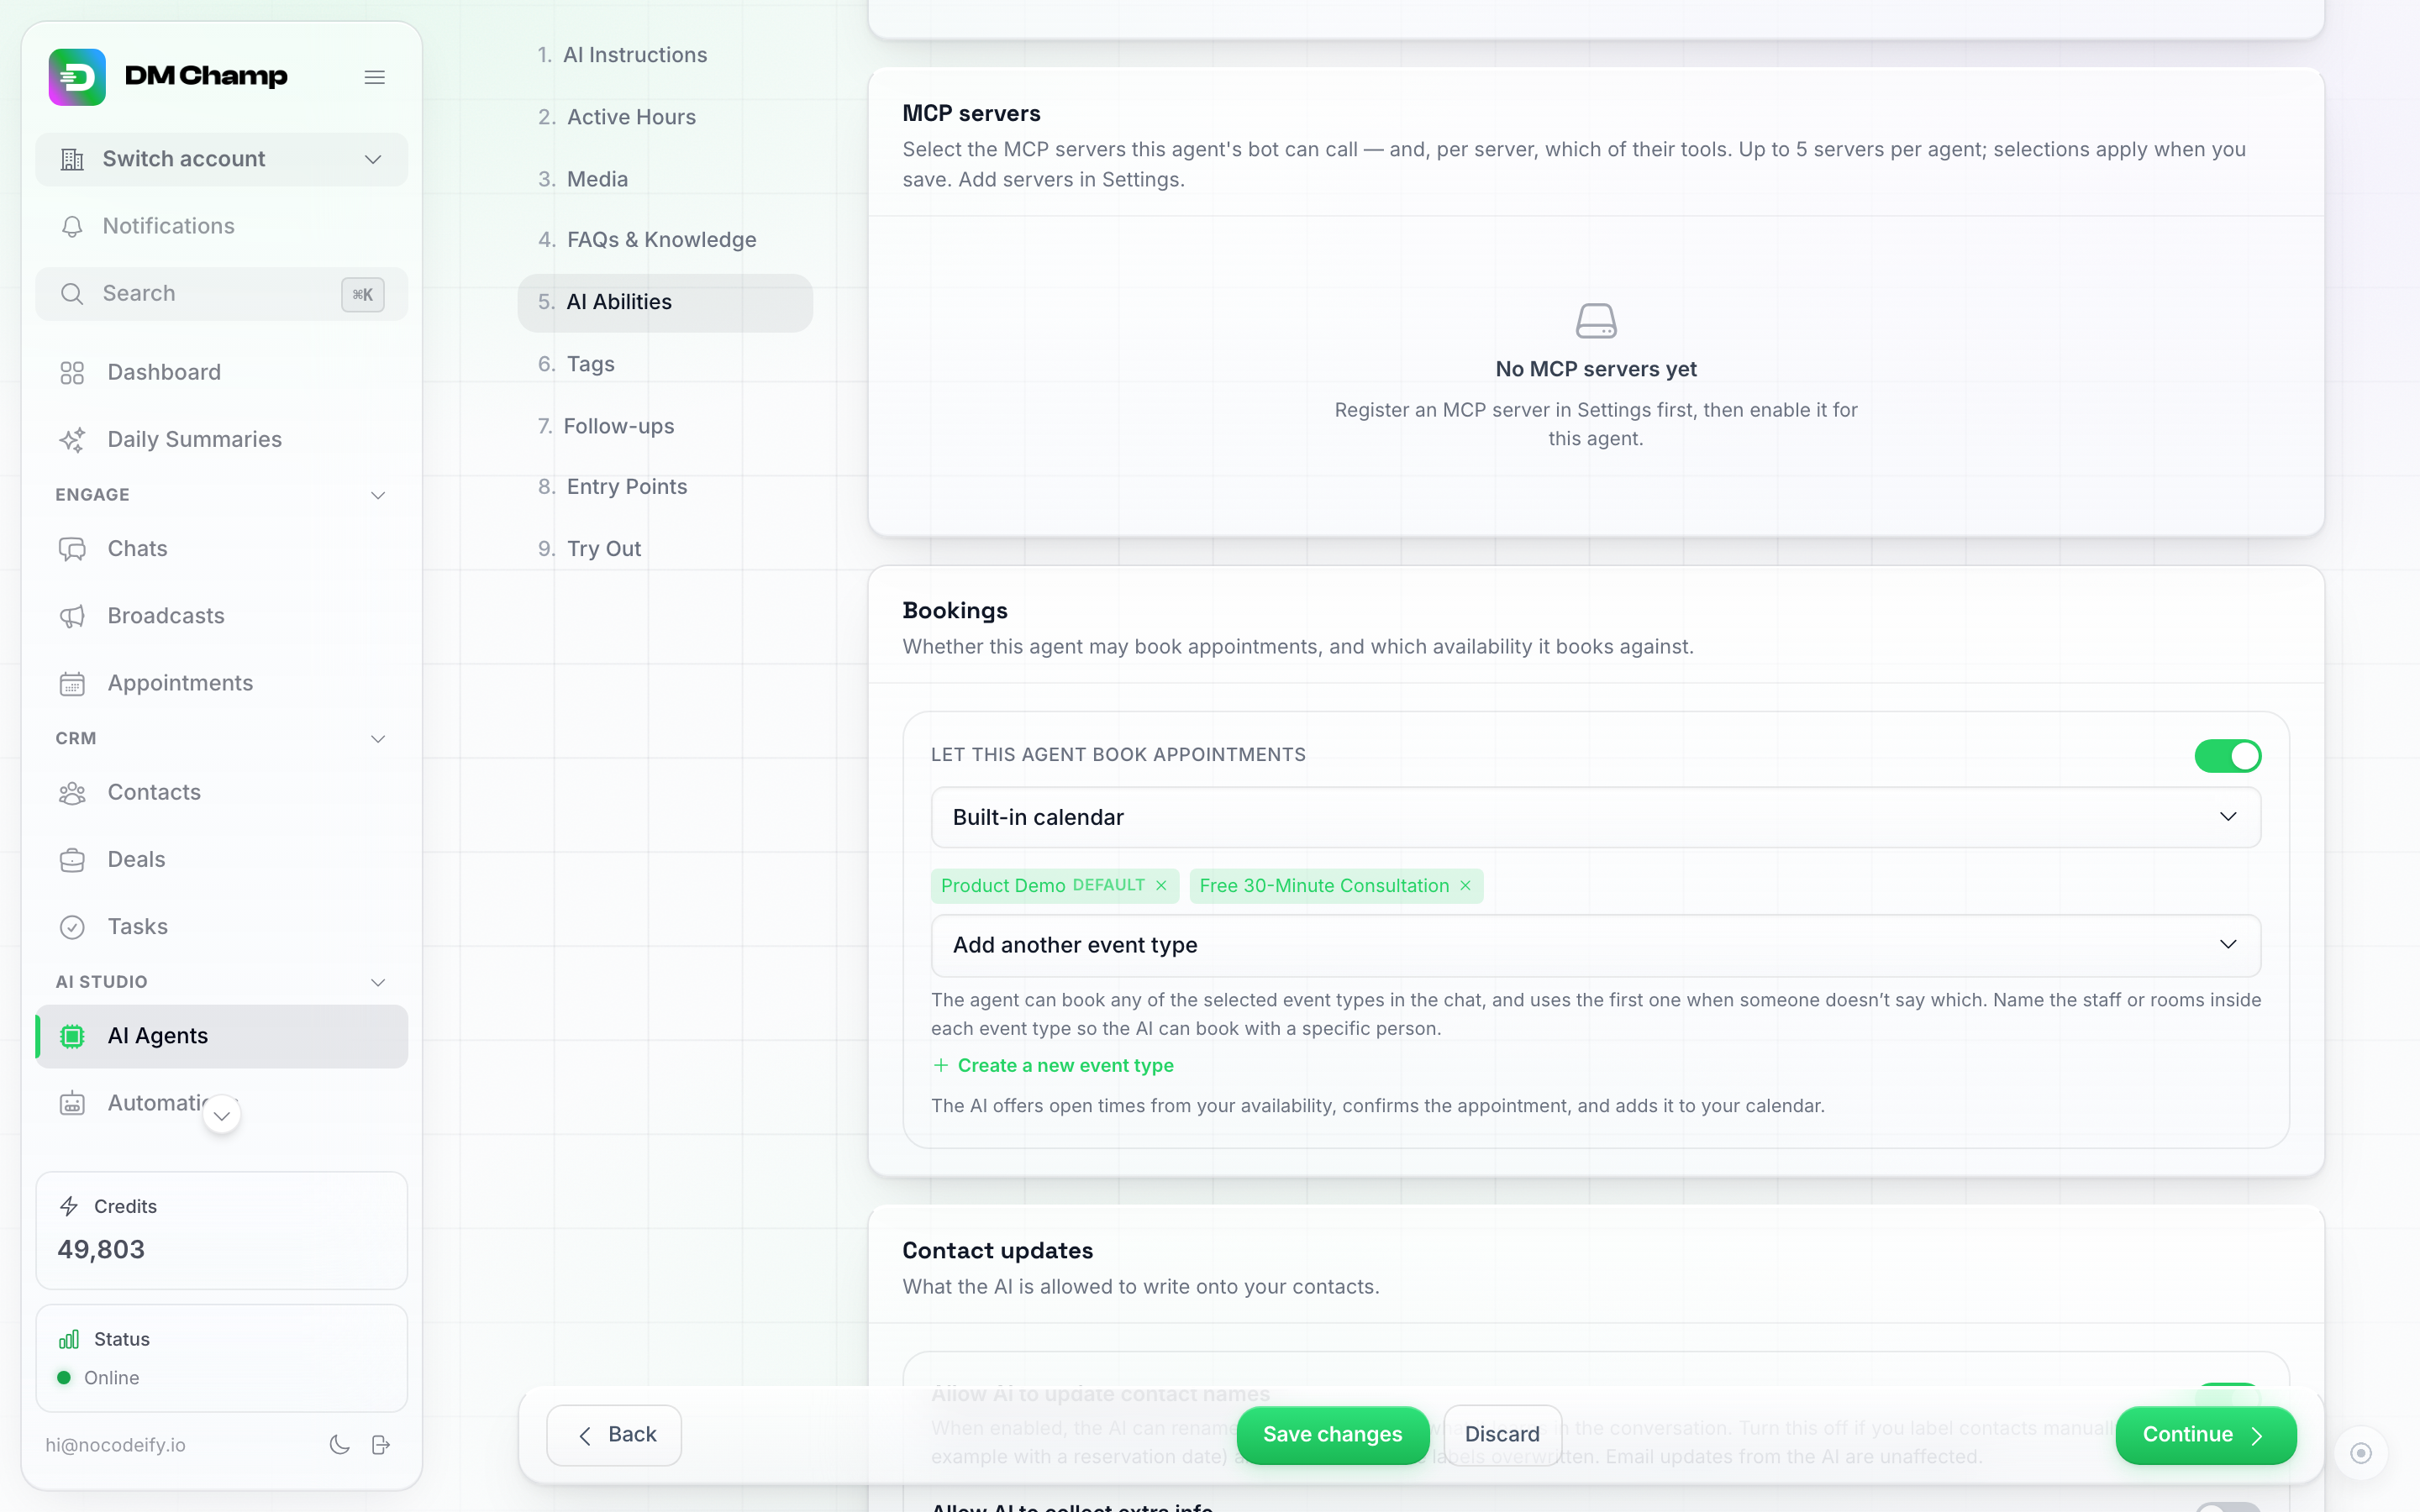
The Bookings panel with two event types linked. The first chip carries the default pill, the picker now reads Add another event type, and the line underneath explains that naming the staff or rooms inside each event type lets the AI book with a specific person.
Linking more than one? See Booking When You Offer Many Services below.
Once that’s saved, the AI automatically offers available time slots during conversations and handles the entire booking flow — from checking availability to confirming the appointment.
Example: A contact messages “I’d like to book a consultation.” The AI responds with available time slots based on your event settings (and Google Calendar, if synced). The contact picks a time, and the AI confirms the booking — all automatically.
The AI only books a time the contact has actually named or agreed to in the conversation. If it tries to book a slot nobody mentioned (for example after “Friday morning” with no exact time), the booking is refused and the AI shows the open slots and asks the contact to choose instead.
Require an email before the AI books
If you want a calendar invite to reach every contact (a Google Meet link, for example), the AI needs their email address before it books. Switch on Require email before booking in the same Bookings panel, under your event types. It shows up once Let this agent book appointments is on with Built-in calendar as the provider.
With it on, the AI asks for the contact’s email before it confirms a time, and it will not book until a real address is saved on the contact. If the contact already gave their email earlier in the chat, the AI saves it and books straight away. Bookings you make yourself in the app are never blocked by this switch.
Click Save changes, then Publish the agent so the switch goes live.
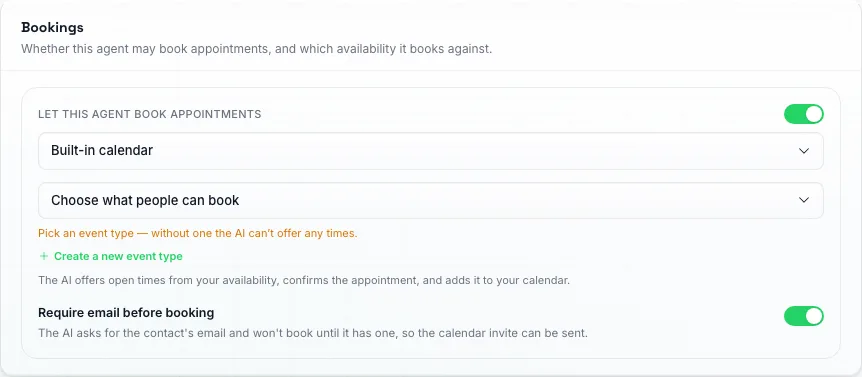
The Require email before booking switch sits at the bottom of the Bookings panel.
Letting People Book Themselves (Shareable Booking Page)
The steps above are about bookings made in a conversation, where your AI offers the times. Every event type can also have a public booking page: one link anyone can open and book on, with no account and no conversation first. Put it behind a “Book now” button, in your bio, in an email signature, or on a flyer as a QR code.
Switch it on in the Booking page section at the bottom of the event type form. Because the page asks for a name and an email or phone before it shows the calendar, people who start booking and never pick a time still land in your contacts, ready to follow up.
Using an External Scheduling Link (Calendly, Cal.com, etc.)
Already have a scheduler you love, like Calendly or Cal.com? You don’t have to switch to the built-in booking system — you can simply have the AI share your existing scheduling link so contacts book themselves there.
There’s no separate setting for this: the link just goes into your AI’s instructions.
- Open AI Agents in the sidebar and open your agent.
- Go to the AI Instructions tab.
- In the Rules section, add a line like: When someone wants to book, share this scheduling link so they can book themselves: https://calendly.com/yourname
- Optionally, add a matching step to the Conversation flow section, for example: Once they are interested, share the scheduling link.
- Click Save changes, then Publish to live so the updated instructions reach your contacts. The Try Out tab always tests your draft, so you can check the AI shares the link right after saving — even before publishing.
That’s it — whenever booking comes up in a conversation, the AI sends your link. Keep the built-in Bookings toggle (on the AI Abilities tab) off in this setup: with it off, the AI won’t try to offer time slots itself, and with your link in the rules it knows exactly what to do instead. If you choose External booking link during the guided onboarding wizard, this rule is added for you automatically.
The trade-off compared to the built-in booking system: the contact leaves the chat to book, and the appointment lands only in your external scheduler — it won’t show on the Appointments page.
Booking When You Offer Many Services
Offer a dozen different treatments? Your agent can book all of them in the chat. On the AI Abilities tab, under Choose what people can book, keep adding event types until every service is on the list — there is no limit, and the first one you add is the default. See Step 3 for the picker itself.
- Create an event type for each service on the Event Types tab, with a name your customers would use (“Haircut”, “Colour & highlights”, “Beard trim”).
- Open your agent’s AI Abilities tab, turn on Let this agent book appointments, and add every one of them under Choose what people can book.
- Click Save changes. That’s it — the AI asks which service the contact wants (or picks it up from what they’ve already told it), offers the times for that service, and books it.
Each event type keeps its own duration, hours, rooms and calendar, so nothing about the event types themselves changes — you just link them all to the same agent. Two things help the AI get it right:
- Order matters a little. The first event type on the list is the default: it’s what the AI falls back to when the contact hasn’t said which service they want and there is nothing in the conversation to go on. Put your most common service first.
- Give them names a customer would recognise. The AI matches what the contact says against the event name, so “Colour & highlights” works far better than “Service B”.
Prefer to send links? You can still do that instead, or as well. Switch on the shareable booking page for each event type so every service has its own link, then add a rule to your AI’s instructions listing them, for example: When someone wants to book, share the booking link for the service they’re interested in: Haircut — https://yourlink/haircut, Coloring — https://yourlink/coloring. Because these are your own booking pages rather than an external scheduler, the visitor is saved as a contact before they even see the calendar, and every booking still lands on your Appointments page (and your Google Calendar, if connected).
And if people ask for a particular person? Add each staff member as a named room inside the event type and the AI can book them by name — see Booking with a specific person.
Offering Times Without Booking
Some services are only confirmed once the customer has paid, or are booked by your own team or checkout. For those, open the event type and turn on Offer times only, don’t book under Notifications.
With the switch on, your AI checks the calendar and tells the contact which times are free for that event type, but it will not create the appointment itself. Once the contact picks a time, the AI moves on to whatever you set up for the next step, for example a custom function that sends a payment link, or handing the chat to your team. Mention that step in your agent’s instructions so it knows what to do.
If an agent has several event types, the switch only affects the ones you turn it on for. The others are still booked by the AI as usual.
Collecting Extra Information During Booking
Sometimes you need a little more than just a time. You can have the AI collect additional details from the contact before it confirms a booking — for example a delivery or home address, the number of guests, a reference number, or any custom field you use.
Examples of when this is handy:
- A mobile car-detailing service that needs the customer’s home address to know where to show up.
- A restaurant that needs the number of guests before reserving the right table.
- A repair service that needs an order or reference number to look up the job.
How it works
- Click AI Agents in the sidebar, open the Agent, go to its AI Abilities step and flip on Allow AI to collect extra info (under Contact updates). A Collect extra info during booking card then appears where you pick which of your custom fields the AI should ask for, and mark each one as required or optional. Required fields must be answered before the booking is confirmed — the AI will keep asking until it has them.
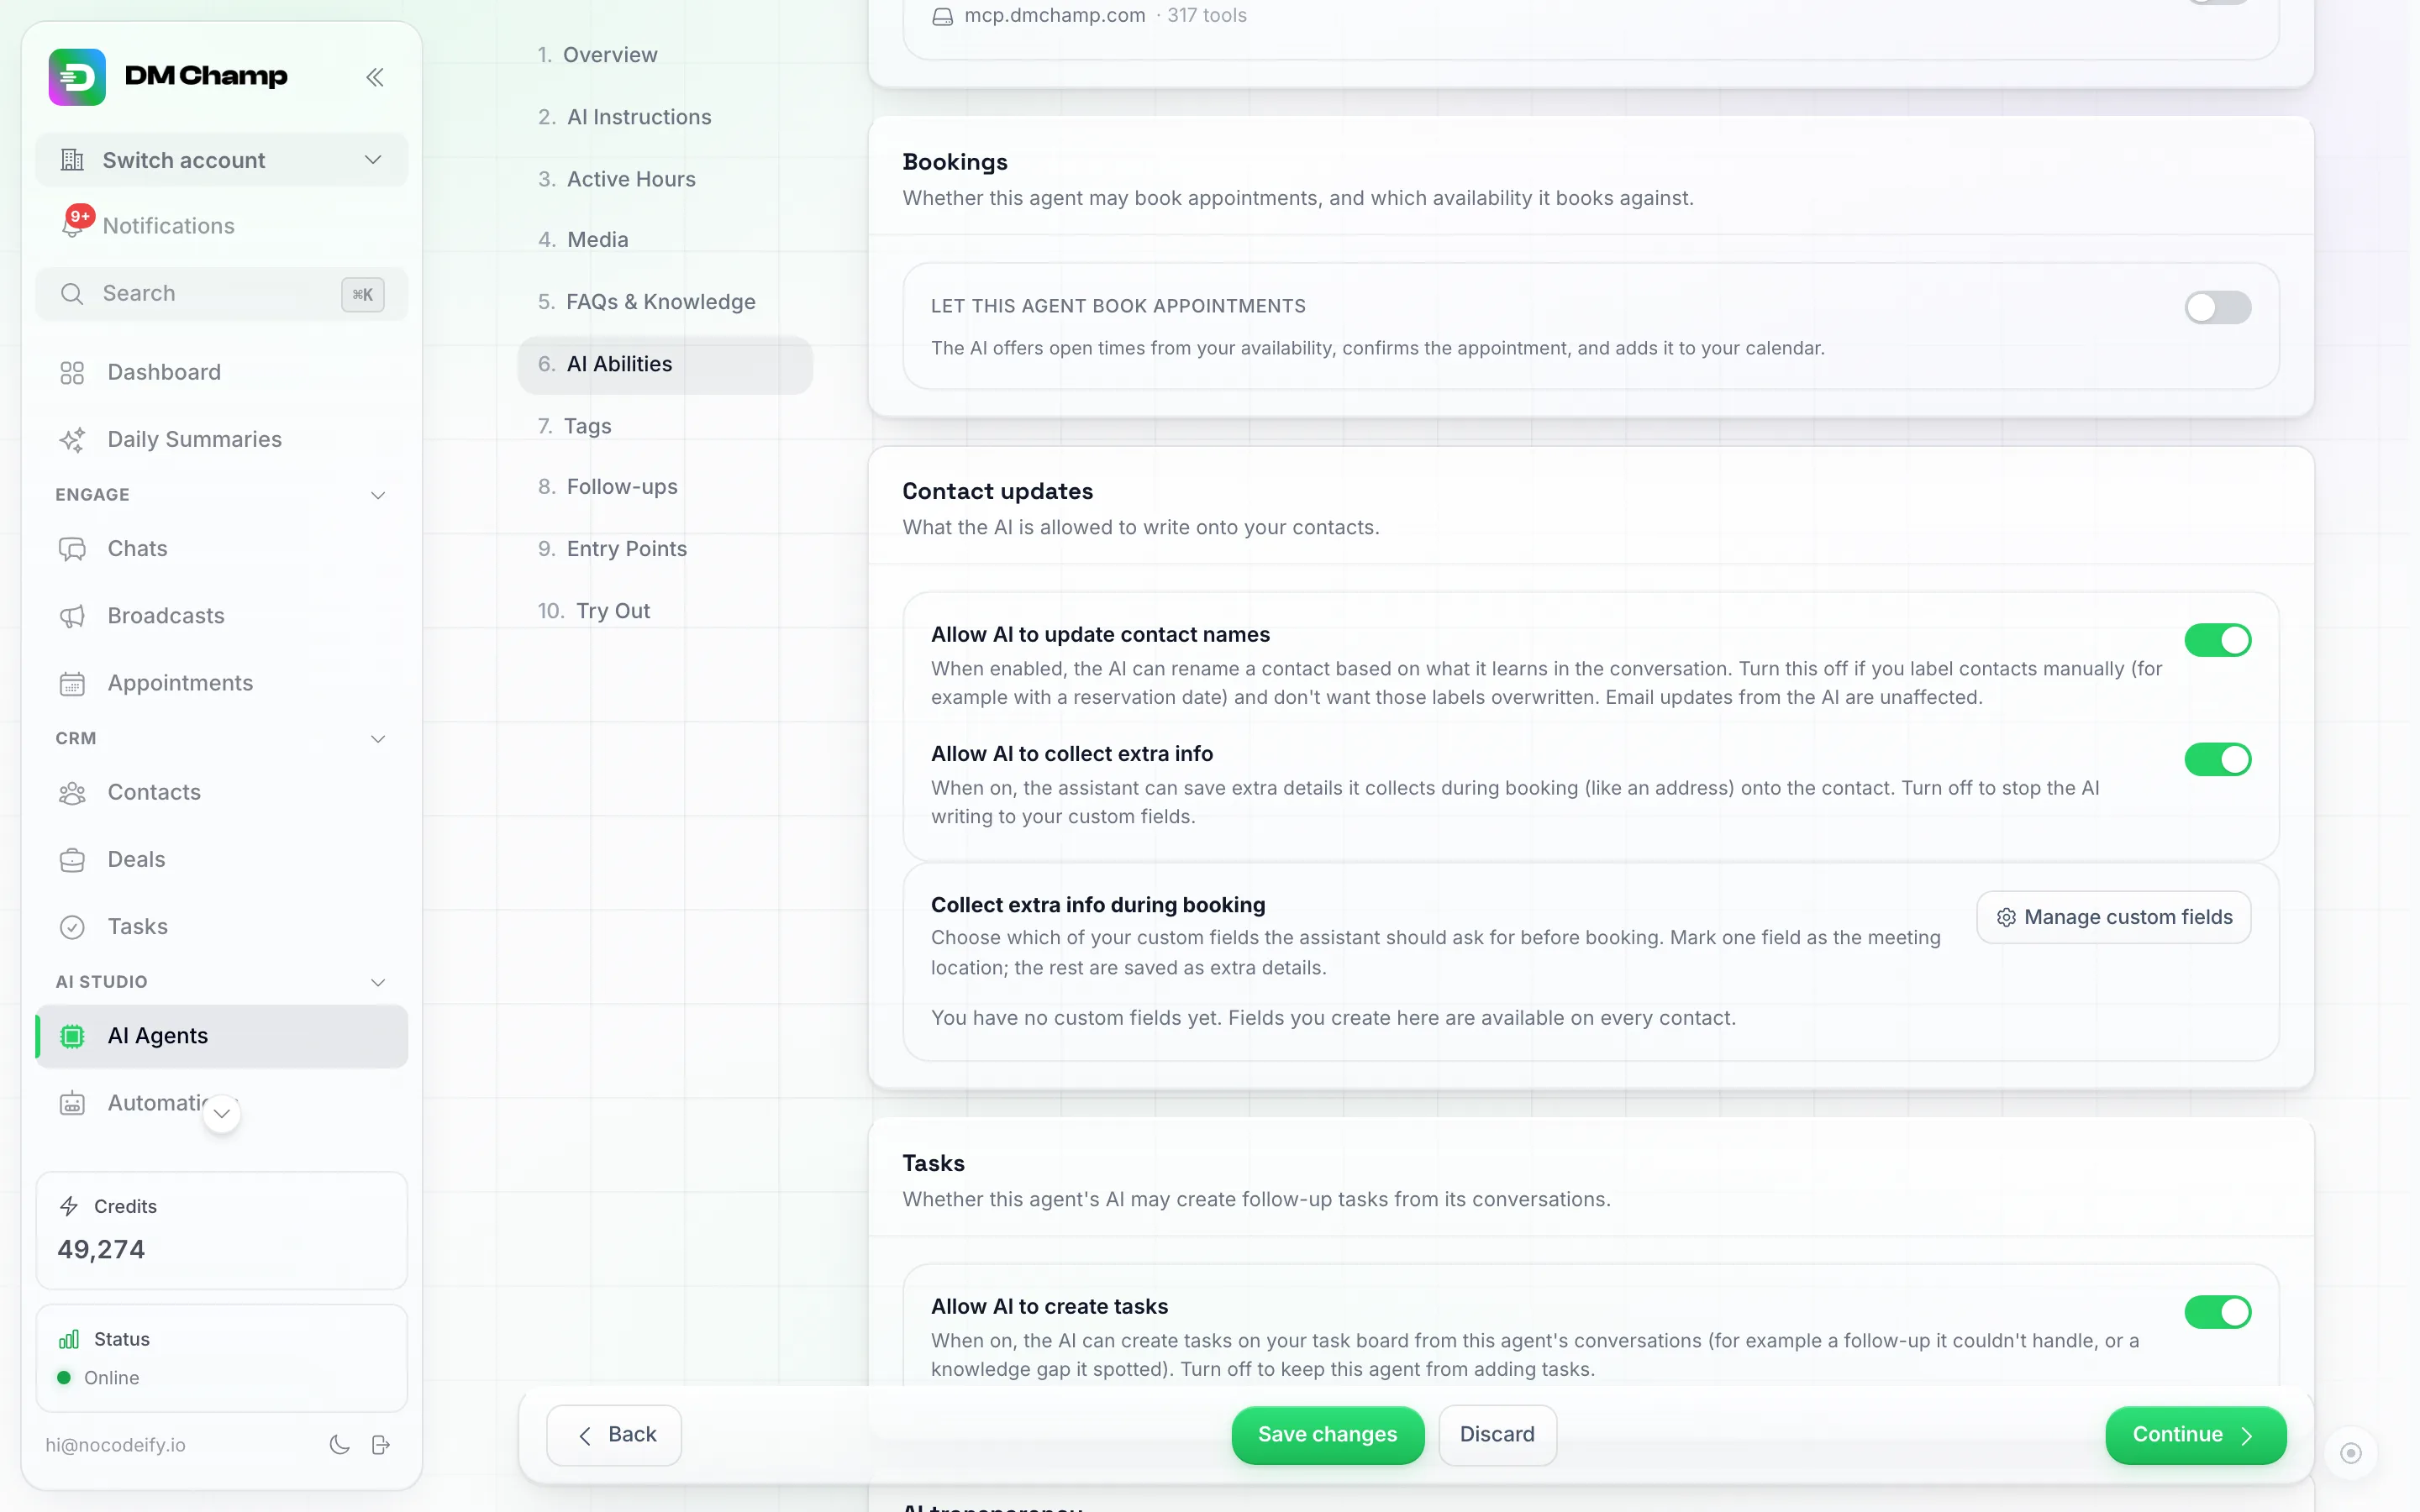
Turn on Allow AI to collect extra info and the field picker appears. No custom fields yet? Manage custom fields on the card creates them without leaving the Agent.
- The collected answers are saved on the contact (so you have them on the contact record), added to the Google Calendar event, and listed in the booking notification email you receive, so you can see everything at a glance without opening the app.
- You can mark one of these fields as the meeting location. When you do, the customer’s answer (for example, their address) becomes the location on the calendar event — ideal for services that travel to the customer. This works hand-in-hand with the In person meeting type you pick on the event type.
Before you start
- The fields you choose from are the same custom fields you manage for contacts (see Custom Contact Fields). If a field you want to collect doesn’t exist yet, create it first, then it will be available to pick here.
- Make sure Update contact names/fields is allowed in the same AI Abilities step. The AI needs that permission to save the information it collects; if it’s off, the answers won’t be stored.
- This isn’t only for bookings. The same two settings let the AI save details it picks up anywhere in a conversation — a birthday, a dietary requirement, a preference — even when no appointment is involved. See Letting the AI Fill Custom Fields For You.
Example: You run a mobile pet-grooming business. You create a custom field called “Home address,” tell the AI to collect it as a required field, and mark it as the meeting location. Now when a contact books, the AI asks for their address, saves it on the contact, and puts it as the location on the Google Calendar event — so your groomer knows exactly where to drive.
Asking different questions depending on the answer
You are not stuck asking everybody the same list. Pick every field the AI is allowed to collect in the Collect extra info during booking card, then describe in your AI instructions when each one applies (the agent’s AI Instructions step). The AI reads those instructions in plain language, so a question can depend on what the contact just told it.
Example: an airport transfer service. Create custom fields for “Flight number” and “Meet & Greet”, tick both in the field picker, and write in your instructions: “Always ask for the pickup address. If the pickup address is an airport, also ask for the flight number and whether they want a Meet & Greet.” Someone booking a ride across town is never asked about flights; someone booking an airport pickup is asked both questions before the booking is confirmed.
How Slots Are Offered
A few useful things to know about how the AI turns your settings into offered times:
- Slots are offered back-to-back within your weekly hours: a 30-minute event is offered as 9:00, 9:30, 10:00, and so on.
- Once a time is booked it stops being offered, so the AI never double-books.
- Event types that allow multiple bookings per slot are the exception: those times keep being offered until they are full, and the AI can tell a contact how many spots are left (for example, “5:00 PM has 3 spots left”). See Letting multiple people book the same slot just below.
- Event types with more than one room are worked out room by room: each room has its own hours, can have its own calendar, and can have its own number of bookings per slot. See Rooms.
- Anything on your synced Google Calendar is treated as busy and removed from what the AI offers, whatever the event type allows.
- The Notice setting trims away slots that start too soon; Bookable ahead caps how far in the future the AI will offer times.
- Days you are closed are answered as closed, not as full. If somebody asks for a Saturday and your event type has no Saturday hours, the AI says you are closed that day and offers your next open day, instead of saying you are fully booked. The same goes for a day that has simply run out of time: once the last appointment that could still start today has passed, the AI says today is over rather than full. A day only gets a “fully booked” answer when it has hours, still has time left in it, and every slot in it is taken.
Letting Multiple People Book the Same Slot
Normally one booking fills a time slot: the moment somebody takes 5:00 PM, nobody else is offered 5:00 PM. Plenty of businesses work the other way, so an event type can be set to accept several bookings at the same time.
Who this is for:
- A chauffeur or taxi company with a fleet of 10 cars. Ten different customers can all be picked up at 5:00 PM, because you have ten drivers.
- A fitness studio or workshop running a class with 12 places in it.
- A clinic or salon with three chairs, where three people can be treated in the same hour.
- A tour, tasting or open house where a group turns up at the same time.
Turning it on
- Open the event type on the Event Types tab (click its row, or click the pencil at the right-hand end), or create a new one.
- In the Slot section, switch on Multiple bookings per slot. The line underneath explains the default: “Off means one booking per time slot, the way bookings have always worked.”
- A Bookings per slot number appears. Type how many bookings that time can hold, anything from 2 to 500. A fleet of ten cars is 10; a class with twelve places is 12.
- No limit at all? Flip the small Unlimited switch beside the number. The number greys out and reads Unlimited, and the time keeps being offered however many people have booked it.
- Click Save event (or Create event for a new one).
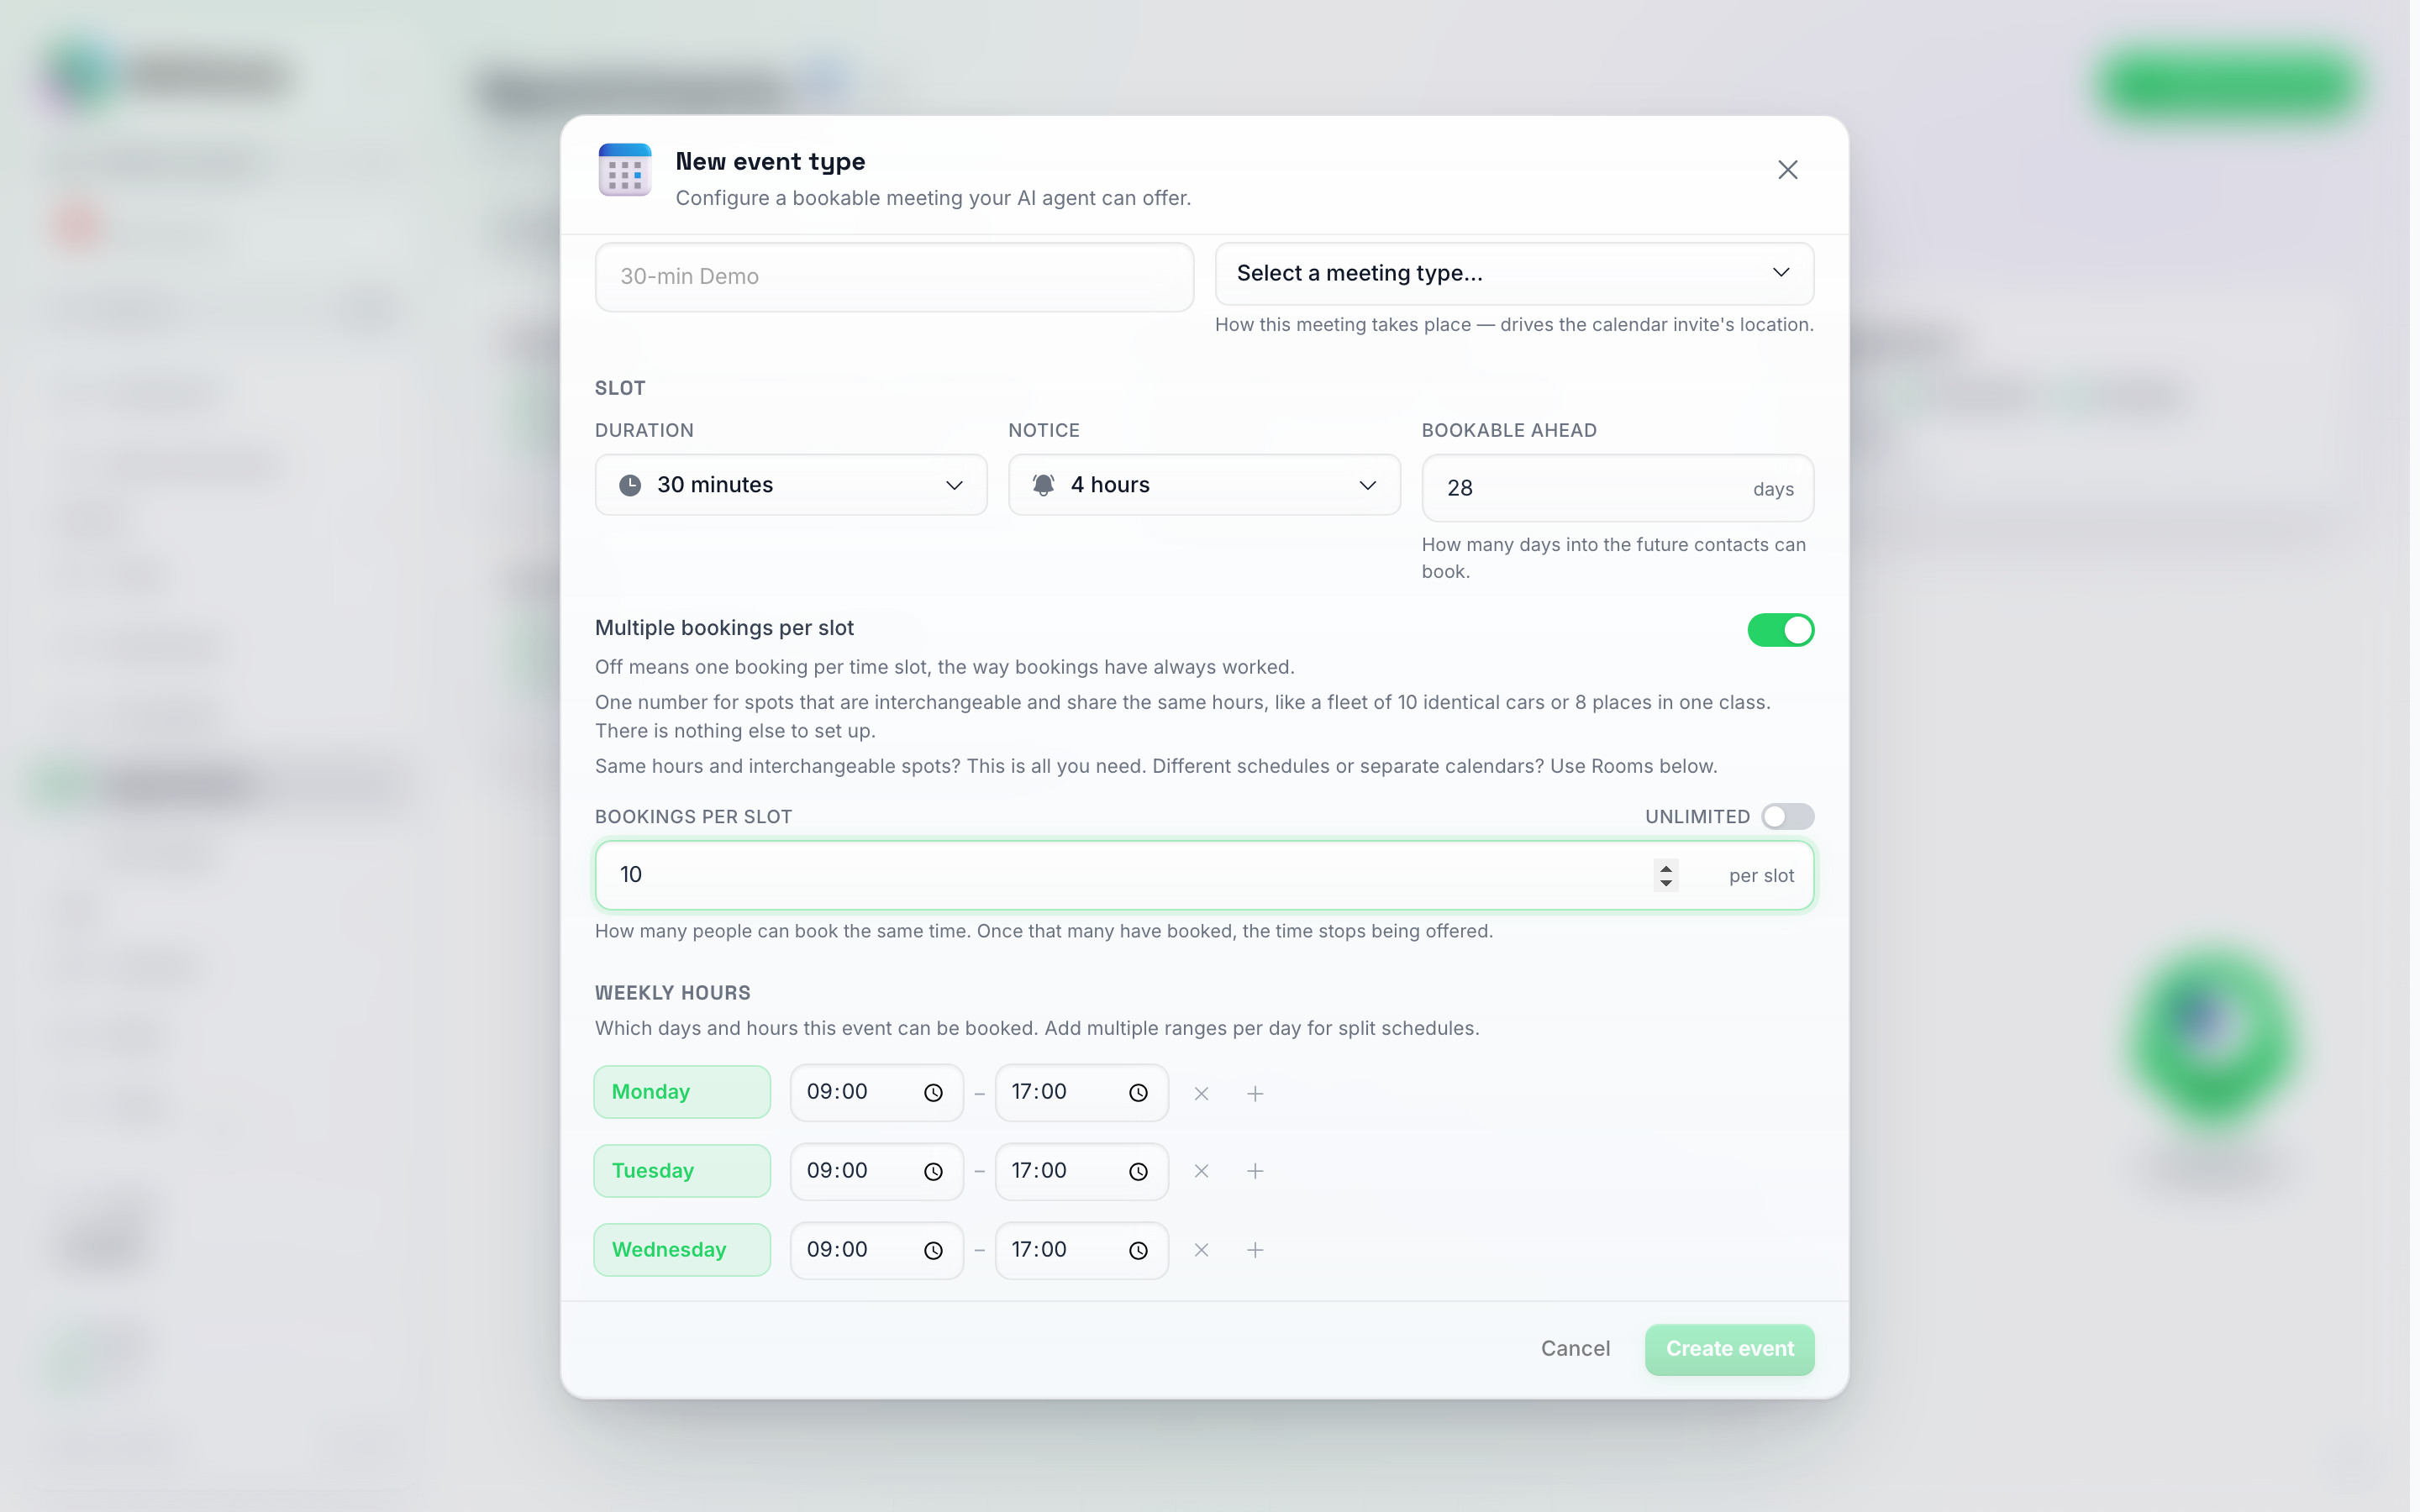
Switch on Multiple bookings per slot and the Bookings per slot number appears: "How many people can book the same time. Once that many have booked, the time stops being offered." The Unlimited switch beside it removes the limit completely.
Back on the Event Types tab, the Capacity column says so: 10 per slot, or Unlimited. If the event type has rooms and one of them has been given its own number, it reads Varies by room instead.
What happens once it is on
- The time keeps being offered until it is full. With 10 per slot, 5:00 PM is still offered to the second contact who asks, and the third, right up to the tenth. The eleventh is offered a different time.
- The AI can say how many spots are left, for example “5:00 PM has 3 spots left”, when that helps the contact decide. It only does this for event types that accept multiple bookings. For a normal one-booking event type it says nothing about spots and never invents a number, and for an unlimited one there is no number to mention.
- Canceling frees the spot straight away. If one of your ten 5:00 PM bookings cancels, 5:00 PM is offered again to the next contact who asks. The same goes for moving a booking to another time.
- Every booking is still its own appointment. Ten bookings at 5:00 PM are ten rows on the Upcoming Appointments tab, each with its own contact, and ten separate events on your Google Calendar if you have sync switched on. That is what you want: ten cars, ten jobs.
- Booking by hand shows the same count. When you book an appointment manually, each time chip carries a small badge with the spots still free, so a 9:00 chip on a two-per-slot event reads 09:00 2 left.
- With more than one room, the number counts per room. Two rooms on an event set to 3 per slot is up to 6 bookings at the same time, unless a room overrides it with a number of its own.
- Busy time on your calendar still blocks the whole slot. If something on your synced Google Calendar overlaps 5:00 PM, that time disappears for everyone, no matter how many bookings the event type allows. A meeting on your calendar means you are not available at all, not that one of your places is taken.
- Switching it back off returns the event type to one booking per time slot. Bookings already made stay exactly where they are.
If two contacts happen to grab the last free spot at the same moment, only one of them gets it. The other is told the time has just gone and is offered the next available times instead, so you never end up with an eleventh booking on a ten-place slot.
Rooms: Separate Resources With Their Own Schedules
A room is a separate bookable resource. Despite the name it does not have to be a physical room: it can be a staff member, a chair, a car, a court or a treatment table. The form puts it in one line: “Rooms are separate bookable resources: a staff member, a chair, a car, a court. Each room has its own weekly hours and can have its own Google Calendar, so rooms can differ. Dr. A works Monday to Wednesday, Dr. B works Thursday and Friday.”
Every event type already has one room, so there is nothing to do here until a second resource works different hours or needs its own calendar. Rooms have their own Rooms section in the event type form, between Weekly hours and Notifications.
Give your rooms real names — the barber, the doctor, the chair — and the AI can book a contact with the person they ask for. See Booking with a specific person further down.
Who this is for:
- A clinic or practice where Dr. A works Monday to Wednesday and Dr. B works Thursday and Friday.
- A salon with three chairs, one of them only staffed in the afternoon.
- A driving school or rental where each car has its own availability.
- A club with two courts, each kept on its own calendar.
Adding, renaming and removing rooms
- Open the event type on the Event Types tab (click its row, or click the pencil at the right-hand end), or create a new one.
- Scroll down to Rooms. Room 1 is already there, and it is the one you have been setting hours for all along. Its note says exactly that: “This room uses the Weekly hours above. Rooms you add below set their own hours.”
- Click Add room. A new card appears with its own name field and its own Hours for this room editor, which works just like the weekly hours at the top of the form.
- Give every room a name. Two rooms cannot share one: if they do, the form says “Two rooms have the same name. Give each one its own name, or bookings meant for both land on the same room.” That is not tidiness for its own sake. Bookings are matched to a room by its name, so two rooms called the same thing behave as a single resource.
- Click Save event (or Create event for a new one).
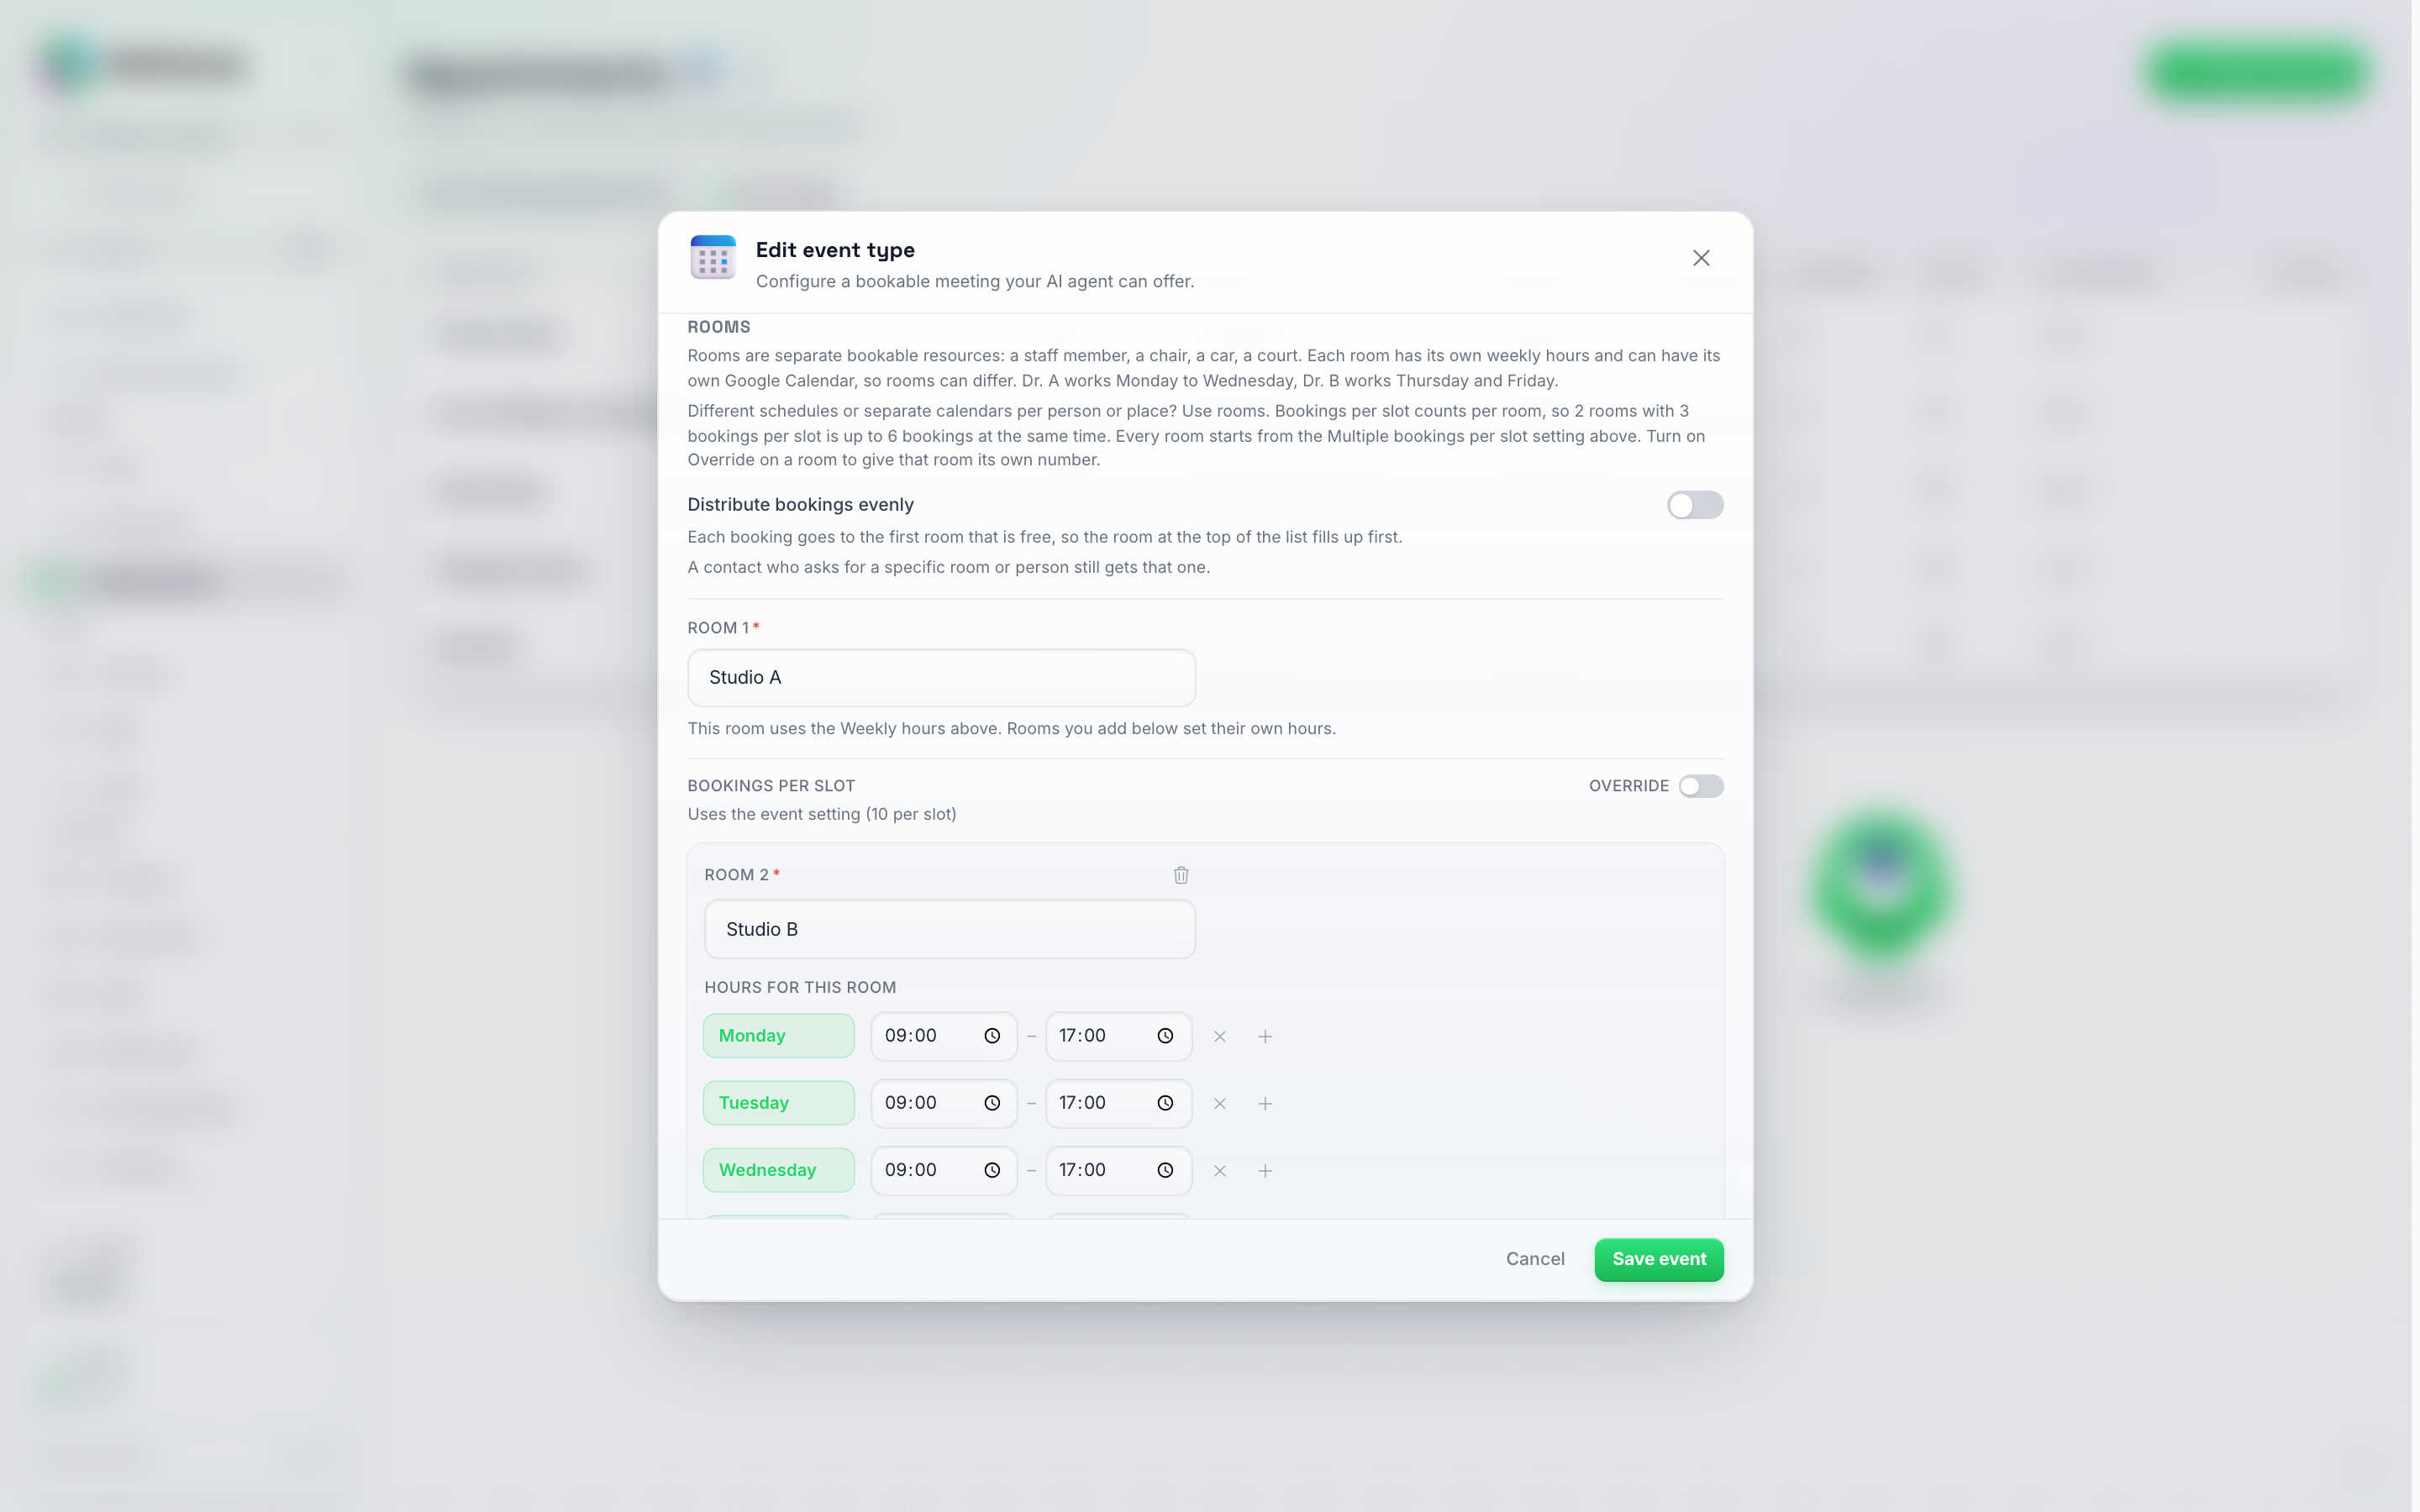
The Rooms section. The Distribute bookings evenly switch sits at the top; Room 1 uses the Weekly hours at the top of the form, every room you add below sets its own hours, and each room ends with its own Bookings per slot row.
To rename a room, type over its name. One thing to know before you do: renaming a room does not rename bookings that were already made under the old name. Those appointments keep the name they were booked with, and the renamed room starts counting from zero again. Rename early, or leave the name alone.
To remove a room, click the trash icon on its card and confirm. The confirmation spells out what happens: “This room stops being offered for new bookings. Bookings already made keep their room name and stay in your calendar.” Room 1 has no trash icon, because its hours are the Weekly hours at the top of the form.
Back on the Event Types tab, a Rooms column appears as soon as any event type has more than one room, showing each event’s room count.
A calendar per room
Once your Google Calendar is connected, every room card also gets a Google Calendar picker, with the note “Busy time on this calendar blocks this room, and this room’s bookings are added to it.” Point Dr. A’s room at Dr. A’s calendar and Dr. B’s room at Dr. B’s, and each room is checked against its own calendar and writes its own bookings there. Leave a room on No calendar if it should not sync at all.
Below the picker, Also check these calendars for conflicts lets a room check extra calendars too, for example Dr. A’s Personal calendar next to the Work one. Busy time on any ticked calendar blocks that room, and bookings are still only added to the room’s own calendar. See Checking more than one calendar.
The picker only appears once Google Calendar is connected on the account (see Google Calendar Integration). Until then rooms work exactly the same, there are simply no calendars to choose from. One Google account can hold several calendars, so you rarely need more than one connection.
If a room’s calendar can’t be read. A room’s calendar has to be readable by the Google account you connected. If it isn’t (the calendar was deleted, was never shared with that account, or the wrong one was picked), the AI cannot check that room’s busy time, so it will not offer any times for that event until it’s fixed. You’ll get an email and an in-app alert naming the event and the calendar (at most one every six hours). To fix it, share the calendar with the connected Google account, or open the event and pick a different calendar for that room.
Spreading bookings evenly across rooms
When a booking comes in and nobody asked for a specific room or person, it has always gone to the first room in your list that’s free at that time. That’s the right behavior for many setups — order your rooms by preference and the top one fills up first, with the others as overflow. But if your rooms are colleagues who should each get a fair share of the work, “first in the list wins” means the person at the top stays fully booked while the others sit half empty.
The Distribute bookings evenly switch fixes that. It sits at the top of the Rooms section, and only appears once the event type has two or more rooms:
- Off (how every event type starts): each booking goes to the first room in your list that’s free, so the room at the top fills up first.
- On: each booking goes to the room with the fewest bookings, counting recent and upcoming appointments — so bookings spread evenly across everyone.
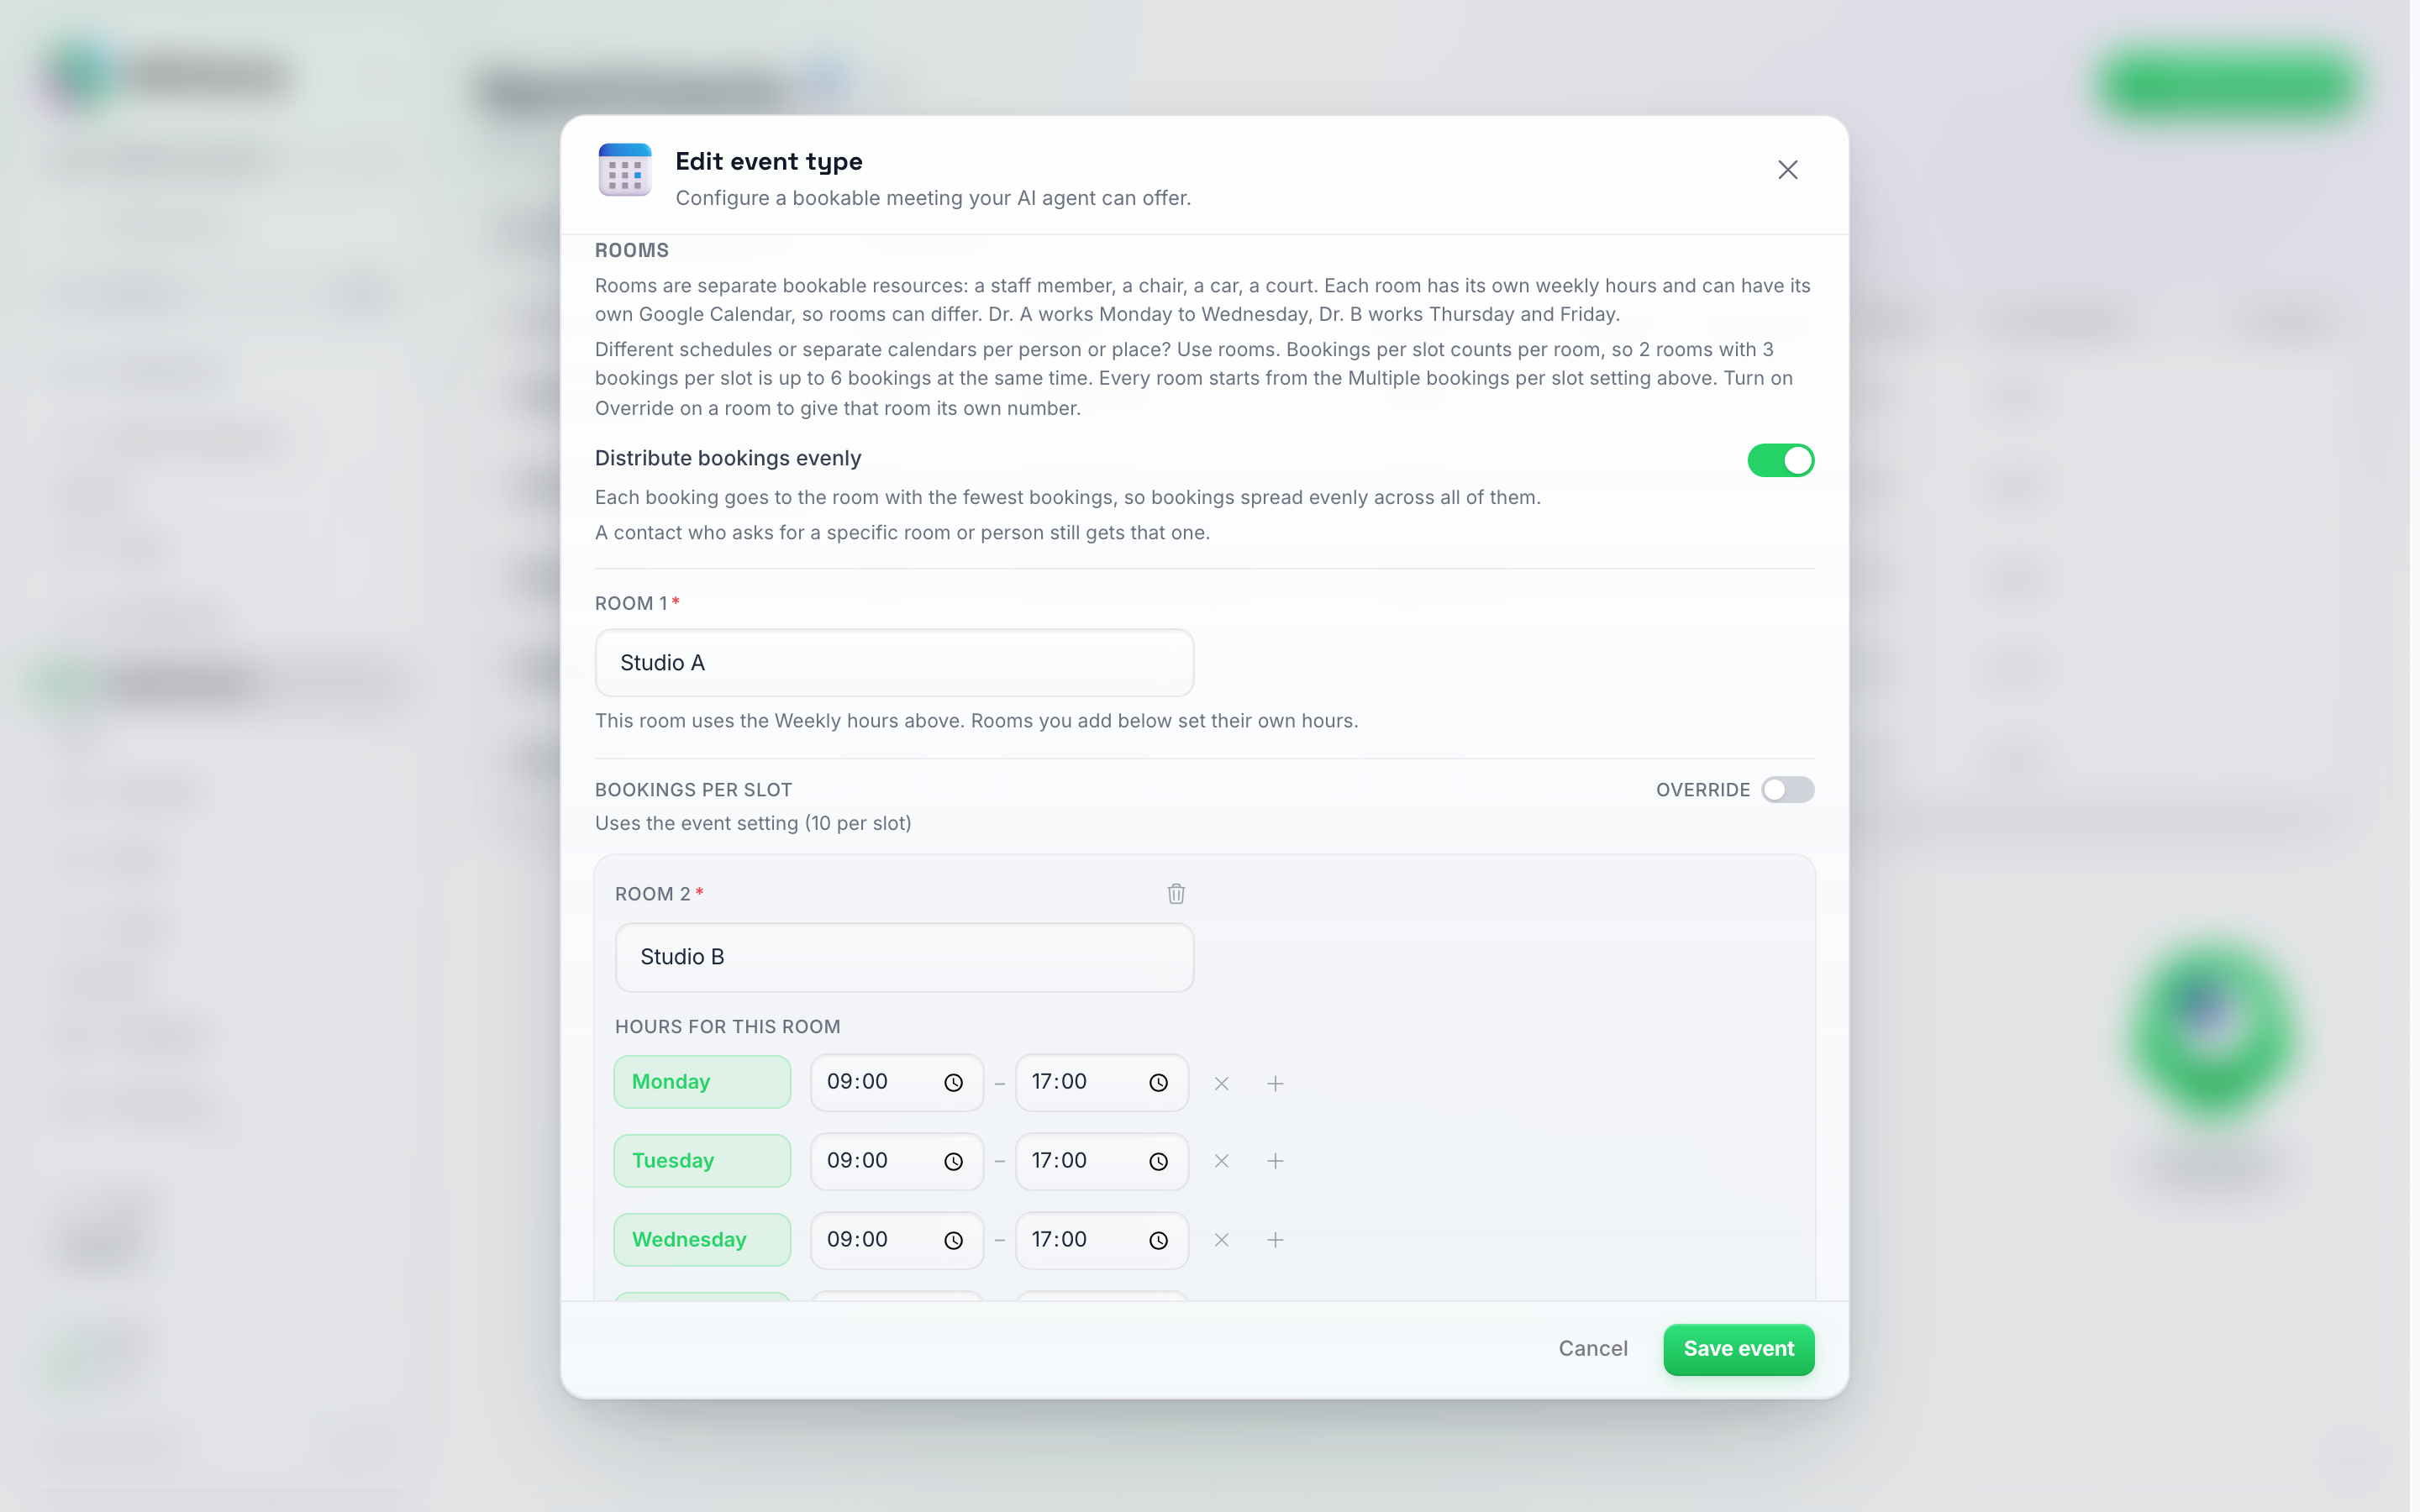
With Distribute bookings evenly on, the line under the switch says exactly what changes: each booking goes to the room with the fewest bookings. The note below it stays either way: a contact who asks for a specific room or person still gets that one.
Three things stay the same either way:
- A contact who asks for a specific person still gets that person. The switch only decides the no-preference case.
- A room is never handed a booking it can’t take. Its own hours, its calendar’s busy time and its bookings-per-slot number are all respected — if the least-booked person is closed or full at that time, the next-least-booked one takes it.
- Recurring bookings stay with one person. A weekly series is balanced once, at the first appointment, and then sticks with that person for the rest of the series.
With the switch on, the AI also gets a little more considerate: before booking someone who hasn’t mentioned a name, it asks once whether they already have a preferred person. If they don’t care, it books and your calendar does the spreading. The booking page follows the same rule — a visitor who leaves the Book with row on Anyone is placed with the least-booked person.
Cancellations and reschedules count too: a person who loses a booking automatically moves toward the front of the line for the next one.
Rooms or multiple bookings per slot?
Both let more than one person book the same time, so it is worth being clear about which one you actually want. The form draws the line right under the Multiple bookings per slot switch: “Same hours and interchangeable spots? This is all you need. Different schedules or separate calendars? Use Rooms below.”
- Multiple bookings per slot is one number for spots that are interchangeable and share the same hours: ten identical cars, twelve places in one class. There is nothing else to set up.
- Rooms are separate named resources that are allowed to differ: their own days and hours, their own calendar, and their own number of bookings per slot.
Every room starts from the event’s number. Whatever you set as Multiple bookings per slot is the default for every room, and each room card shows what it inherited: “Uses the event setting (10 per slot)”, or “Uses the event setting (Unlimited)” when the event is unlimited. Change the event’s number and every room that is following it changes with it.
A room can have its own number instead. Flip Override on that room’s card and a Bookings per slot number appears for that room alone, starting at 1, with its own Unlimited switch beside it. The line underneath reads “How many people can book this room at the same time. Once that many have booked, this room stops being offered for that time.” A room set to 1 behaves exactly like a classic one-booking-at-a-time resource, inside an event type that otherwise takes several.
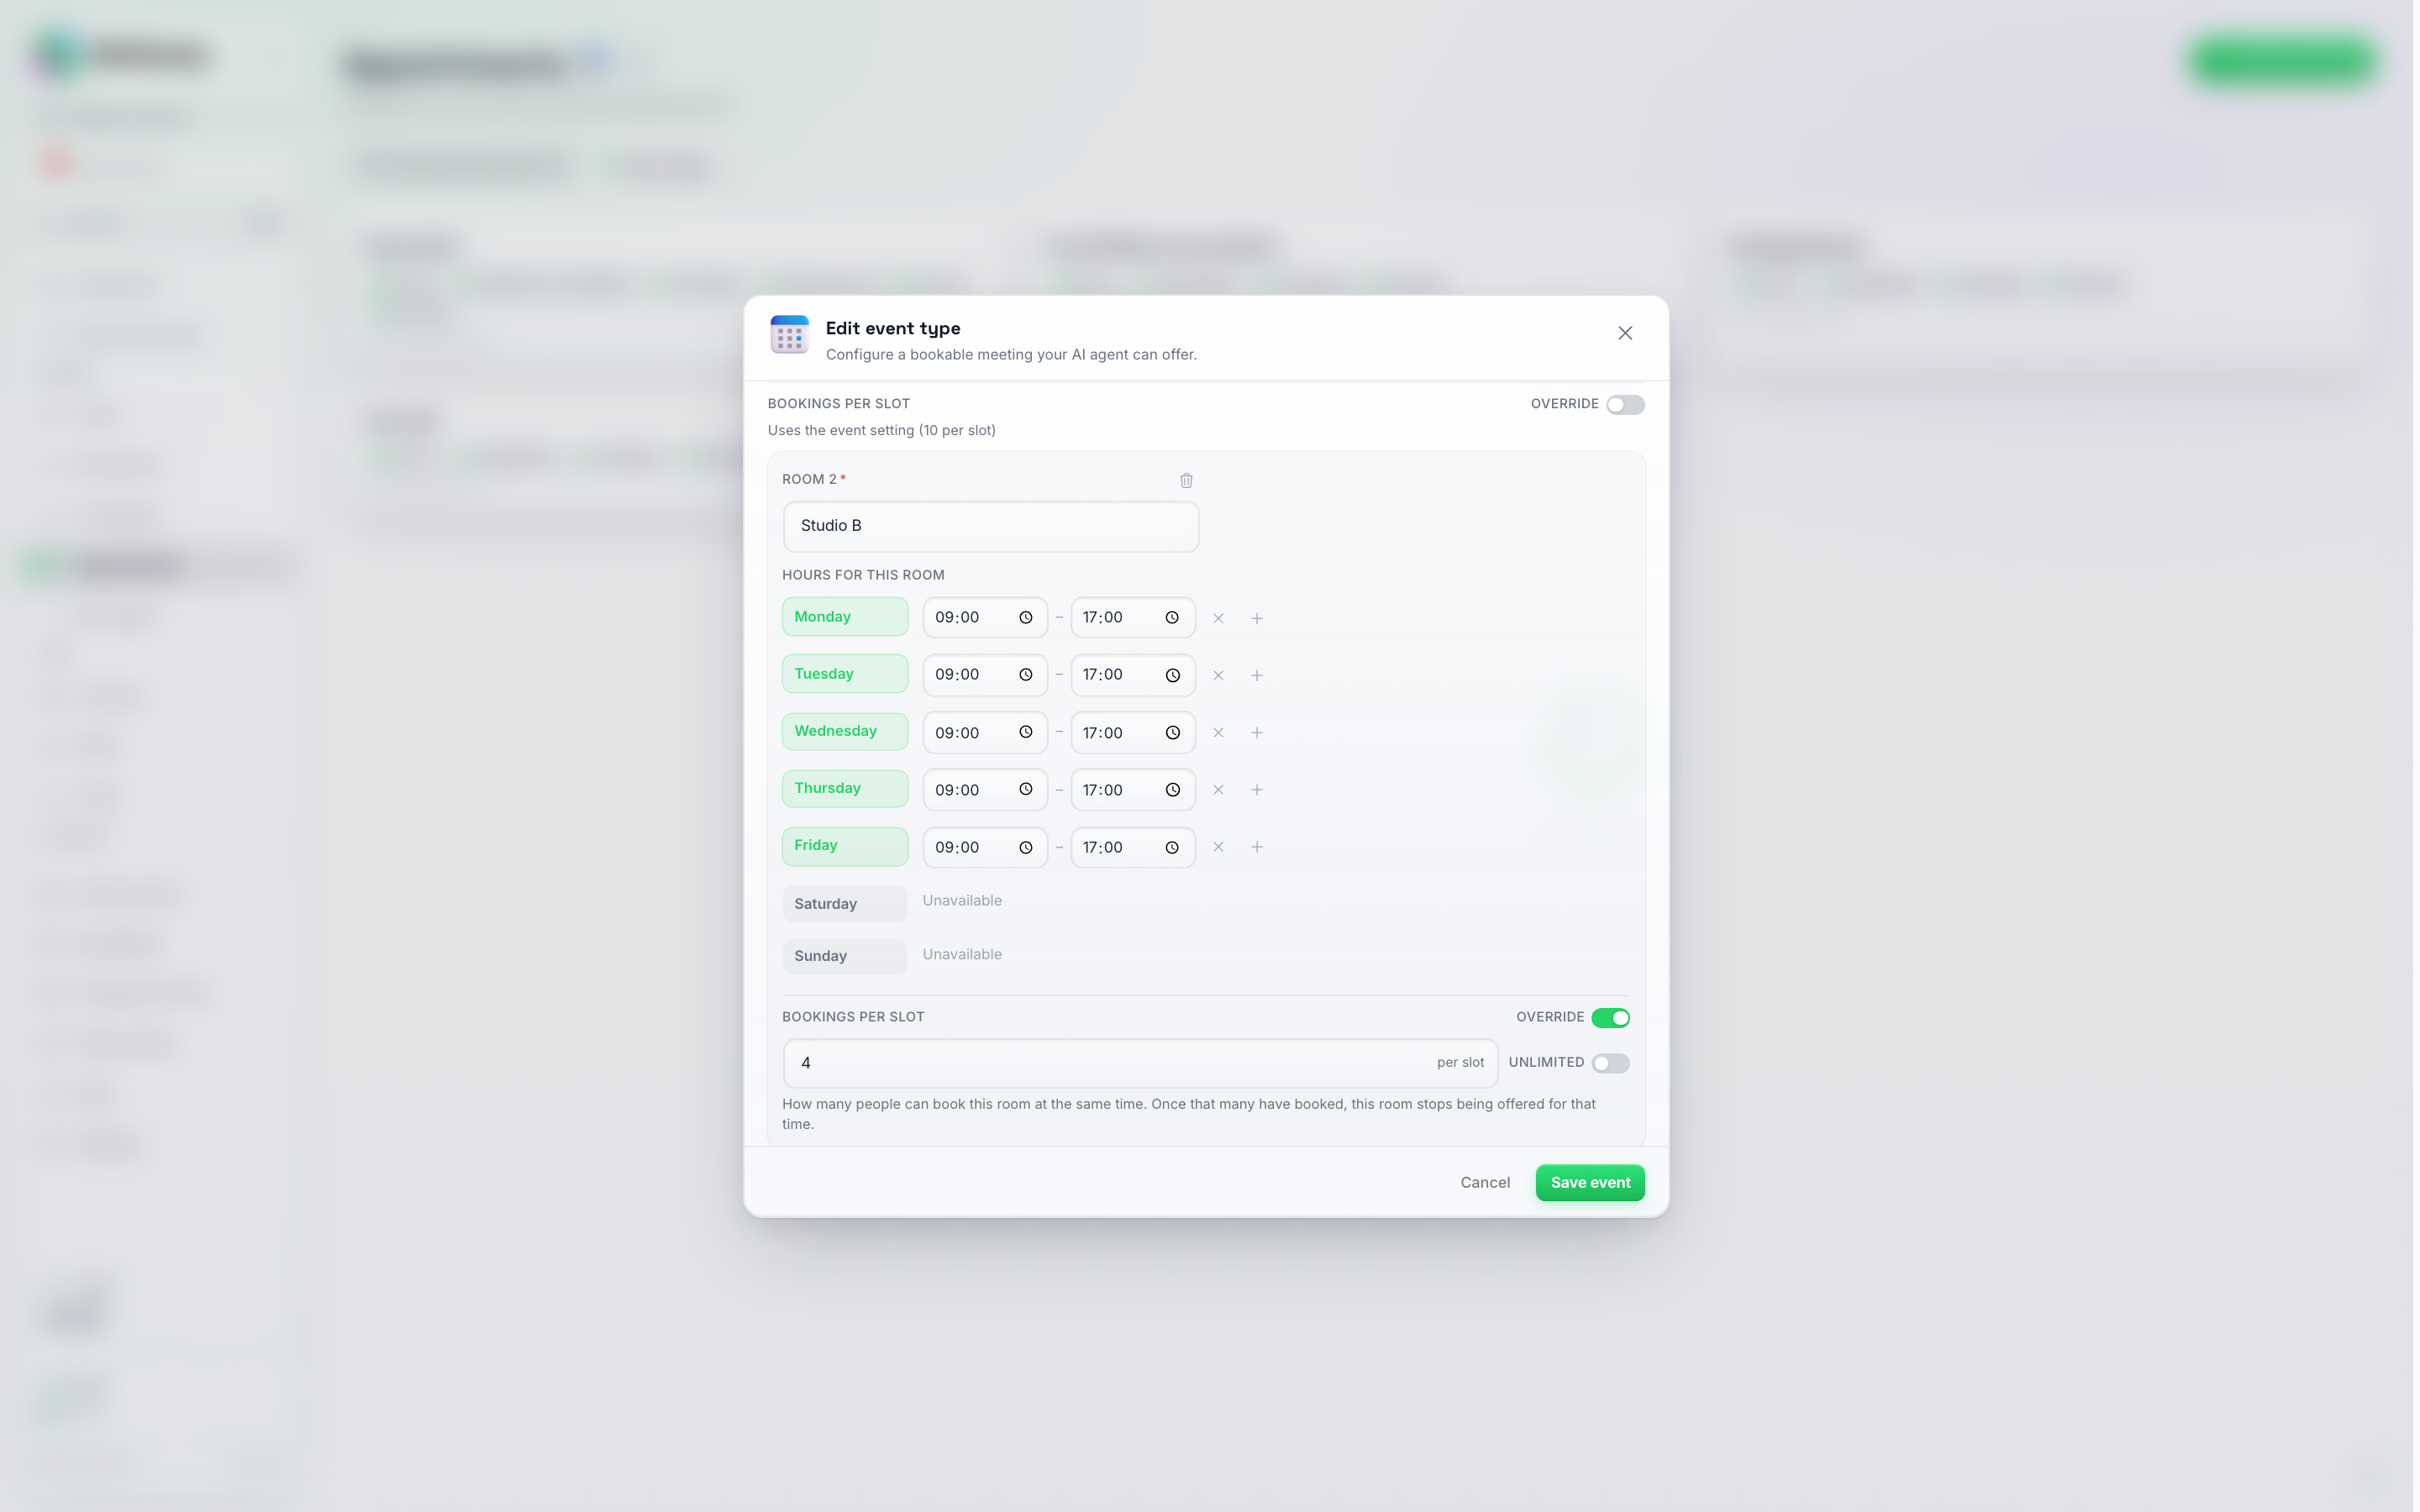
The first room follows the event ("Uses the event setting (10 per slot)"); the second has Override switched on and takes 4 bookings at a time. The Unlimited switch beside the number takes the limit off for that one room.
An example. A clinic runs one event type called “Session” with two rooms, and the event is set to 12 per slot. The group room follows that and takes twelve people at 6:00 PM. The treatment room has Override switched on with the number 1, so it takes one person at 6:00 PM and then stops being offered for that time, while the group room carries on filling up.
How many bookings that adds up to. With no overrides anywhere, the event’s number applies to each room: two rooms on an event set to 3 per slot is up to 6 bookings at the same time. Once a room has a number of its own, the total is simply the sum of each room’s own number, so a twelve-place group room next to a one-person treatment room is thirteen bookings at 6:00 PM.
On the Event Types tab, an event type whose rooms are not all on the same number swaps its per-slot chip for Varies by room. Open the event type to see what each room is set to.
Booking by hand, room by room. When you create an appointment yourself from the Upcoming Appointments tab and the event type has more than one room, a row of room chips appears above the times, each showing how many times that room still has open that day. Pick the room first, then the time; the booking is saved against that room, so its “2 left” badges and its own hours are the ones you see. With a single room there is nothing to pick and the times show as usual.
Booking with a specific person
If your rooms are named after real people or real things — barbers, doctors, chairs, cars — the AI can use those names in the conversation. Name a room “Alex” and a contact who asks for Alex gets Alex.
Here’s what the AI can do once your rooms have proper names:
- Say who is free, and when. “Alex is free at 10:00 and 10:30, Luan at 11:00” — instead of a bare list of times.
- Book with the person the contact asks for. “Can I have Alex on Thursday?” books Alex, and only Alex. If Alex isn’t free at that time, the AI says so and offers Alex’s next open times rather than quietly putting them with someone else.
- Keep the same person when a booking moves. Reschedule a contact who booked with Alex and they stay with Alex. If the new time only works with somebody else, the AI tells them who they’d be moved to instead of swapping people behind their back.
- Pick anyone when the contact doesn’t mind. “Whoever’s free at 3” works exactly as it always has: the AI takes the first room that’s open at that time. Prefer those bookings spread evenly across your people instead? Turn on Distribute bookings evenly in the event’s Rooms section — see Spreading bookings evenly. With it on, the AI also asks once whether the contact already has a preferred person before it picks for them.
Naming tips. The AI matches on the name, so a little care here goes a long way:
- Name each room after the person (or the thing) as your customers know them — “Alex”, “Dr. Bakker”, “Chair 3 — Sanne”, “Court A”.
- Use the exact same spelling everywhere: in the room name, in your AI instructions, and in anything you send out. “Alex Araújo” and “Alex Araujo” are safest kept identical.
- If two people share a first name, add something that tells them apart — the location, the surname, the specialty: “Alex — Centro”, “Alex — Norte”. Otherwise the AI cannot tell which one the contact means and will ask.
- The AI only ever uses names that are actually on your rooms. It won’t invent a colleague who doesn’t exist.
Leave the names generic and nothing changes. Rooms that are still called “New Room”, “Room 1” and “Room 2” are treated as interchangeable, exactly as before: the AI never mentions them and simply puts the booking wherever there’s space. That’s the right setup when your resources are identical from the customer’s point of view — ten identical cars, two identical treatment rooms.
The booking page uses the same names. When an event type has two or more named rooms, the public link shows a Book with row (Anyone, plus one chip per person) above the times, so visitors can pick their person there too. Generic room names show no such row.
Recurring Appointments
The platform supports recurring appointments for contacts who need regular sessions — perfect for ongoing coaching, therapy, training, or maintenance services.
- A recurrence has a frequency of Day, Week, or Month, plus an interval. For example, every-other-week sessions are Week with an interval of 2.
- A series can be limited so it ends after a certain number of sessions (for example, “repeat 10 times”).
Recurring appointments are tracked as a series, making it easy to manage ongoing client relationships without rebooking each time.
Booking Confirmation and Notifications
When a contact books an appointment through the AI, here is what happens:
- The appointment is created and appears on the Upcoming Appointments tab.
- A confirmation message is sent to the contact in the chat (for example, “Your appointment is confirmed for Tuesday at 2:00 PM”).
- If the contact has an email address on file, they also receive a confirmation email (replies go to your account email). This is controlled by the Send appointment email to contact switch on the event type, on by default. Note: this email is not sent for imported or Formitable bookings.
- The appointment syncs to your Google Calendar (if connected — see Google Calendar Integration).
- You receive a notification based on your Notifications settings. The booking email lists the contact’s name and phone, the event, the date and time, the meeting location, and any extra details the AI collected during the booking. When the AI booked the appointment in a chat, the email also has a short Conversation recap (two or three sentences on who the person is, what they want and anything worth knowing before the appointment, written in your account’s language) and a View Chat button that opens that conversation. The recap does not cost credits. Bookings made through your booking page or the API have no conversation behind them, so their email has the View Chat button but no recap. If you white-label, the button opens the chat on your own app domain. On an agency sub-account, the copy sent to the agency includes the recap but no chat button, because the agency’s link would open the agency’s own account. From the app itself, the appointment’s detail panel has a button to open the chat.
Want different wording in the confirmation email? The appointment confirmation is one of the emails you can rewrite in your own words, per language, under Settings → Email Templates. See Email Language & Templates.
Cancellation Handling
Both contacts and administrators can cancel appointments:
- Cancellation reason tracking — When an appointment is canceled, the reason is recorded so you can spot patterns (for example, if many contacts cancel due to scheduling conflicts).
- Status updates — The appointment status changes from “Confirmed” to “Canceled.”
- Calendar sync — Cancellations automatically sync back to Google Calendar, freeing up the time slot for other bookings.
- Formitable cancellations — For Formitable restaurant bookings, a dedicated cancellation link is provided.
Open an appointment from the Upcoming Appointments tab to reschedule or cancel it.
External Booking Platforms: Formitable, Zenchef and Trafft
Already run your bookings somewhere else? Five platforms can be connected directly, so the AI books in the system your team already works in instead of keeping a second calendar here.
For restaurants. Formitable, Zenchef, OpenTable and TheFork are restaurant reservation platforms the AI can use to handle table reservations directly in chat conversations — checking available tables and time slots in real time, and creating the reservation in both the platform and the restaurant system at once. Zenchef, OpenTable and TheFork support connecting multiple restaurants under one account, and each can be independently activated or deactivated. OpenTable and TheFork reservations also let the guest change or cancel through the same chat, within the restaurant’s cancellation policy.
For appointment businesses. Trafft is a scheduling platform for businesses that book people’s time rather than tables — salons, barbers, clinics, studios, consultants, repair shops. Connected, the AI can list your services and staff, check what is genuinely free in Trafft, book the appointment there, and cancel or move it later in the same conversation. Unlike the restaurant platforms, a Trafft booking also lands on your Appointments page and fires the Appointment Booked webhook like any other booking.
All of them — Google Calendar, Formitable, Zenchef, OpenTable, TheFork and Trafft — connect, disconnect and show their status in Settings → Booking & Calendar:
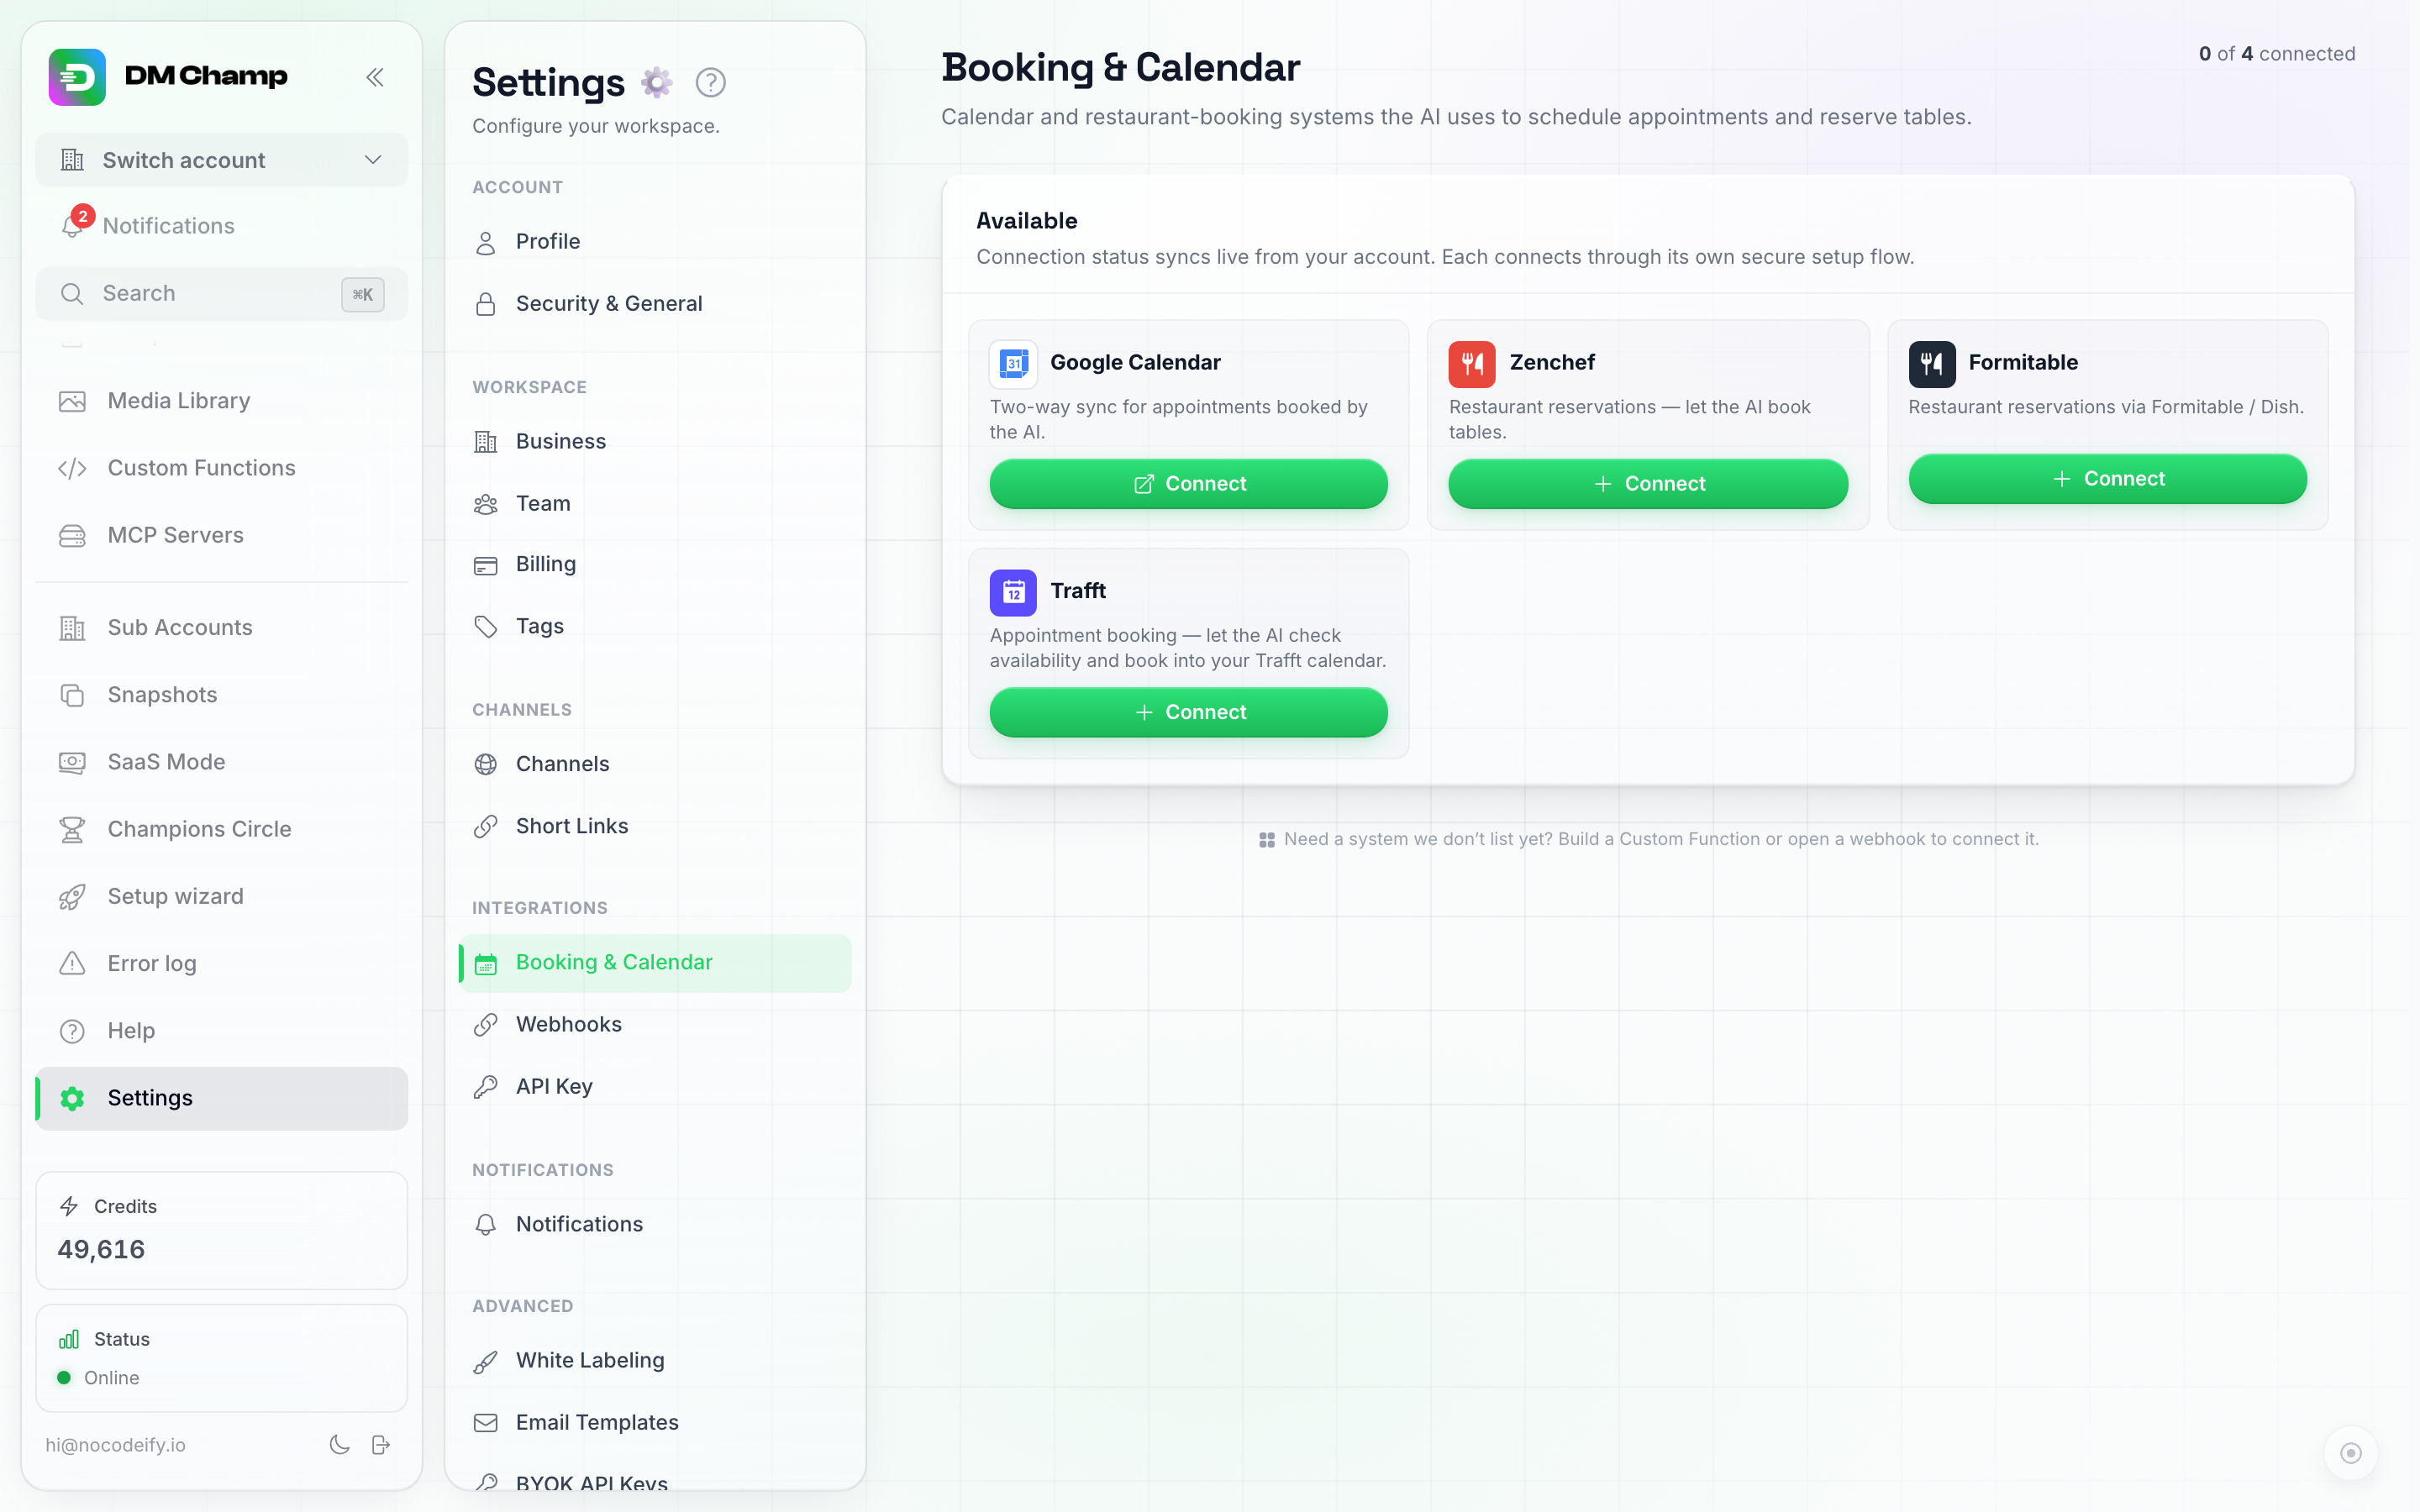
Settings → Booking & Calendar shows at a glance which booking systems are connected, and connects each one.
See Zenchef, Formitable, OpenTable, TheFork and Trafft for the setup steps.
To have your AI book with one of them, open AI Agents, open the Agent, go to its AI Abilities step and pick the platform as the booking provider in the Bookings section (see Turn on bookings for your AI).
Bookings Made Outside the Platform
Already keep your bookings somewhere else — your own CRM, a class schedule, another booking tool? You can still have them appear on the Appointments page: record each one through the API’s Book an appointment endpoint, or with the Create appointment step in an automation, giving just a title and a start time instead of an event type. They sit in the list next to everything else and can be rescheduled, cancelled or deleted the same way, and you get the usual booking notification — but since there is no event type behind them, nothing is checked against your availability and they are not added to your Google Calendar.
Import Calendar Events
Not currently available in the interface. This feature is described for reference, but it is not yet surfaced anywhere you can click to in the app. Reach out to support if you need to import existing appointments.
Importing existing appointments pulls events from your connected Google Calendar. Connect Google Calendar first, then choose which event type the appointments should attach to, and whether to match contacts by Email or Phone Number. The platform reads events from your linked calendar and links each one to a contact, creating a contact if needed.
This is useful when migrating from another scheduling system or when you want to bring existing calendar events into the app.
Need Help?
If you have questions about the booking system or integrations, reach out via our email support.