White-Labeling and Custom Domains
What Is White-Labeling?
White-labeling lets you put your own brand on the platform, so your clients see YOUR company name instead of ours. Your clients access the platform at your own web address (like app.youragency.com), see your company name and logo throughout, and have no idea they are using the platform under the hood. This is ideal for agencies and resellers who want to offer a fully branded messaging platform to their customers.
Prefer to see it? Click through the whole flow:
White-labeling is unlocked by the White labeling feature on your plan, not by a plan name. It is included on the Agency and Agency Unlimited plans and on AppSumo tiers 3, 4, 5 and 6. It is not included on the Business plan or on AppSumo tiers 1 and 2. To check, open Settings → Billing and look for White labeling under What’s included in your plan.
White-labeling also gates access to credit reselling (branded as SaaS Mode), which lets you sell credits to your sub-accounts at your own pricing. See Agency Accounts for details.
New here? This page is the full reference for every setting on the White Labeling panel. If you just want a step-by-step walk-through that gets you from “I upgraded to Agency” to “my first client logged in”, read White-Label Quickstart first.
Where to Find White-Labeling
- In the main sidebar, click Settings (near the bottom, below Sub Accounts).
- In the Settings menu on the left, scroll to the Advanced group.
- Click White Labeling. The main area now shows the White Labeling panel.
If you don’t see White Labeling under Advanced, your plan doesn’t include the White labeling feature — see Plan Requirements for White-Labeling below.
“Add your domain to switch on white labeling”
If the panel shows Add your domain to switch on white labeling instead of the cards below, your plan already includes white-labeling — you just haven’t added a domain yet, and there’s nothing for the panel to show until you do. This is a setup step, not a locked feature, so there’s no upgrade to buy.
Type the subdomain you want the app to run on (for example app.yourbrand.com) and click Add domain. That’s the whole setup: the cards described on the rest of this page appear straight away, and the Custom domain card gives you the CNAME to add at your DNS provider. You can change the domain later, so it doesn’t have to be final.
Two things to know about the domain you enter:
- Use a subdomain you control, not a bare domain, and enter it on its own — no
https://and no trailing slash. - Each domain can only belong to one account. If you get That domain is already in use, pick a different one.
A different message — White labeling isn’t included on your plan — does mean the White labeling feature isn’t included on your plan. See Plan Requirements for White-Labeling below.
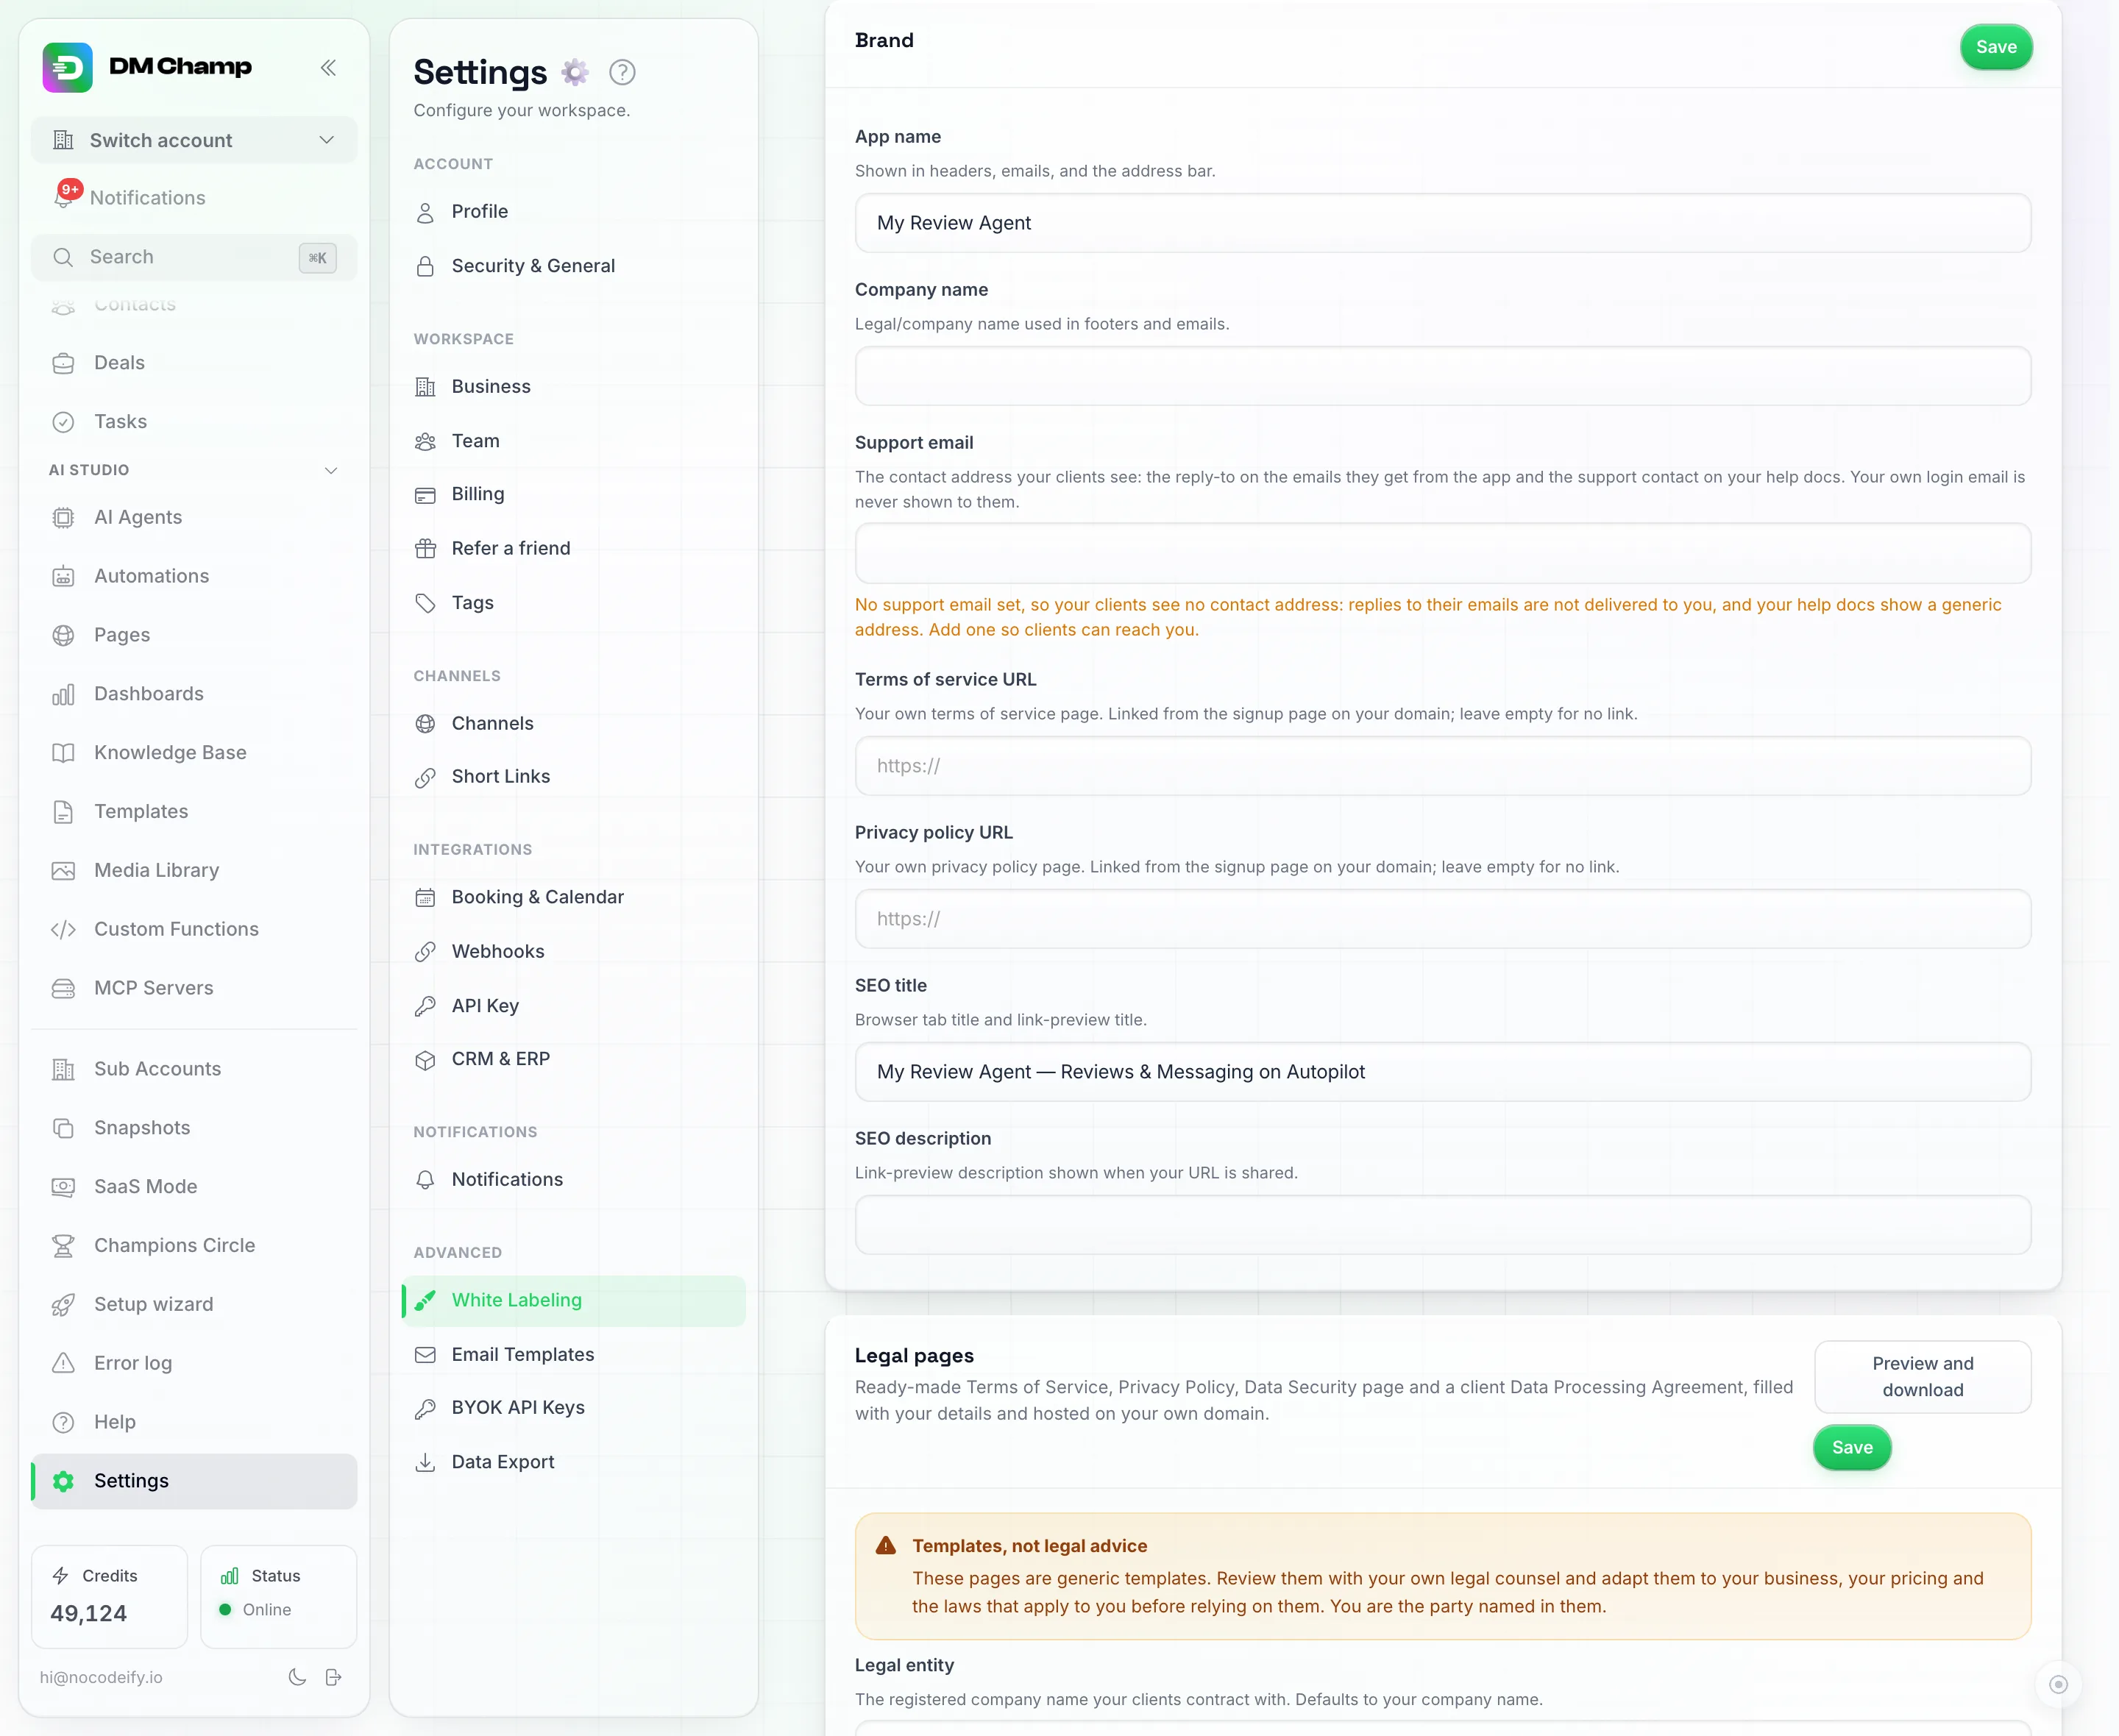
The Brand card — one card per section on this panel, each with its own Save button. The two URL fields feed the signup page on your domain.
Every card on this panel saves independently — there’s no single page-wide Save button. Fill in a card, click its own Save, move to the next.
White-Label Status
At the top of the panel, a status card shows whether your white-label is Active and reminds you that your branding applies across the app, emails, and all your sub-accounts. Activation itself is handled during provisioning — there’s nothing to switch on here; once your plan includes the White labeling feature, this shows Active and the cards below are yours to configure. Active here only means white labeling is switched on for your account. It does not mean your own domain is set up or working: your app domain (for example app.yourdomain.com) only works once you have added it under Custom Domain and its CNAME record points at us, and the managed mail domain and email sending each have their own card and status further down.
Brand
The first configuration card. Seven text fields:
| Field | What it does |
|---|---|
| App name | The brand name shown in headers, emails, and the browser address bar. Use your agency’s brand name (e.g. “YourAgency”), not a tagline. Required — the card won’t save without it. Until it is set, emails, page titles and the home-screen shortcut say “DM Champ”, a neutral placeholder, so your clients never see our name. |
| Company name | Your legal/company name, used in footers and emails. |
| Support email | The contact address your clients see: the reply-to on the emails they get from the app, and the address behind the “Contact Support” link at the bottom of every article on your branded docs domain. Your own login email is never shown to your clients. If you leave this blank, clients see no contact address: replies to their emails do not reach you and your docs show a generic address, and the Brand card shows a warning until you add one. Below the field you see the exact address your clients will see. |
| Terms of service URL | Your own terms page, hosted wherever you like (for example terms.yourbrand.com or a page on your website). The signup page on your domain links to it from its “I agree to the Terms” line. Leave it empty and that line shows plain text with no link; the platform’s own terms are never shown on your domain. |
| Privacy policy URL | Your own privacy policy page, same rules as the terms link. To show it in emails too, add it as a footer link under Email Branding. |
No terms or privacy policy of your own yet? The Legal pages card just below Brand hosts ready-made Terms, a Privacy Policy, a Data Security page and a client DPA on your domain, filled with your company details, and can fill these two URL fields for you. See Hosted Legal Pages for Your White Label. | SEO title | Browser tab title and link-preview title. Keep it under 60 characters. | | SEO description | The link-preview description shown when your URL is shared. Keep it under 160 characters. |
Click Save on the Brand card when you’re done.
Logo & Favicon
Four upload slots, each with its own preview and an Upload button (an up-arrow icon). Uploading replaces the current image immediately.
| Slot | What it’s for |
|---|---|
| Logo | Your main horizontal logo. Shown in the sidebar and on light backgrounds. |
| Logo (dark mode) | A version of your logo that stays readable when the dashboard is in dark mode. Leave it empty and your main logo is used everywhere. |
| Favicon | The tiny icon in the browser tab, on the dashboard and on your branded docs site. A square image (256×256 is safe) works best. Replacing it updates both within the hour. |
| App icon (square) | Your square mark. Used when a client installs the dashboard to their phone’s home screen (see Install as a Mobile App below), and in the sidebar when it’s collapsed. Phones keep the icon they installed with, so a client who installed the app before you uploaded or changed it needs to remove it from the home screen and add it again. |
Supported formats: the two logo slots take PNG, WebP, SVG or JPG. The favicon and app icon take PNG, WebP or SVG — no JPG. Maximum size: 5 MB each.
Why two logos? A logo designed for a white background often disappears on a dark one. Uploading a separate dark-mode logo keeps your brand sharp whether a client uses light or dark mode.
Upload a square app icon even if nobody installs the app. A collapsed sidebar is a narrow strip, so a wide logo has to shrink to fit and becomes unreadable. When you’ve uploaded a square icon, the collapsed sidebar shows that instead — the same way most apps show a compact mark. Without one, your main logo is squeezed into the space.
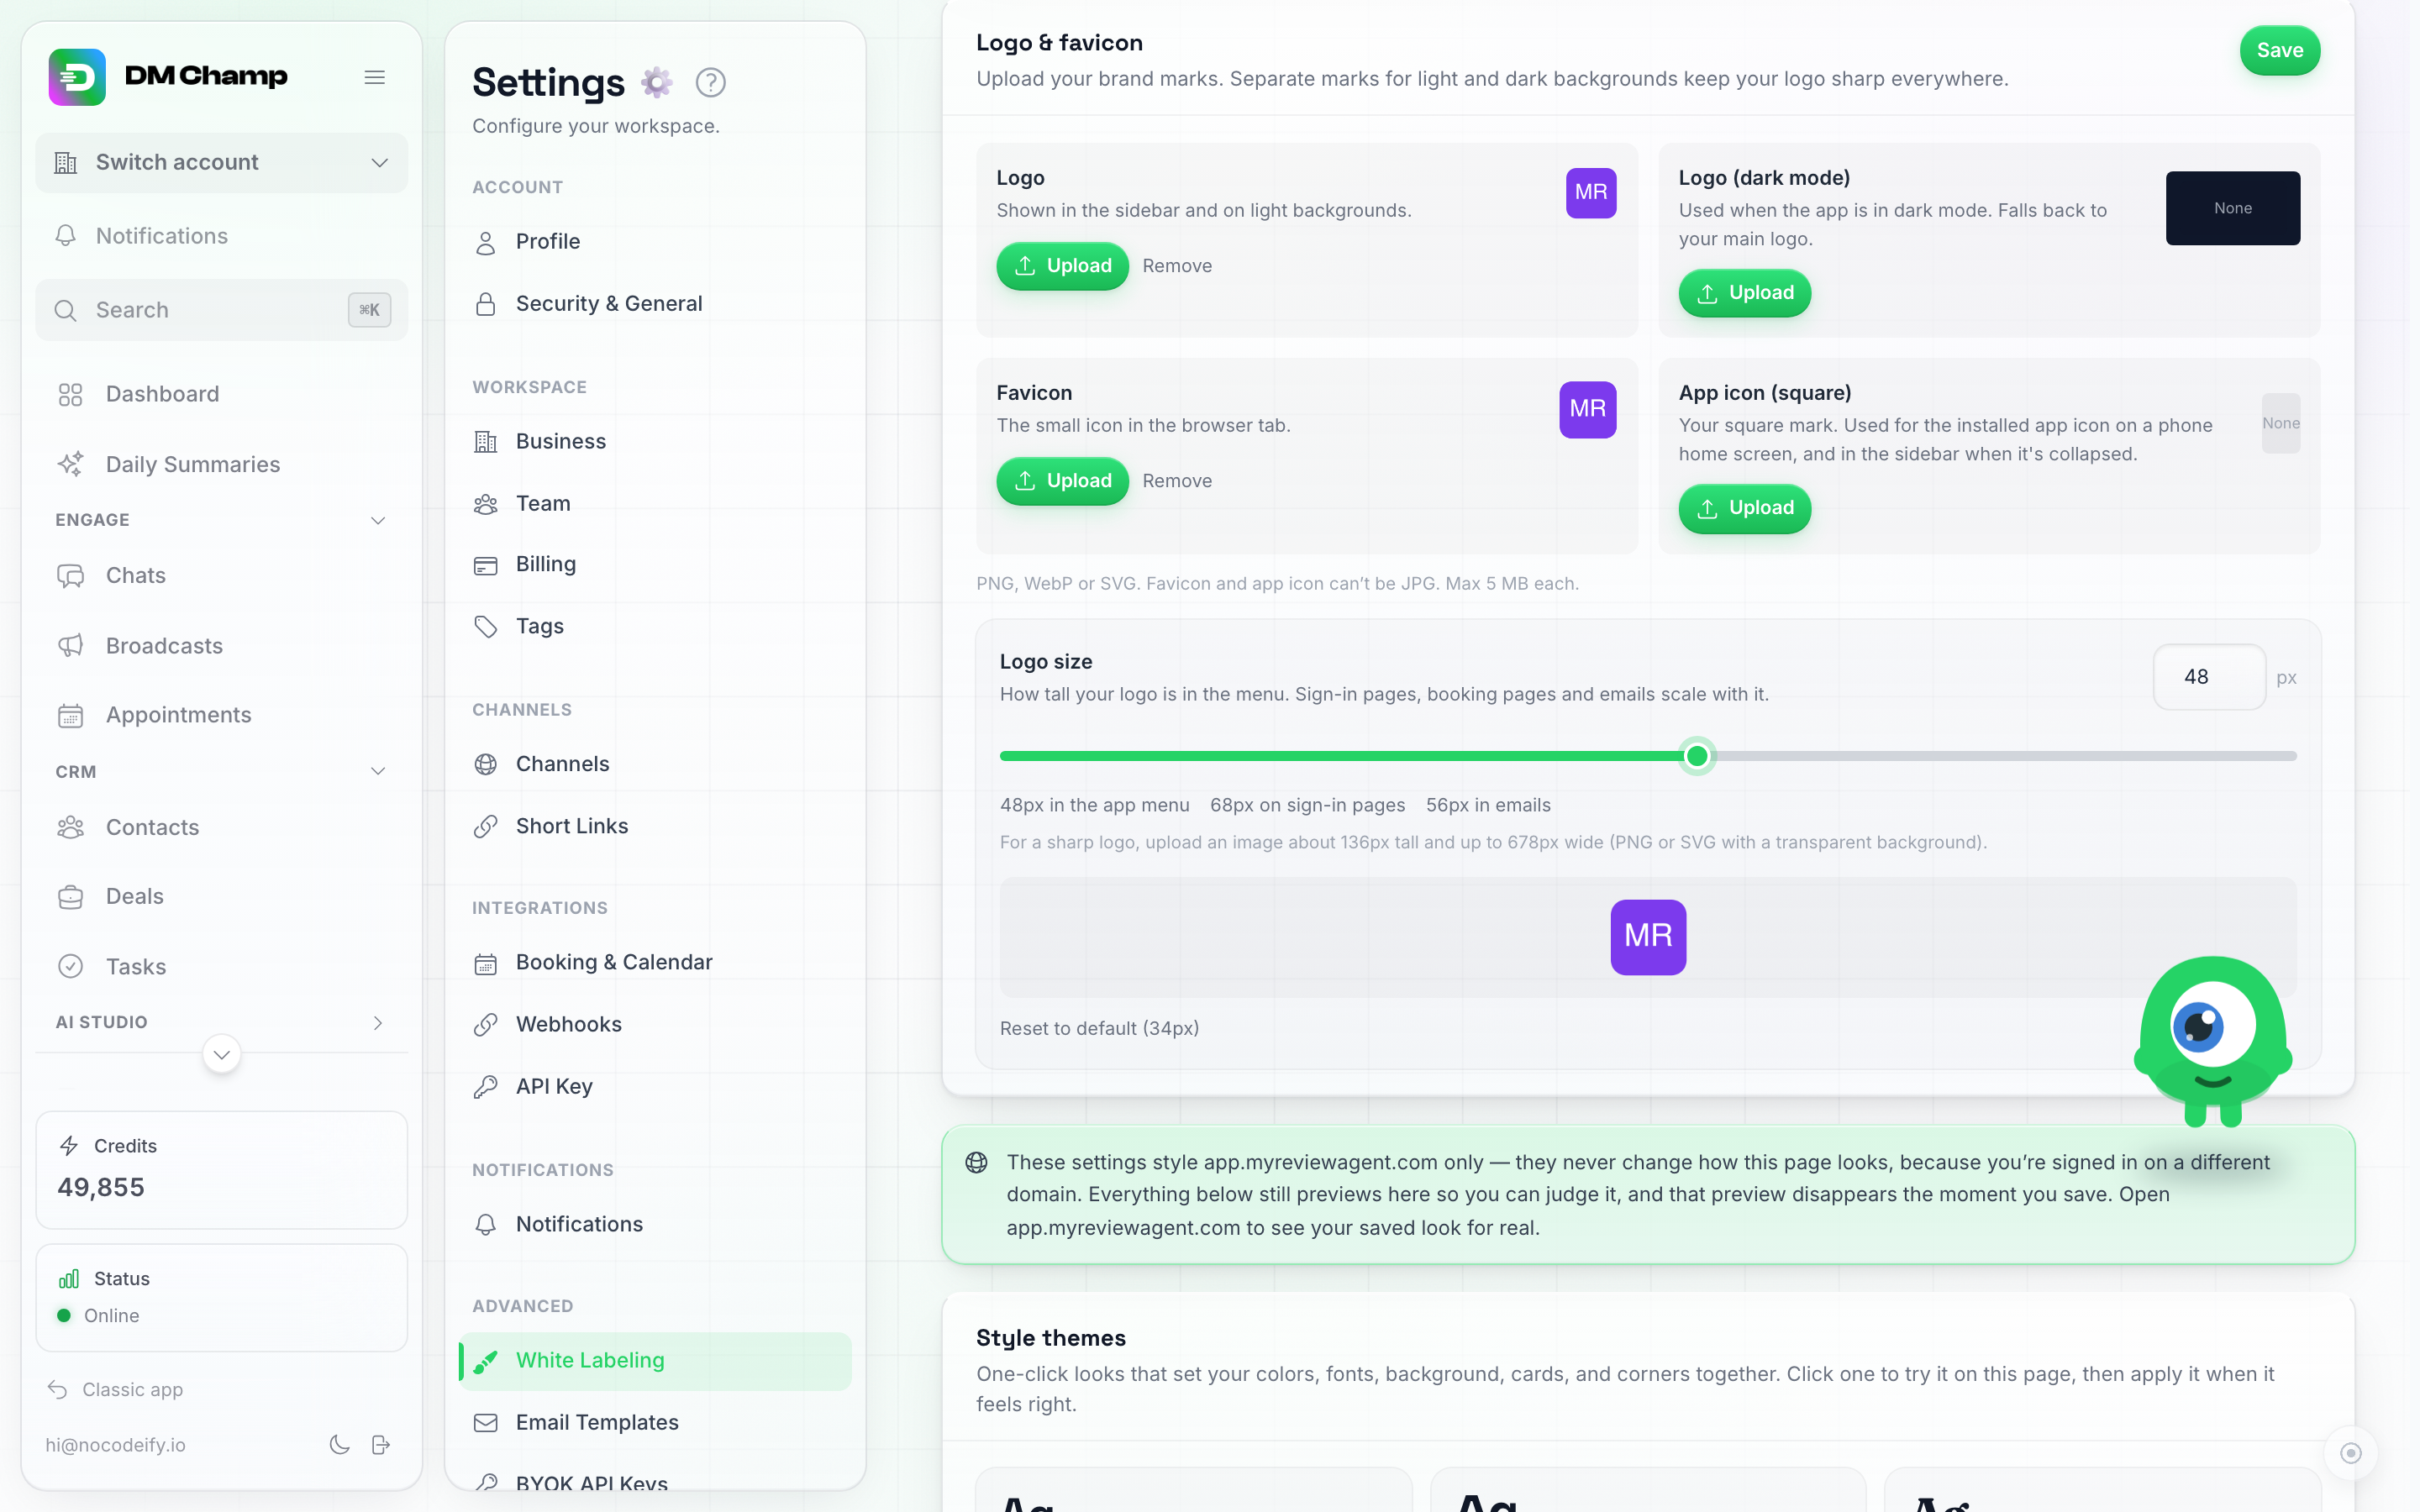
The four upload slots, with Logo size underneath. The line under the slider updates as you move it, so you always know what each surface will render at — here 48px in the menu. Logo (dark mode) and App icon show "None": until you upload one, the main logo and a default icon are used instead.
App name on the sign-in page
Under the upload slots is a Show the app name next to the logo on the sign-in page switch. It is off by default: the sign-in page shows your logo on its own, because most logos already spell out the name. Turn it on to show your app name under the logo. It saves as soon as you flip it. Without a logo, the sign-in page always shows the app name.
Logo size
Under the upload slots is a Logo size slider, with a box next to it if you’d rather type an exact number. It sets how tall your logo is in the menu, in pixels — anywhere from 20 to 72, with 34 as the standard size.
Everywhere else scales with it, so you set one number and the rest follows. As you move the slider the card tells you exactly what you’ll get, for example:
- 48px in the app menu — the sidebar your clients see all day
- 68px on sign-in pages — sign-in, sign-up and your public booking pages
- 56px in emails — the header of every email sent from your brand
- Your help docs — if you’ve connected a docs domain, the logo in the docs header and menu grows with it too
A preview under the slider shows your own logo at the size you’ve picked, and if you’re on your own white-label address the menu resizes as you drag so you can judge it in place. Nothing is saved until you click Save at the top of the card, and Reset to default (34px) puts it back.
What size image should I upload? The card tells you as you move the slider — aim for roughly double the height it shows, so the logo stays sharp on high-resolution screens. A wide logo also has a width limit on each surface: past a point, making it taller stops making it bigger, because the width runs out first. If your logo looks small even at a large setting, it’s usually very wide — trimming the empty space around it, or using a more compact version of your mark, gains more than the slider can.
The collapsed menu doesn’t change. When a client collapses the sidebar to a narrow strip there is only room for a small square, so that slot stays fixed — upload an App icon (square) for it in Logo & Favicon.
Colours
Four colour pickers, plus six ready-made palettes you can apply with one click.
- Primary Color — the main colour used for buttons and links throughout the dashboard. Defaults to WhatsApp green (
#25D366). - Accent Color — a secondary colour used for highlights and gradients.
- Success — used for positive states and confirmations.
- Danger — used for errors and destructive actions.
Click a coloured square to open the picker, or type a hex code directly into the field beside it. Click Save on the Colours card when you’re done.
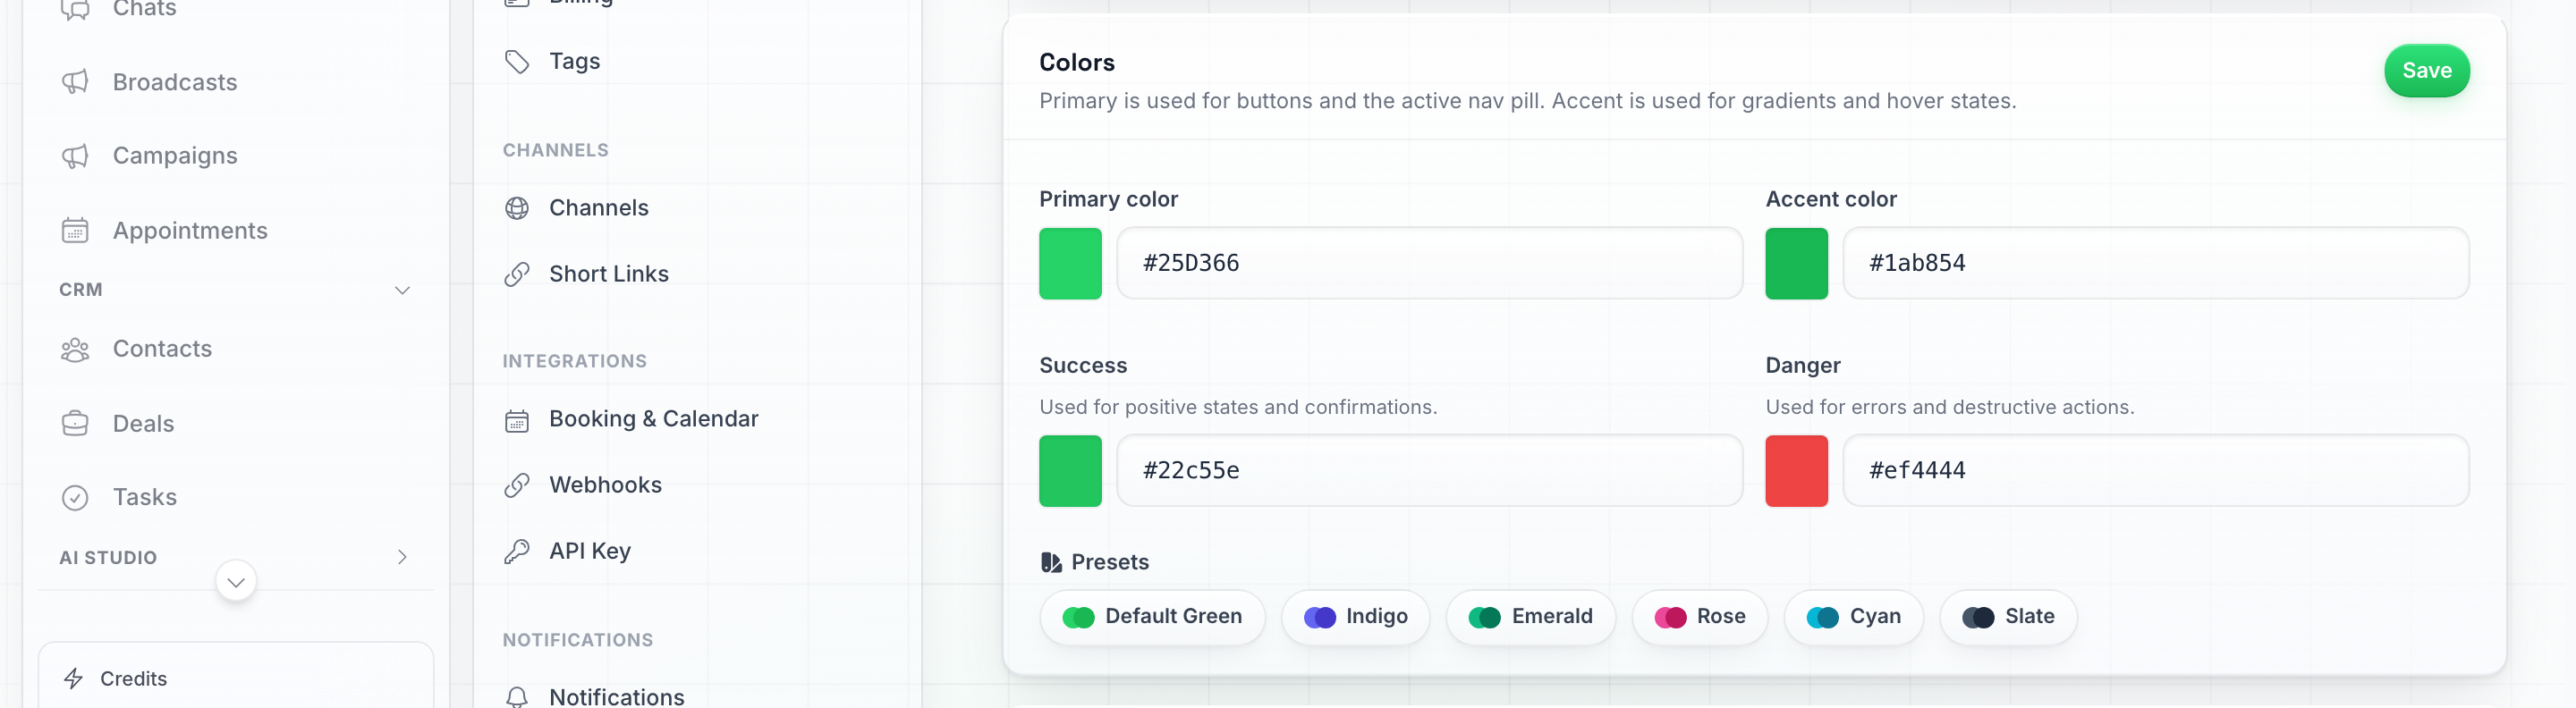
The Colours card: four pickers plus one-click presets (Default Green, Indigo, Emerald, Rose, Cyan, Slate).
Fonts
Two dropdowns — Heading font and Body font — pick from a curated list of professional fonts, both loaded automatically (nothing to install). A live preview underneath shows exactly how your headings and body text will look before you save. Leave either on the platform default to keep the built-in font. Click Save on the Fonts card to apply everywhere.
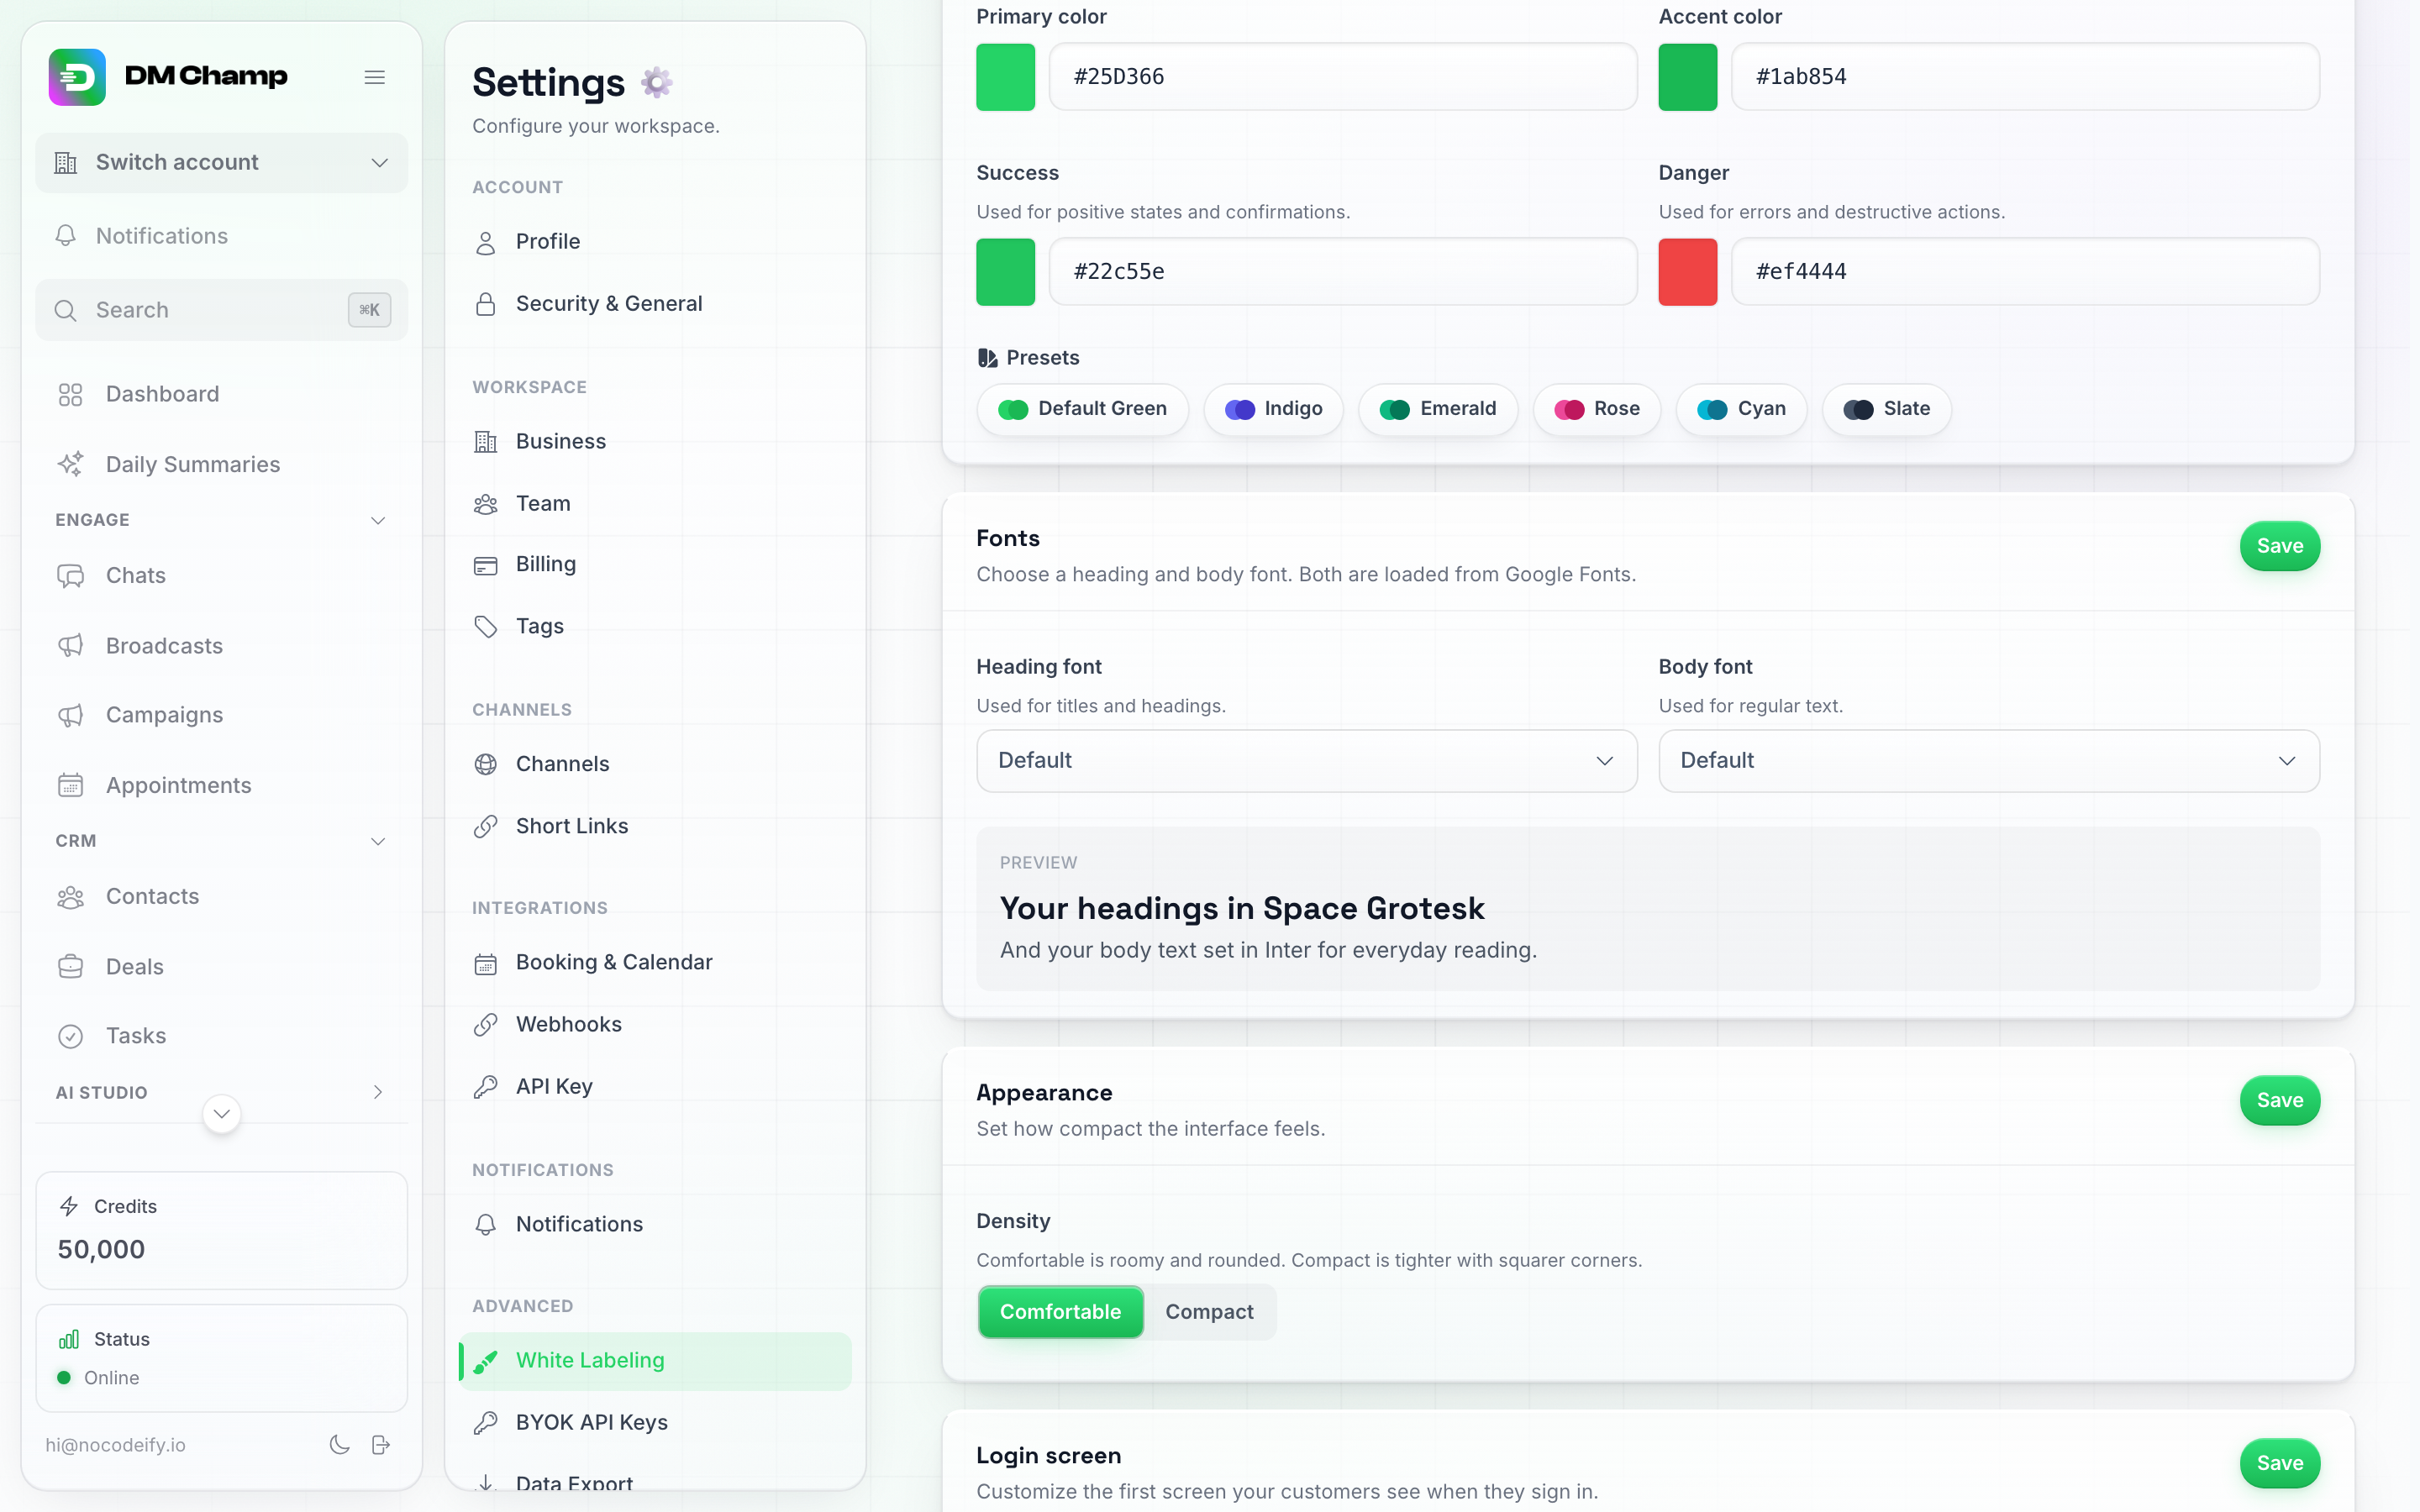
The Fonts card: Heading and Body dropdowns with a live preview underneath.
Style themes
Ready-made looks that set your colours, fonts, background, cards and corners in one go: Original, Nebula, Bloom, Ember, Tidal and Mono.
Click a theme and the page you’re on immediately shows it, so you can judge it for real instead of guessing. Nothing changes for your clients yet — a bar appears with Apply theme (saves it for everyone) and Discard (puts everything back). Your logo, login page and other settings are untouched either way.
A few examples of how different they feel: Nebula puts indigo on soft elevated paper cards, Ember is warm amber on boldly bordered flat cards, Tidal is crisp sky-blue hairline outlines on a grid, and Mono is black-and-white minimalism with sharp corners and no background decoration at all.
A theme is only a starting point: apply one, then change any individual setting below it. The theme card shows a check mark on the theme you’re currently on, and it disappears once you customise something.
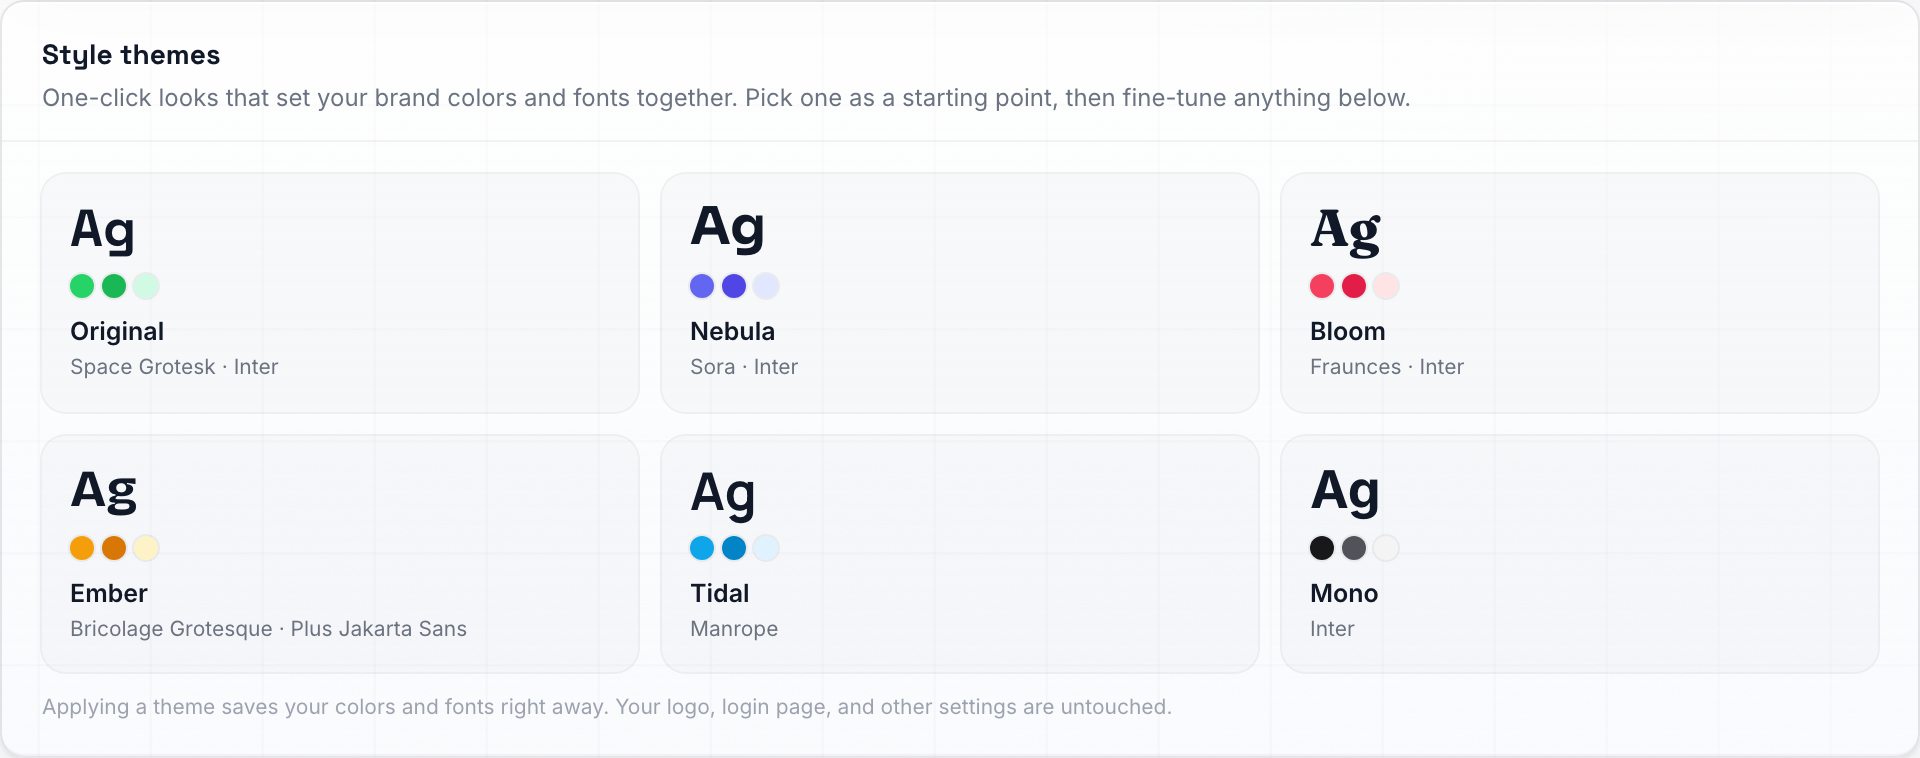
Style themes — one click sets your colours, fonts and whole appearance together.
Appearance
The overall look of your branded app. Every choice previews on the page the moment you click it — click Save to make it live for everyone, or navigate away to discard.
| Setting | What it does |
|---|---|
| Page background | What sits behind the content in light mode: Glow + grid (default), Glow, Bloom, Top glow, Grid, Lines, Zigzag, Dots, Ruled, Grain, or Plain. |
| Background motion | Backgrounds drift slowly by default. Switch off for a perfectly still background. |
| Card style | The material your panels are made of: Glass (default), Paper, Flat, or Hairline. |
| Corners | How rounded panels and buttons are: Rounded (default), Soft, or Sharp. |
| Decorations | The playful accent images around the app — empty states, and the waving hand on the sign-in screen. Choose Emojis (default 3D emojis), Line icons, Filled icons or Duotone icons (all in your brand colour), or None to remove them entirely. |
| Density | Comfortable (default, roomy spacing) or Compact (tighter spacing, more fits on screen). |
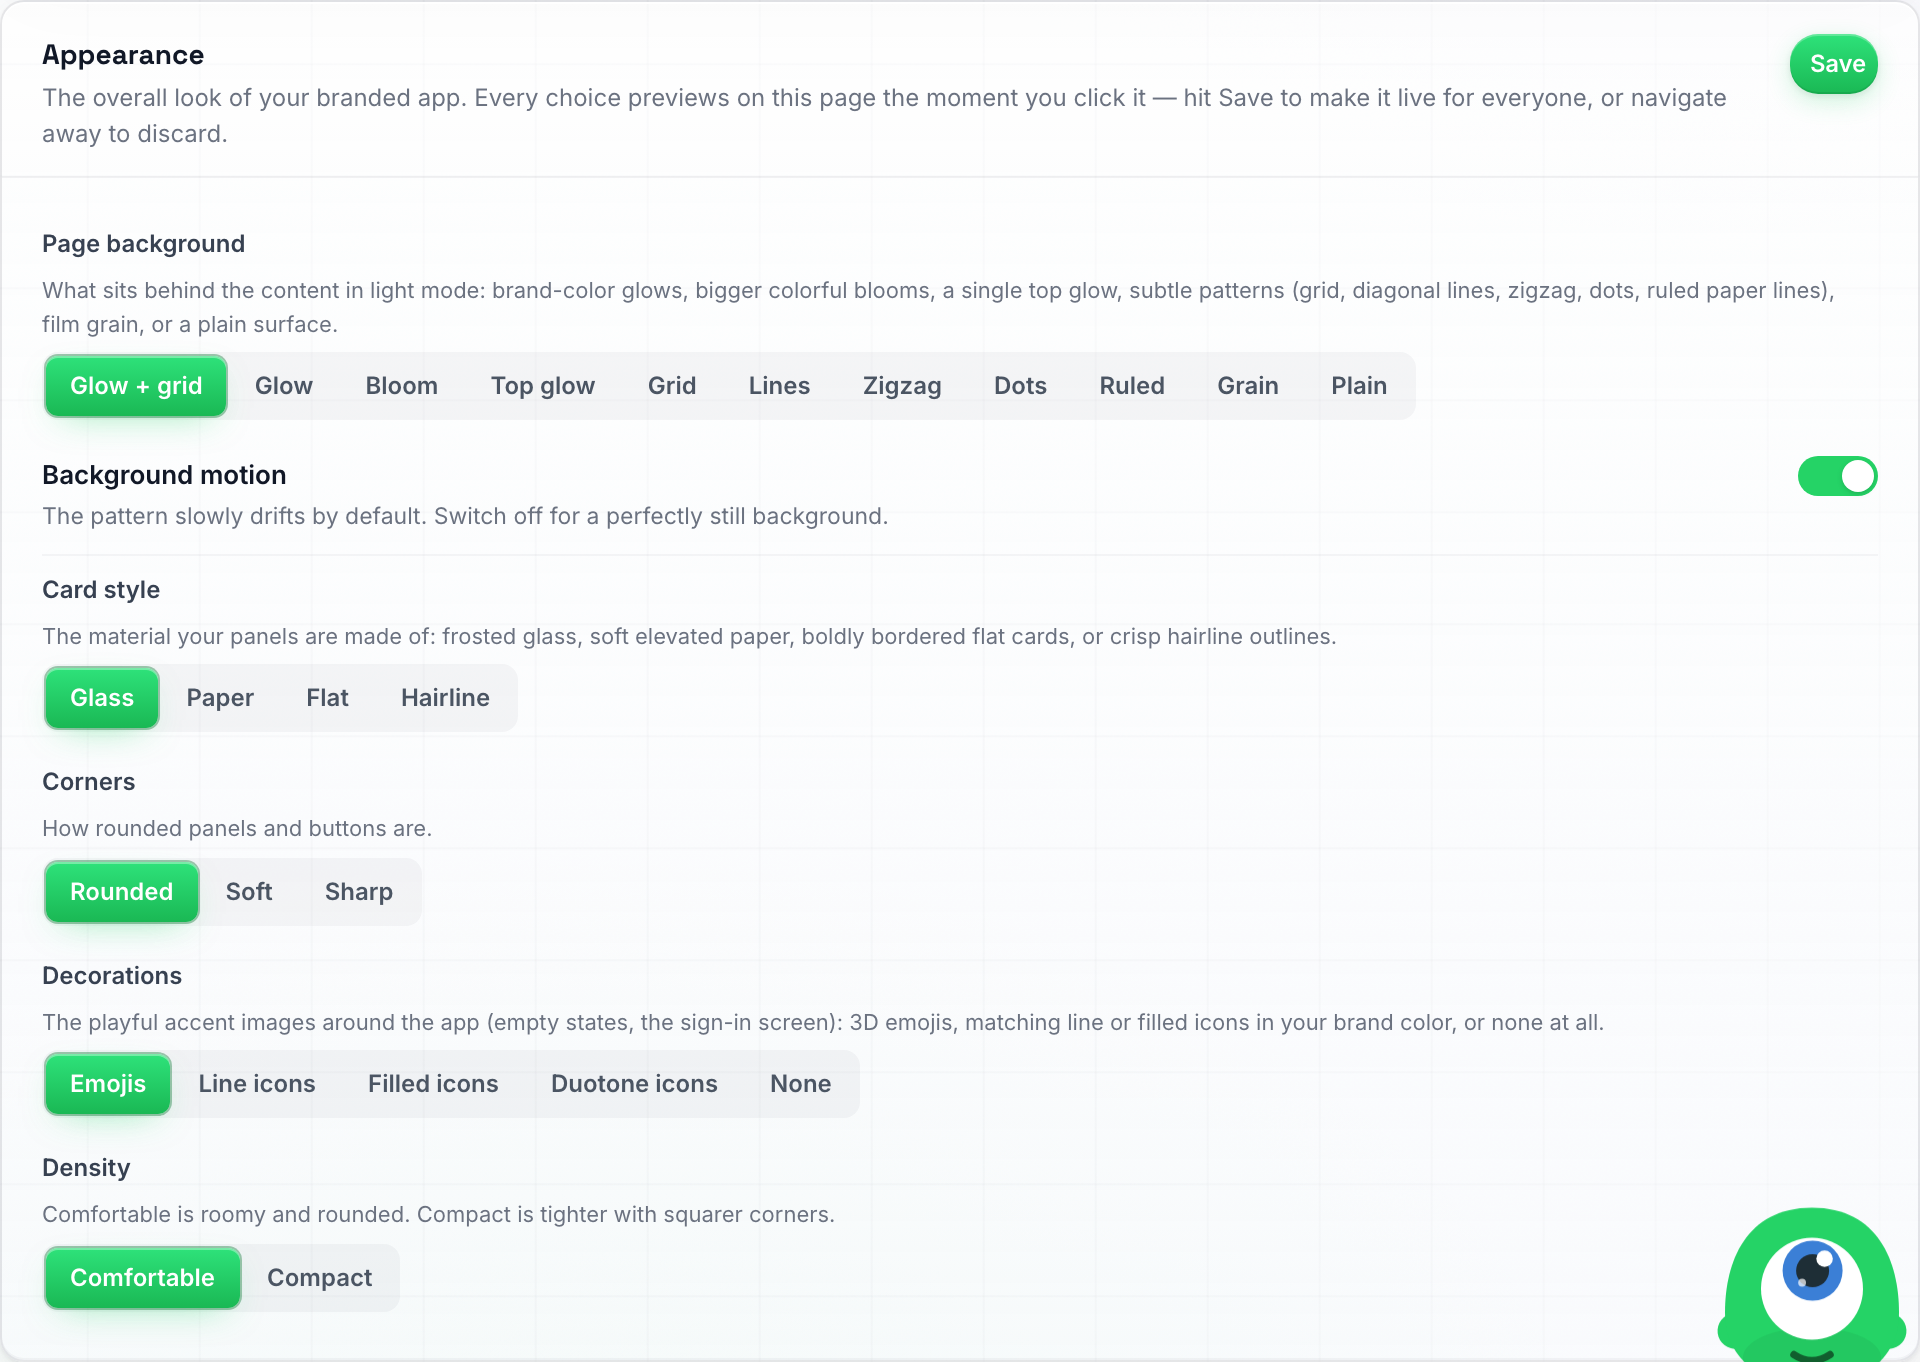
The Appearance card — the full look of your branded app, one choice per row.
To remove the waving hand from your sign-in screen, set Decorations to None and click Save. That hides every decorative image across your app, for all your clients.
Your clients can also override this for themselves under Settings → Profile → Decorations — that choice only affects their own browser, not your domain’s default.
Login Screen
Customise the very first screen your clients see when they sign in.
| Setting | What it does |
|---|---|
| Tagline | A short line shown under your name on the sign-in screen (for example “Welcome back”). Leave blank to use the default. |
| Background | Choose Default, Gradient, or Image. For a gradient, paste a CSS gradient (for example linear-gradient(135deg, #4f46e5, #06b6d4)). For an image, click Upload image and pick a file (PNG, JPG, or WebP, up to 5 MB) — a live preview appears, with Replace and Remove always available. |
| Meta Pixel ID | Your Meta (Facebook) Pixel ID, digits only. When a client signs up through one of your payment links, the sign-in page they land on fires this pixel with a conversion event. See Tracking Meta ads conversions below. Leave blank to fire nothing. |
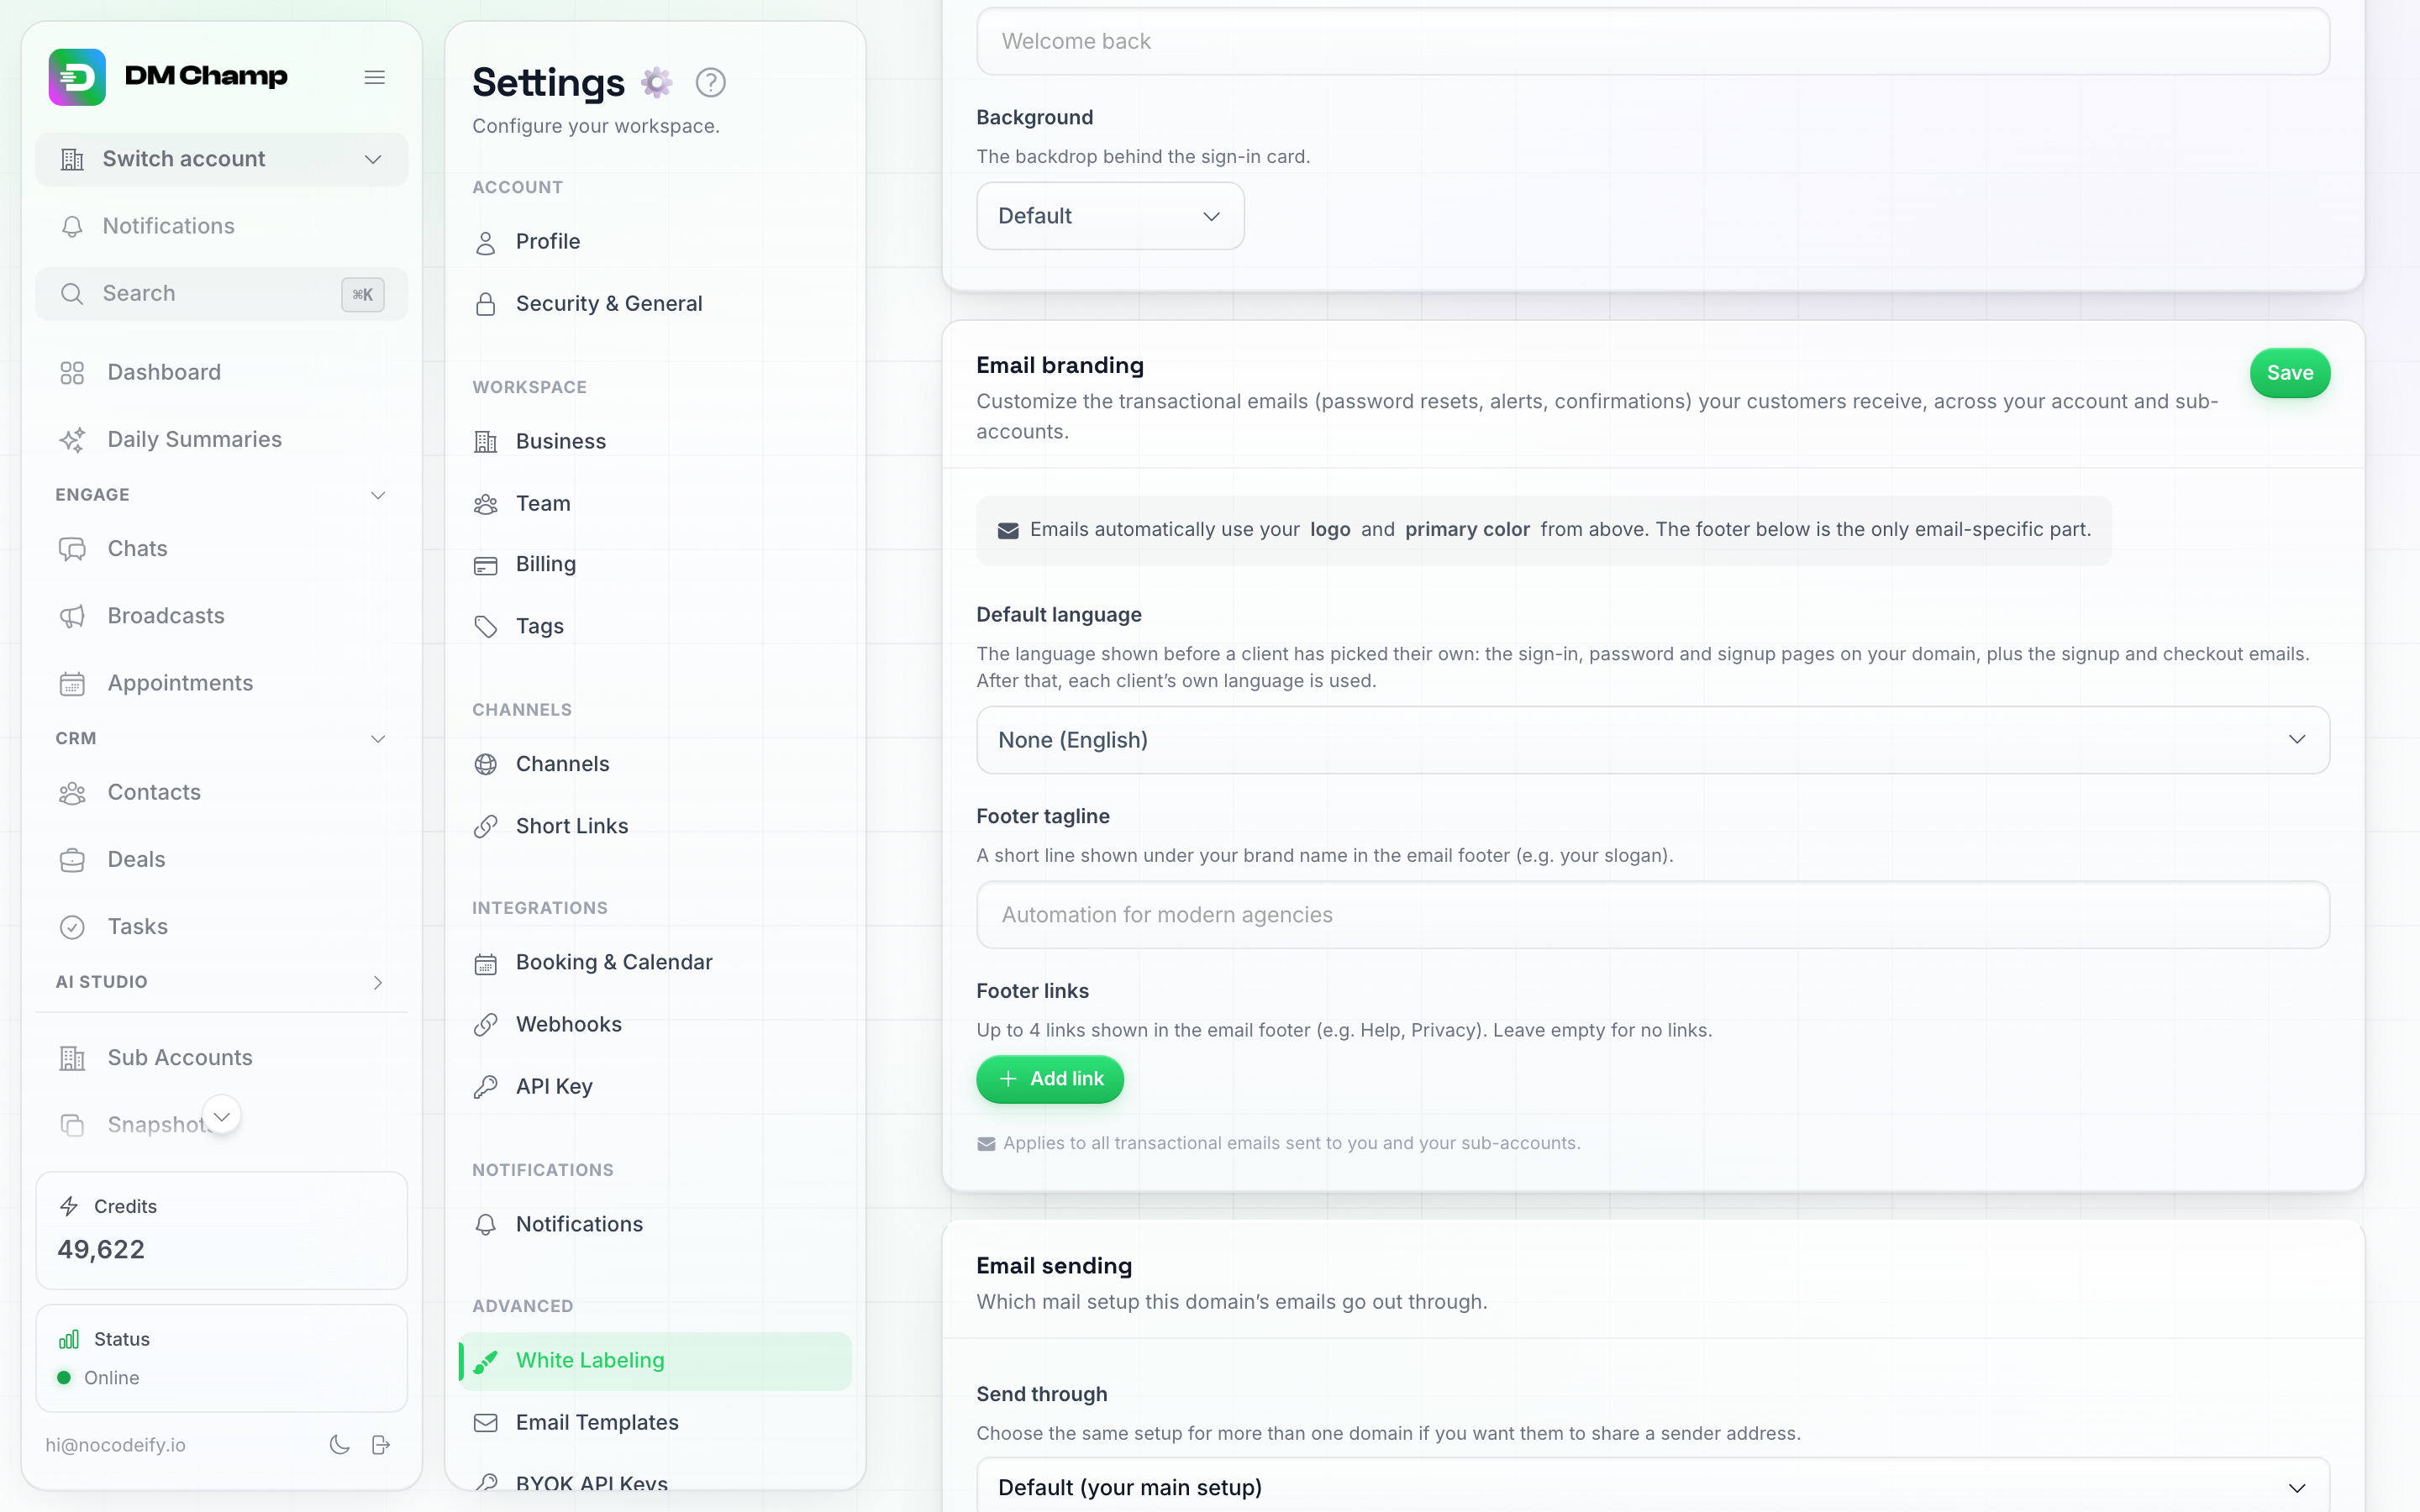
The Login Screen card's Tagline and Background fields (Background shown here at its default setting).
Click Save on the Login Screen card when you’re done.
Tracking Meta ads conversions
If you run Meta (Facebook / Instagram) ads for your own product, you will want to know which ads bring paying clients. The whole signup happens on pages you don’t host — your payment link, the checkout page, and then the sign-in page on your own domain — so you can’t add a pixel to it yourself. Paste your Pixel ID into the Meta Pixel ID field instead and the sign-in page on your domain fires it for you.
What fires, and when:
- Only when a client arrives on the sign-in page straight from a completed checkout through one of your payment links or your embedded pricing cards, on Stripe or PayPal. A normal visit to the sign-in page fires nothing.
- A
PageView, then aStartTrialevent if the plan started a free trial, or aPurchaseevent with the amount and currency if the client paid. Each checkout is reported once, even if the client refreshes the page. - Only your Pixel ID is stored. We load Meta’s own pixel script with that ID; there is no place to paste custom code.
Attribution works best when your marketing site and your white-label domain share a domain (for example youragency.com and app.youragency.com): the pixel on your marketing site and the one on the sign-in page then share the same browser cookies, and Meta ties the conversion back to the ad click on its own. On top of that, the ad click ID (fbclid) that Meta adds to your landing page URL is carried through the checkout when your page passes it on: add &fbclid=... to the payment link, or use the Copy Embed Code snippet from the SaaS Mode Payments tab, which forwards it automatically. See Share your payment links.
Find your Pixel ID in Meta Events Manager: open your pixel (data source) and copy the number under its name. You can check that events arrive with Meta’s Test events tab or the Meta Pixel Helper browser extension by running a test checkout yourself.
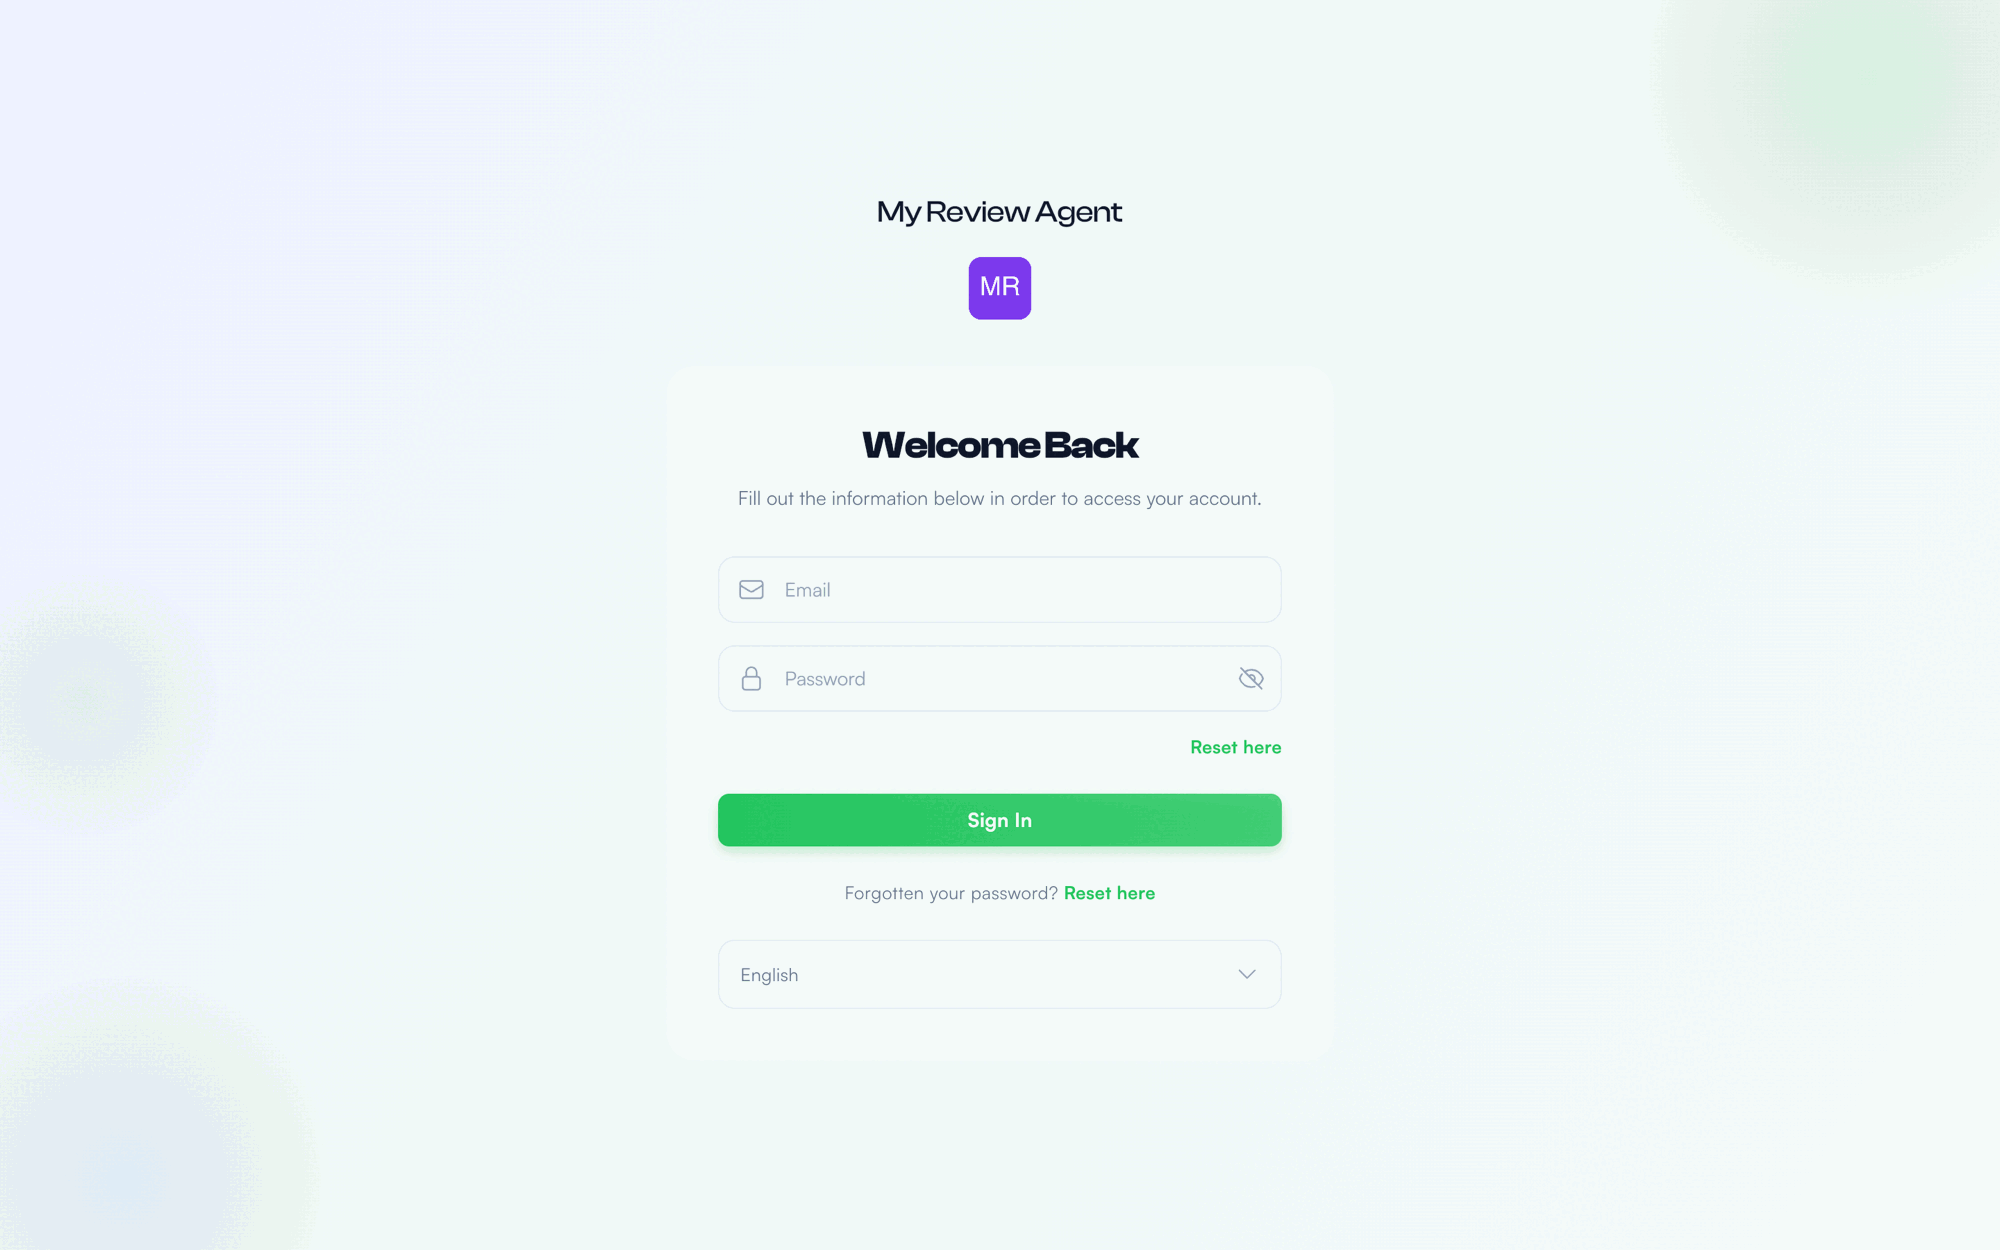
What your clients see: the login page on your own domain, with your name and logo — no trace of us.
Custom CSS
For a look the cards above can’t give you, the Custom CSS card takes your own stylesheet rules. They apply to every page of your white-label app, for you and for every client who signs in on your domain.
- Open Settings → White Labeling and scroll to the Custom CSS card.
- Paste or type your rules, for example
.btn-primary { border-radius: 4px; }. The counter under the box shows how much of the 20,000 character limit you have used. - Click Save on the card. Reload the page to see the result.
What is allowed:
- Styles only. Scripts,
@import,javascript:links,expression()andbehavior:are refused. If your CSS contains one of them, saving stops and the message names the part to remove. - Invalid rules are simply ignored by the browser, so a typo can’t break the app.
- You can’t add your own JavaScript or HTML. Tracking scripts, chat or onboarding tools and similar snippets can’t be injected into the app. For Meta ads tracking, use the Meta Pixel ID field instead.
Each white-label domain has its own Custom CSS, so a second domain can look different. To go back to the standard look, empty the box and click Save.
Class names inside the app can change when we update the interface, so keep your rules small and check your domain after big updates.
Email Branding
Below the visual settings, the Email branding card controls how transactional emails your clients receive — password resets, alerts, appointment confirmations, daily summaries — look. This applies to both your own account and all your sub-accounts.
Your emails automatically use the logo and Primary Color you set above — there’s nothing to re-enter, and the logo scales with the Logo size you chose there. The email-specific settings are the default language and the footer:
| Field | What it does |
|---|---|
| Default language | The language your domain shows before a client has picked one of their own: the sign-in, password-reset and signup pages, plus the very first emails (signup and checkout). After that, each client’s own setting is used. Leave it on None (English) to keep the sign-in page and those first emails in English. See Default language for the sign-in page below and Email Language & Templates. |
| Footer tagline | A short line shown under your brand name in the email footer — your slogan, for example. Leave it blank for no tagline. |
| Footer links | Up to four links shown in the email footer (for example “Help” and “Privacy”). Click Add link, give each one a label and a full https:// URL. Leave the list empty for no footer links. |
The Email branding card: a reminder that logo/color come from Brand and Colours above, then the default email language, the footer tagline and the footer links.
Click Save on the Email Branding card when you’re done — this saves independently of the other cards. The next email your account or any sub-account sends uses the new branding immediately.
Default language for the sign-in page
If your clients mostly speak one language, set Default language on the Email Branding card to it and your branded domain greets them in that language before they have signed in: the sign-in page (“Welcome back”), the password-reset and new-password pages and the signup wizard. It is the same setting that picks the language of the first emails, so one choice covers both.
A few things to know:
- It only applies to browsers that have never chosen a language on your domain. Someone who has signed in before, or picked a language from the sidebar menu or their profile, keeps their own language on the sign-in page, and every signed-in client always sees the language from their own profile.
- Each branded domain has its own setting, so a domain aimed at another country can greet visitors in a different language.
- If you are checking your own domain and still see English, it is most likely because your browser already has a language of its own from earlier sign-ins. Open the page in a private window to see what a new visitor gets.
- A client who has never picked a language of their own also gets their daily summaries in this language.
- Leave it on None (English) and the sign-in page stays in English until the client signs in.
Tip: If you’ve connected your own email provider (Mailgun or SMTP — see Custom Email Provider), these branding settings still apply on top of it. The provider controls which mailbox the email is sent from; Email Branding controls what the email looks like.
Custom Domain
The Custom domain card is where you point your own web address at the platform.
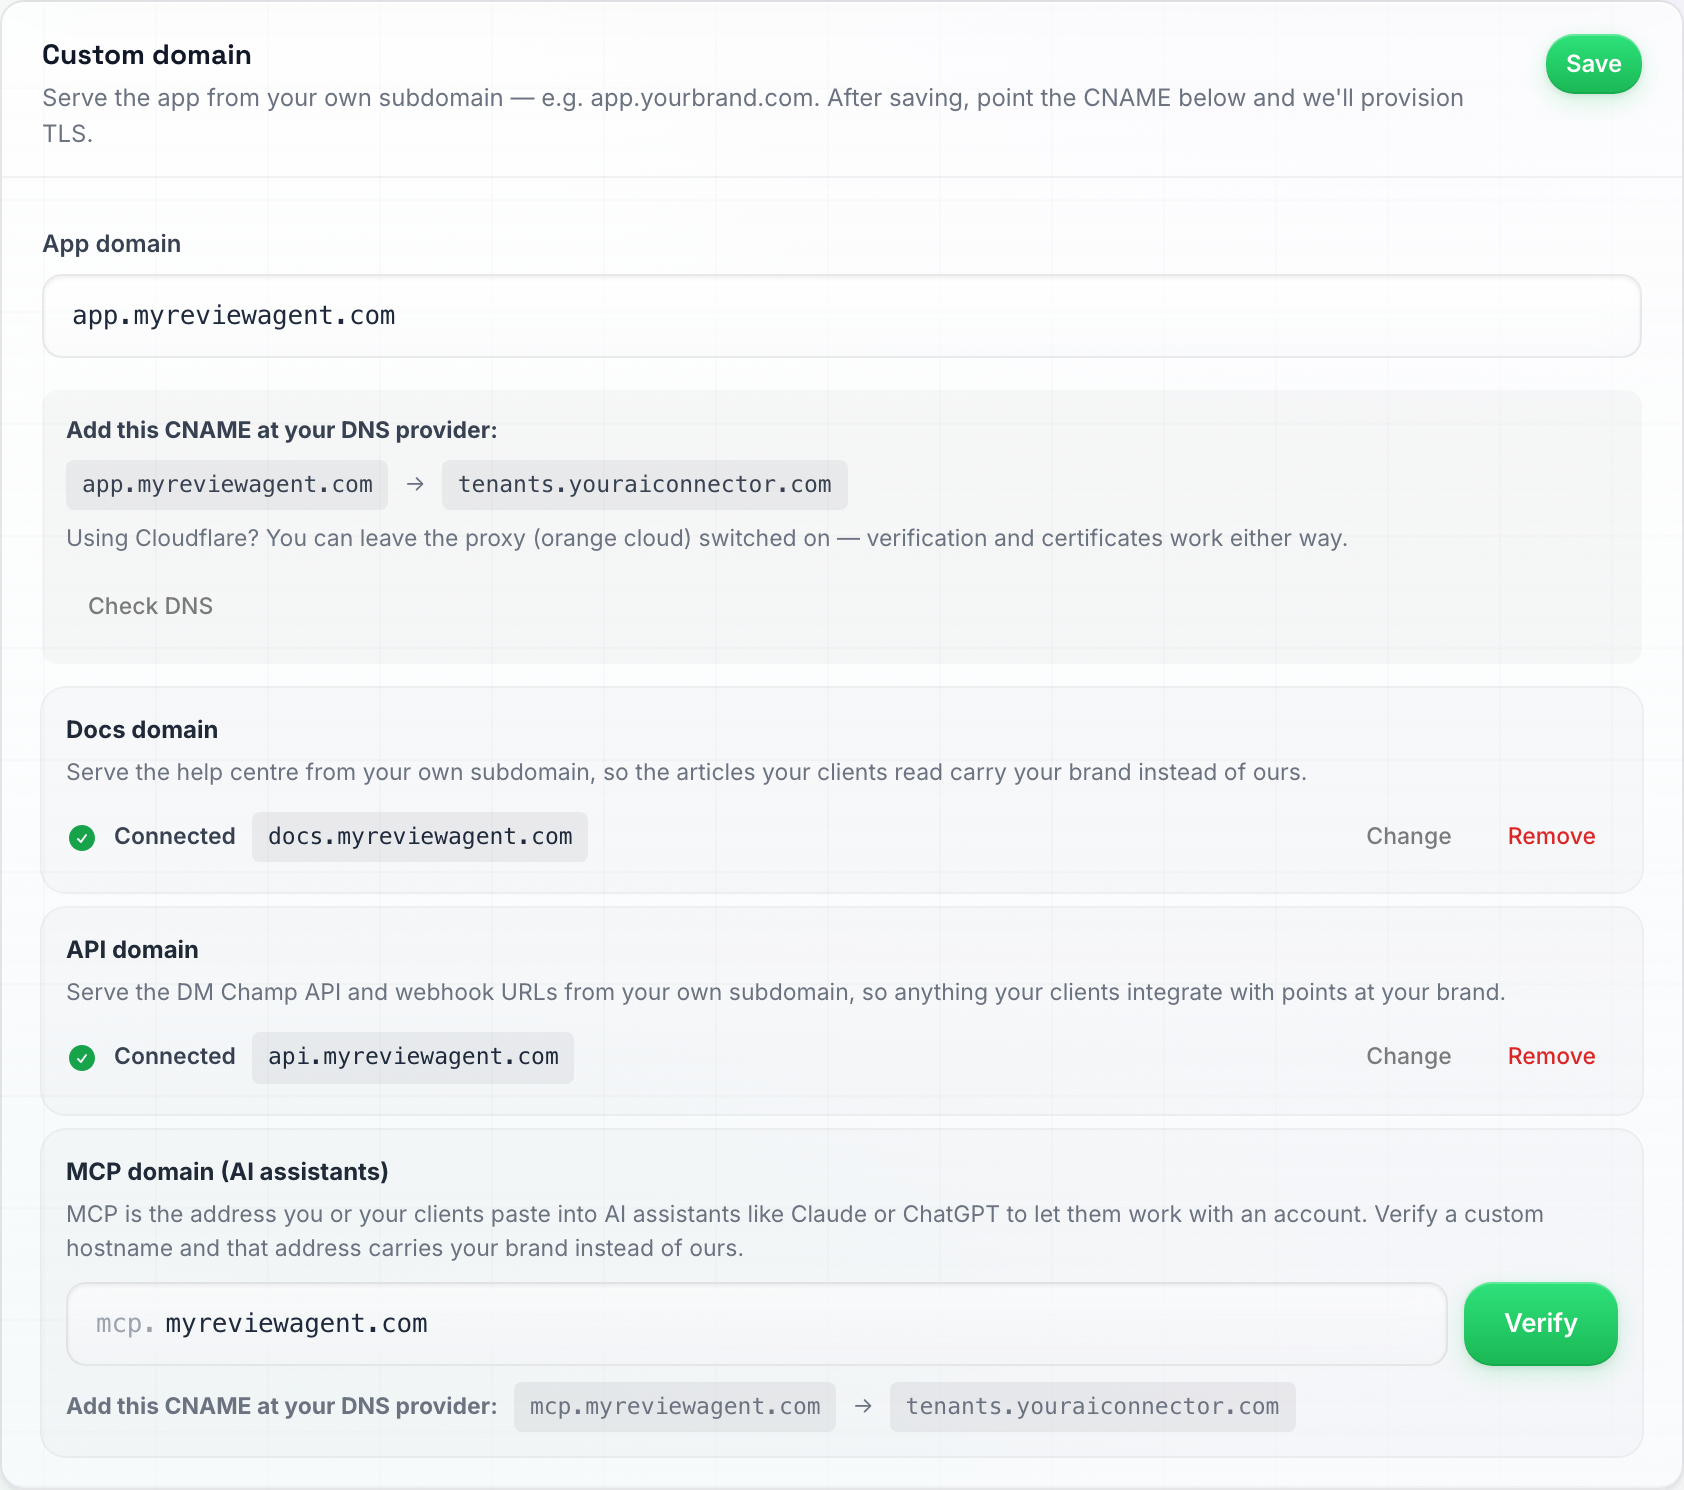
The Custom domain card. Docs and API here are already verified — a green Connected line with the address. MCP is not yet, so it shows its field: the mcp. label is fixed and only the base domain is yours to fill, pre-filled from the app domain.
Adding your domain
- In the App domain field, type the domain you want (for example
app.youragency.com) — nohttps://and no trailing slash. - Click Save.
Pointing the DNS
Once saved, the card shows the CNAME record to add:
app.youragency.com → tenants.youraiconnector.com
Log in to your domain registrar (GoDaddy, Cloudflare, Namecheap, etc.), find its DNS settings, and add a CNAME record with your domain as the host and tenants.youraiconnector.com as the target. Leave TTL at the default.
Using Cloudflare? You can leave the proxy (the orange cloud toggle) switched on — verification and certificates work either way. One setting does matter though: go to SSL/TLS → Overview and set the encryption mode to Full (strict), not Flexible. On Flexible, Cloudflare and our servers each keep handing the visitor back to the other, and the page fails with a “too many redirects” error.
After the CNAME is in place, the platform automatically detects it, verifies ownership, and provisions a security certificate (TLS/SSL) — that’s what gives you the padlock icon and https://. You don’t buy or install anything, and certificates renew automatically forever. This typically takes anywhere from a few minutes up to an hour; DNS propagation itself can occasionally take longer depending on your registrar.
Don’t visit your domain before it’s live. Opening the address in a browser before DNS and the certificate finish provisioning can cache a broken page. If that happens, try again in an incognito/private window once the domain resolves normally.
Your domain shows a notice page instead of a dashboard? Domains set up a while ago may still point at our previous host, which served the classic app — and that app was switched off on 15 August 2026. An address left on the old host no longer opens a dashboard for you or for any client on it; everyone who visits it sees a neutral notice page instead. The fix is the same CNAME above: point
app.youragency.comattenants.youraiconnector.com. Nothing else changes — accounts, data and logins are untouched, and the address starts working again by itself within minutes of the change going live. We emailed every agency still on the old host with the exact domain to change.
If your domain stops pointing at us
We check every connected app and API domain once an hour. When one of them no longer reaches us (the DNS record was deleted or changed, or the domain expired), the account owner gets an email naming the domain, with a link to the White Labeling settings. The email is sent once when the problem starts, and at most once a week while it lasts. Nothing is sent for a short hiccup: a domain has to fail two checks in a row.
While the domain is broken, links we send to your clients (team invites, chat links, checkout pages) keep using your domain. We never switch them to one of our own addresses, because that would show your clients whose platform is behind your brand. Those links start working again as soon as the domain is fixed. To fix it, put the CNAME record for the domain back at your registrar, pointing at tenants.youraiconnector.com, then click Verify on the Custom domain card if it asks you to.
When your subscription ends
Your app domain only works while your agency account is active. If your subscription is cancelled, your licence is deactivated, or your account is blocked for an unpaid invoice, anyone opening your app domain sees a “This workspace has closed” page instead of the sign-in. Clients who were already signed in see the same page. Your branding is no longer shown there: the page names the platform your workspace was built on and points your clients to its plans so they can continue directly. Your docs domain follows the app domain: anyone opening it is sent to that same page.
Nothing about your domains changes, so you don’t need to redo any DNS. As soon as you subscribe again, both domains serve your branded app and docs again within about a minute.
Docs, API and MCP domains
Below the app domain, the same card carries three more addresses you can put on your own brand:
- Docs domain (for example
docs.youragency.com) — the help centre your clients read. It carries your name and logo throughout, and the articles follow the reader’s language choice. Screenshots and the interactive step-by-step walkthroughs (with a voiceover in English, French, German, Spanish, Portuguese and Dutch) show your own branding too: each screen is rendered in your colours, fonts and logo, so your clients never see our interface. A few screens that we can’t rebrand yet stay hidden on your domain rather than showing our branding. The “Need help? Contact Support” block at the bottom of each article keeps its wording, but the link behind it emails your Support email from the Brand card (or your account email while that field is blank). Anything about us as a platform — our community, our own plans and pricing — is removed rather than reworded, so those pages simply don’t exist on your domain. What stays are the things your clients also see in their own dashboard, such as the AI quality tiers and the credits each action uses. - API domain (for example
api.youragency.com) — the API and webhook addresses anything your clients integrate with points at. - MCP domain (AI assistants) (for example
mcp.youragency.com) — the address you or your clients paste into Claude or Cursor. See Connect AI Assistants for what that connection does. Your branded MCP address is built for your clients: it carries the account tools but not the agency tools (managing client accounts, pricing, snapshots, white-label settings). For those, connect with the standard address instead. When you also have a docs domain, the assistant’s built-in help docs on your MCP address read your own docs site, under your brand and with only the features your plan includes.
Each one works the same way, and each is set up separately:
- At your registrar, add a CNAME for that subdomain pointing at
tenants.youraiconnector.com— the same target as your app domain. - Check the address in the block’s field and click Verify. The
docs./api./mcp.part is fixed and shown to the left of the field — that label is what tells us where to send the traffic, so it can’t be changed. You only fill in the domain after it, and it arrives pre-filled from your app domain, so if you’re keeping everything on one brand there’s nothing to type. The CNAME line under the field always shows the full address you’re about to verify. - Once it’s verified, the block shows Connected with the address, plus Change and Remove buttons. That green line is how you know it’s live — if a block still shows a field, that address isn’t set up yet.
Until your API domain is verified, the API and webhook addresses your clients copy from their accounts use your app domain instead (for example app.youragency.com/api/v1/webhooks/automation/...), and those work. The API block shows a yellow note while it isn’t connected. If a client pasted an address starting with api.youragency.com somewhere before that domain was verified, calls to it fail, usually with a TLS or certificate error such as “tlsv1 alert internal error”. Either verify the api. domain here, or have the client copy the address from their account again and paste it in place of the old one.

A verified docs. subdomain — your clients see your brand throughout, never ours.
Each storefront has its own three addresses. If you run more than one brand, switch to the right storefront first, then verify — the address is registered to whichever storefront you’re looking at.
A LinkedIn Outreach domain has a Docs domain and an MCP domain row too, but no API domain row: its API lives on the LinkedIn Outreach domain itself. The docs domain serves the LinkedIn Outreach help docs under that domain’s brand, and the MCP domain is the address your clients’ AI assistants connect to for their LinkedIn workspace. Both are optional: without them, your clients still get the help docs and an MCP address under your brand, provided automatically. See API, AI assistants and help docs for your clients.
Your API domain also serves the chat widget. When you copy the widget’s embed code while your branded domain is live, the snippet points at api.youragency.com — and everything the widget loads afterwards (its code, settings, avatar and launcher image, notification sound, and the messages themselves) comes from that same address. Nothing in it points back at us, so a client inspecting the page only ever sees your domain.
The same goes for your booking pages: a booking link opened on your branded app domain loads its availability through your API domain. If that address isn’t verified yet, the page quietly uses our neutral shared address instead, so the link still works — verifying api. just keeps everything on your own name.
Changing your domain later
You can move your white-label to a different address at any time — rebranding, a new domain, or just a better subdomain.
- Add the CNAME for the new domain at your registrar first, pointing at
tenants.youraiconnector.com, exactly as you did the first time. - Back in the Custom domain card, replace the App domain value with the new address and click Save.
- Wait for the new certificate — same few-minutes-to-an-hour as the first time. Your API, Docs, and MCP domains move across with it.
A few things worth knowing:
- All your branding comes with you. App name, logos, colours, fonts and login screen are carried over — you don’t re-enter anything.
- The old address stops working. Anyone with the previous domain bookmarked will need the new one, so tell your clients before you switch.
- Your clients’ logins are unaffected. Same accounts, same passwords, new address.
- Don’t remove the old CNAME until the new domain is live, so there’s no window where neither address works.
Changing your API domain later
Your API domain is the one address other systems have been told about, so moving it needs a short round of updating them. Verify the new api. address first (same CNAME, same Verify button as the first time), then work through this list.
Your payment webhooks. Stripe stays connected, because it runs on your own restricted key, and none of your plans, prices or subscriptions are touched. What does need editing is the webhook endpoint you pasted into Stripe: open it in your Stripe dashboard, replace the host with your new API domain and save. Editing an endpoint keeps its signing secret, so there’s nothing to re-enter on our side. Same for PayPal if you have it connected. Until you do this, payments still go through but the account doesn’t hear about them, so credits and plan changes stop arriving.
Anywhere else your old API address was pasted. These carry the old host until somebody changes them:
- Chat widget snippets already on your clients’ websites. The code you copy from the widget page points at your API domain. Existing snippets keep pointing at the old one, so re-copy the snippet and send it to the client, or ask them to.
- Provider webhooks your clients set up themselves, which means a bring-your-own Twilio number for SMS, WhatsApp through Meta’s Cloud API, Viber and iMessage. Each of those has a webhook or callback URL in the provider’s own console, and each needs the new host.
Nothing to do for these. Google Calendar, Telegram and WhatsApp Web all keep working through the change, so leave them alone.
Give yourself about half an hour. The old address keeps answering for roughly 30 minutes after you save, which is your window to get the webhooks moved before anything starts failing.
Up to Three White Labels
Your White Labeling page starts with Your white label domains — a row of cards, one per branded domain, with an Add white label tile at the end. Most agencies have one. You can run up to three, each with its own domain, its own branding, and its own email sending — a second brand for a different market, or a Lead Finder domain for your clients.
Extra white label domains (beyond your first) come with the Champions Circle.
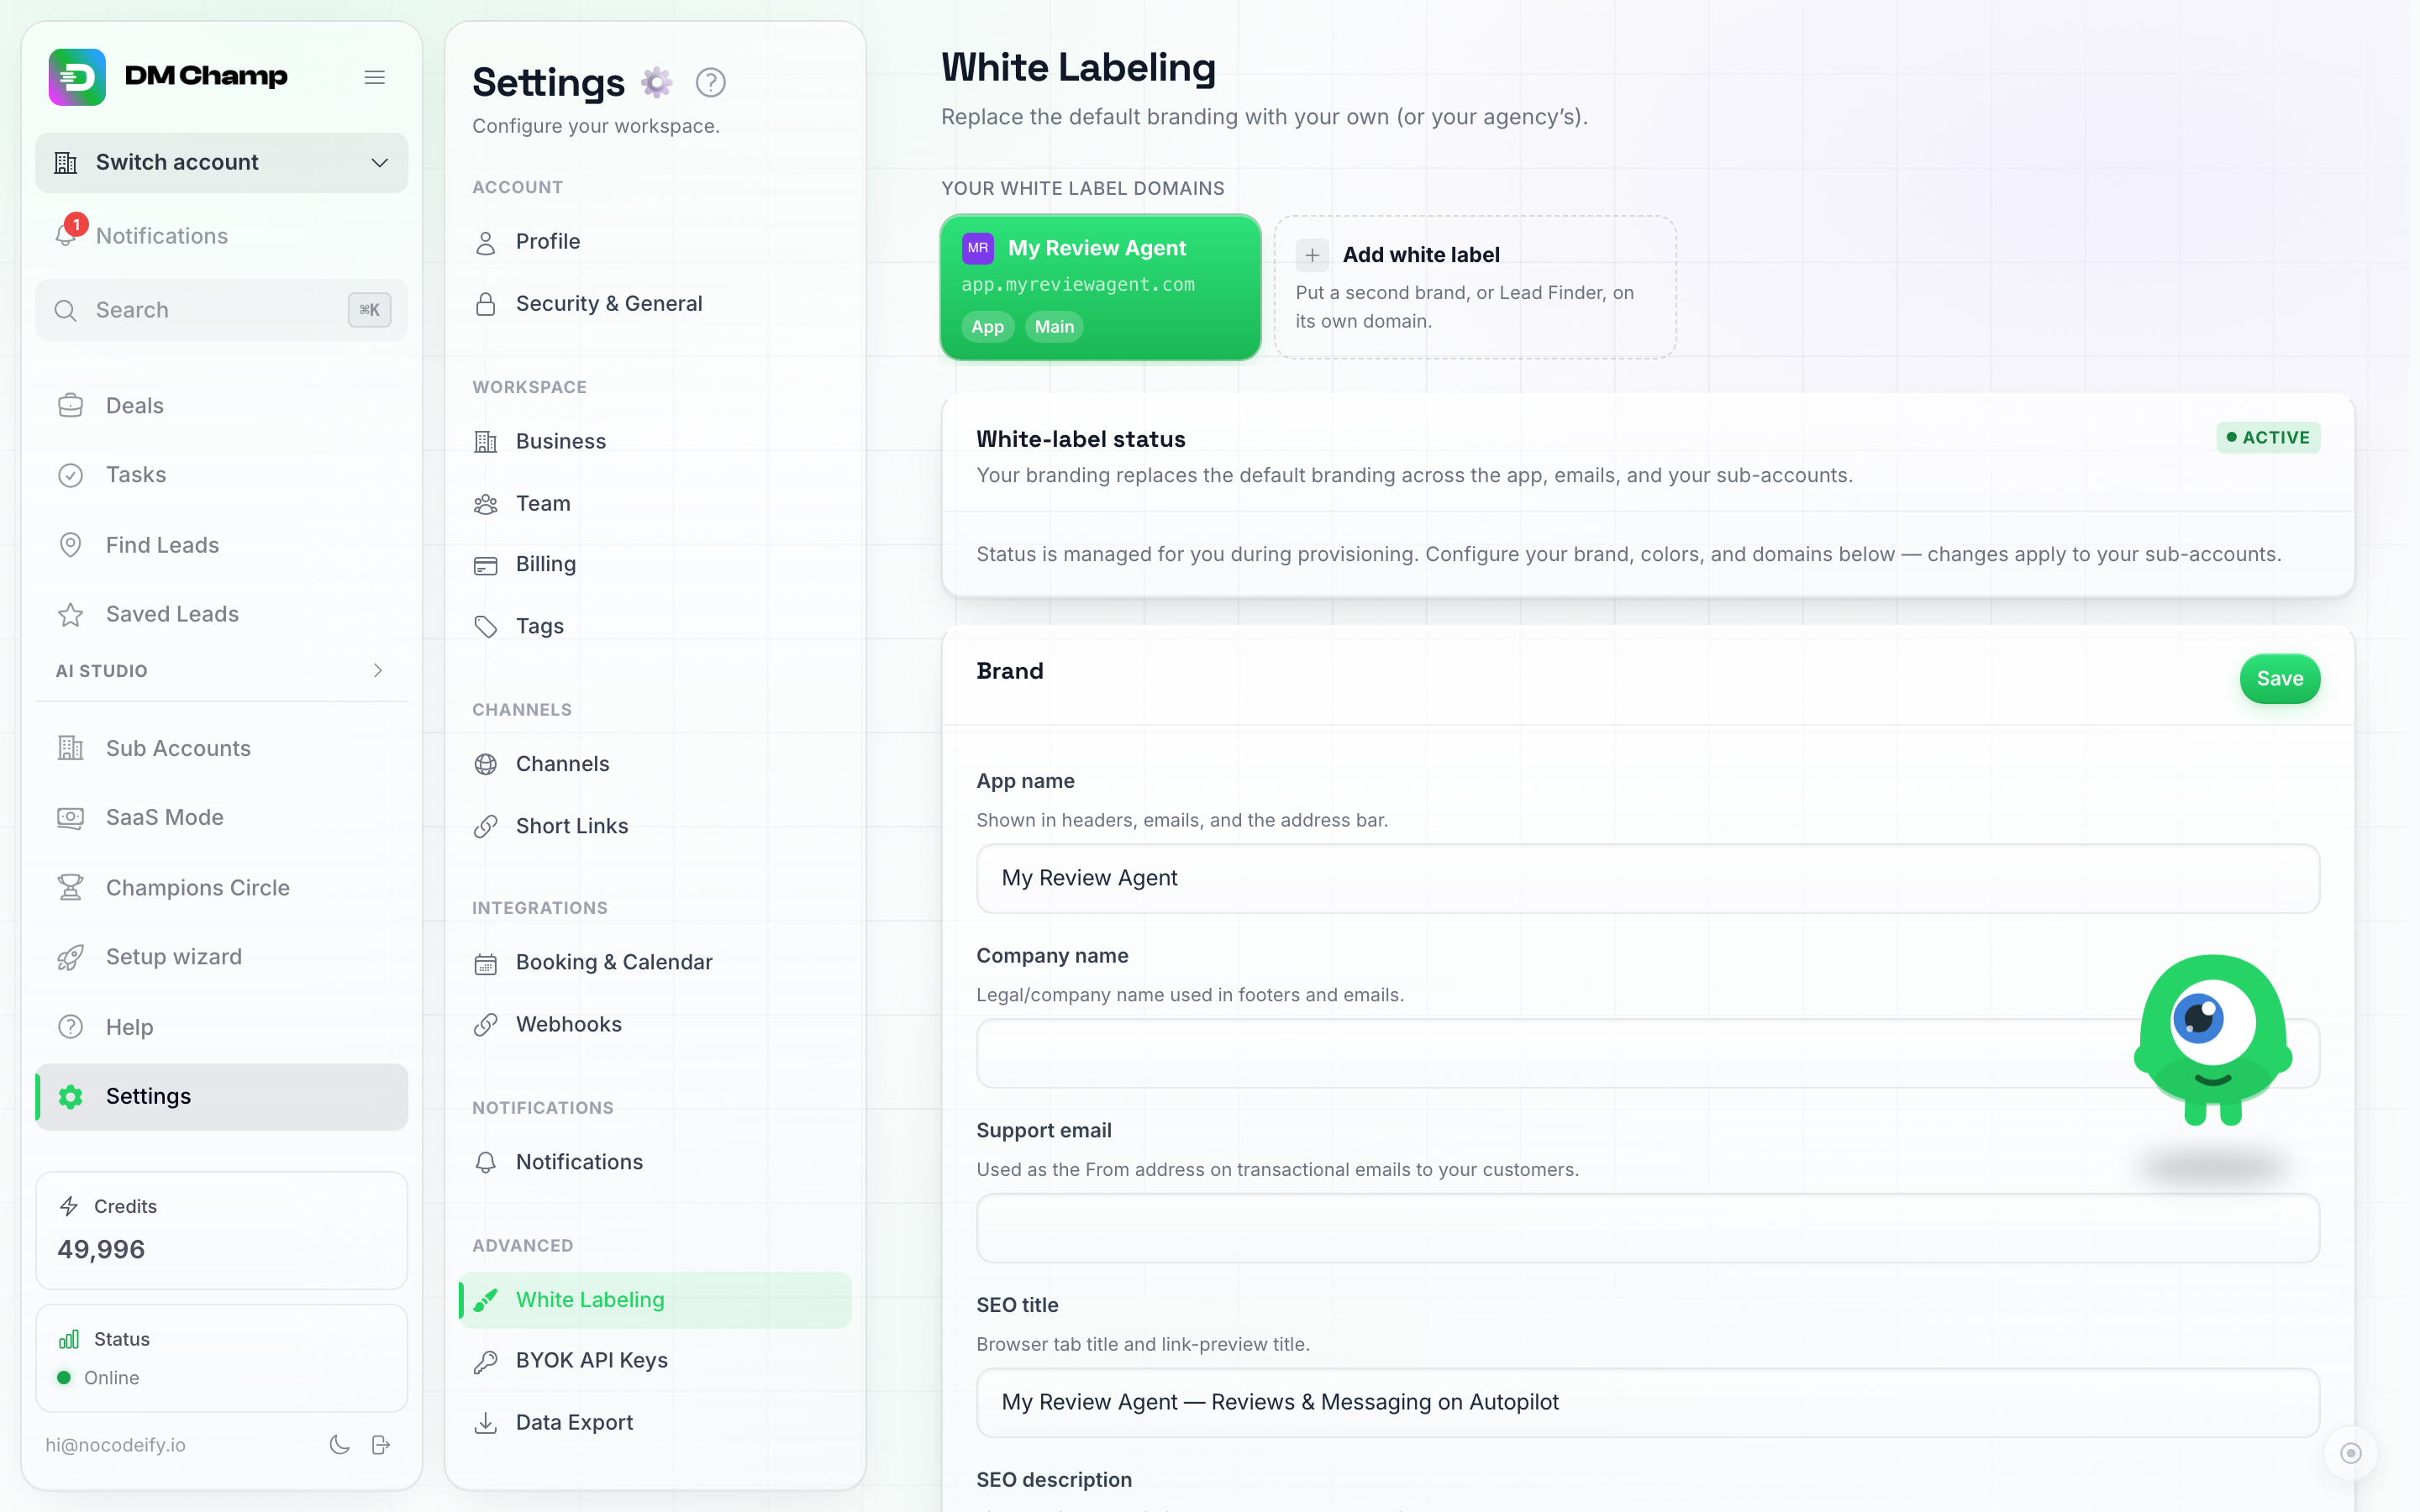
The domain row at the top of White Labeling: your main domain, plus an Add white label tile for a second brand or Lead Finder.
Click any card to edit that domain — everything below the row (brand, colours, login screen, custom domain, email sending) applies to the domain you have selected. Your main domain is marked Main and is always the last one you can remove.
With two or more domains, each client account belongs to one of them. Pick it with White label when you create or edit a sub-account (see Sub-Accounts); a new client starts on the brand of the domain you are working on.
Changing which domain is main
Your main domain is the one your account is branded with by default: the emails your account sends, the app links in them, and any plan in SaaS Mode that isn’t tied to a specific domain. To make another domain the main one, click Set as main on its card and confirm.
Two things happen when you do:
- The Main badge moves to the new domain, and your default branding follows it.
- Plans in SaaS Mode whose Sold on was Main domain are pinned to the old main domain, so the plans you sell today keep being sold on the domain they were built for. The message after the switch tells you how many plans were pinned this way. Want one of those plans sold on the new main domain instead? Open it in SaaS Mode and set its Sold on picker back to Main domain.
Client accounts that are assigned to a specific domain (by hand on the sub-account, or through the plan they bought) keep that domain. Client accounts without an assignment follow your main domain, so their emails and app links switch to the new one. Accounts, data, logins and every domain’s DNS stay exactly as they are.
Adding another white label
- Click the Add white label tile.
- Choose what this domain shows. Every area of the app starts ticked — leave them all on for the full app with your branding, or untick areas to narrow the domain down. Tick only Find Leads and you have a Lead Finder domain; keep, say, Chats and Contacts and you have a lightweight inbox for clients who don’t need the rest.
- Enter a subdomain you control (for example
leads.yourbrand.com) and click Add domain. - Add the CNAME record shown (same target as your main domain:
tenants.youraiconnector.com). The certificate and routing are provisioned automatically within minutes.
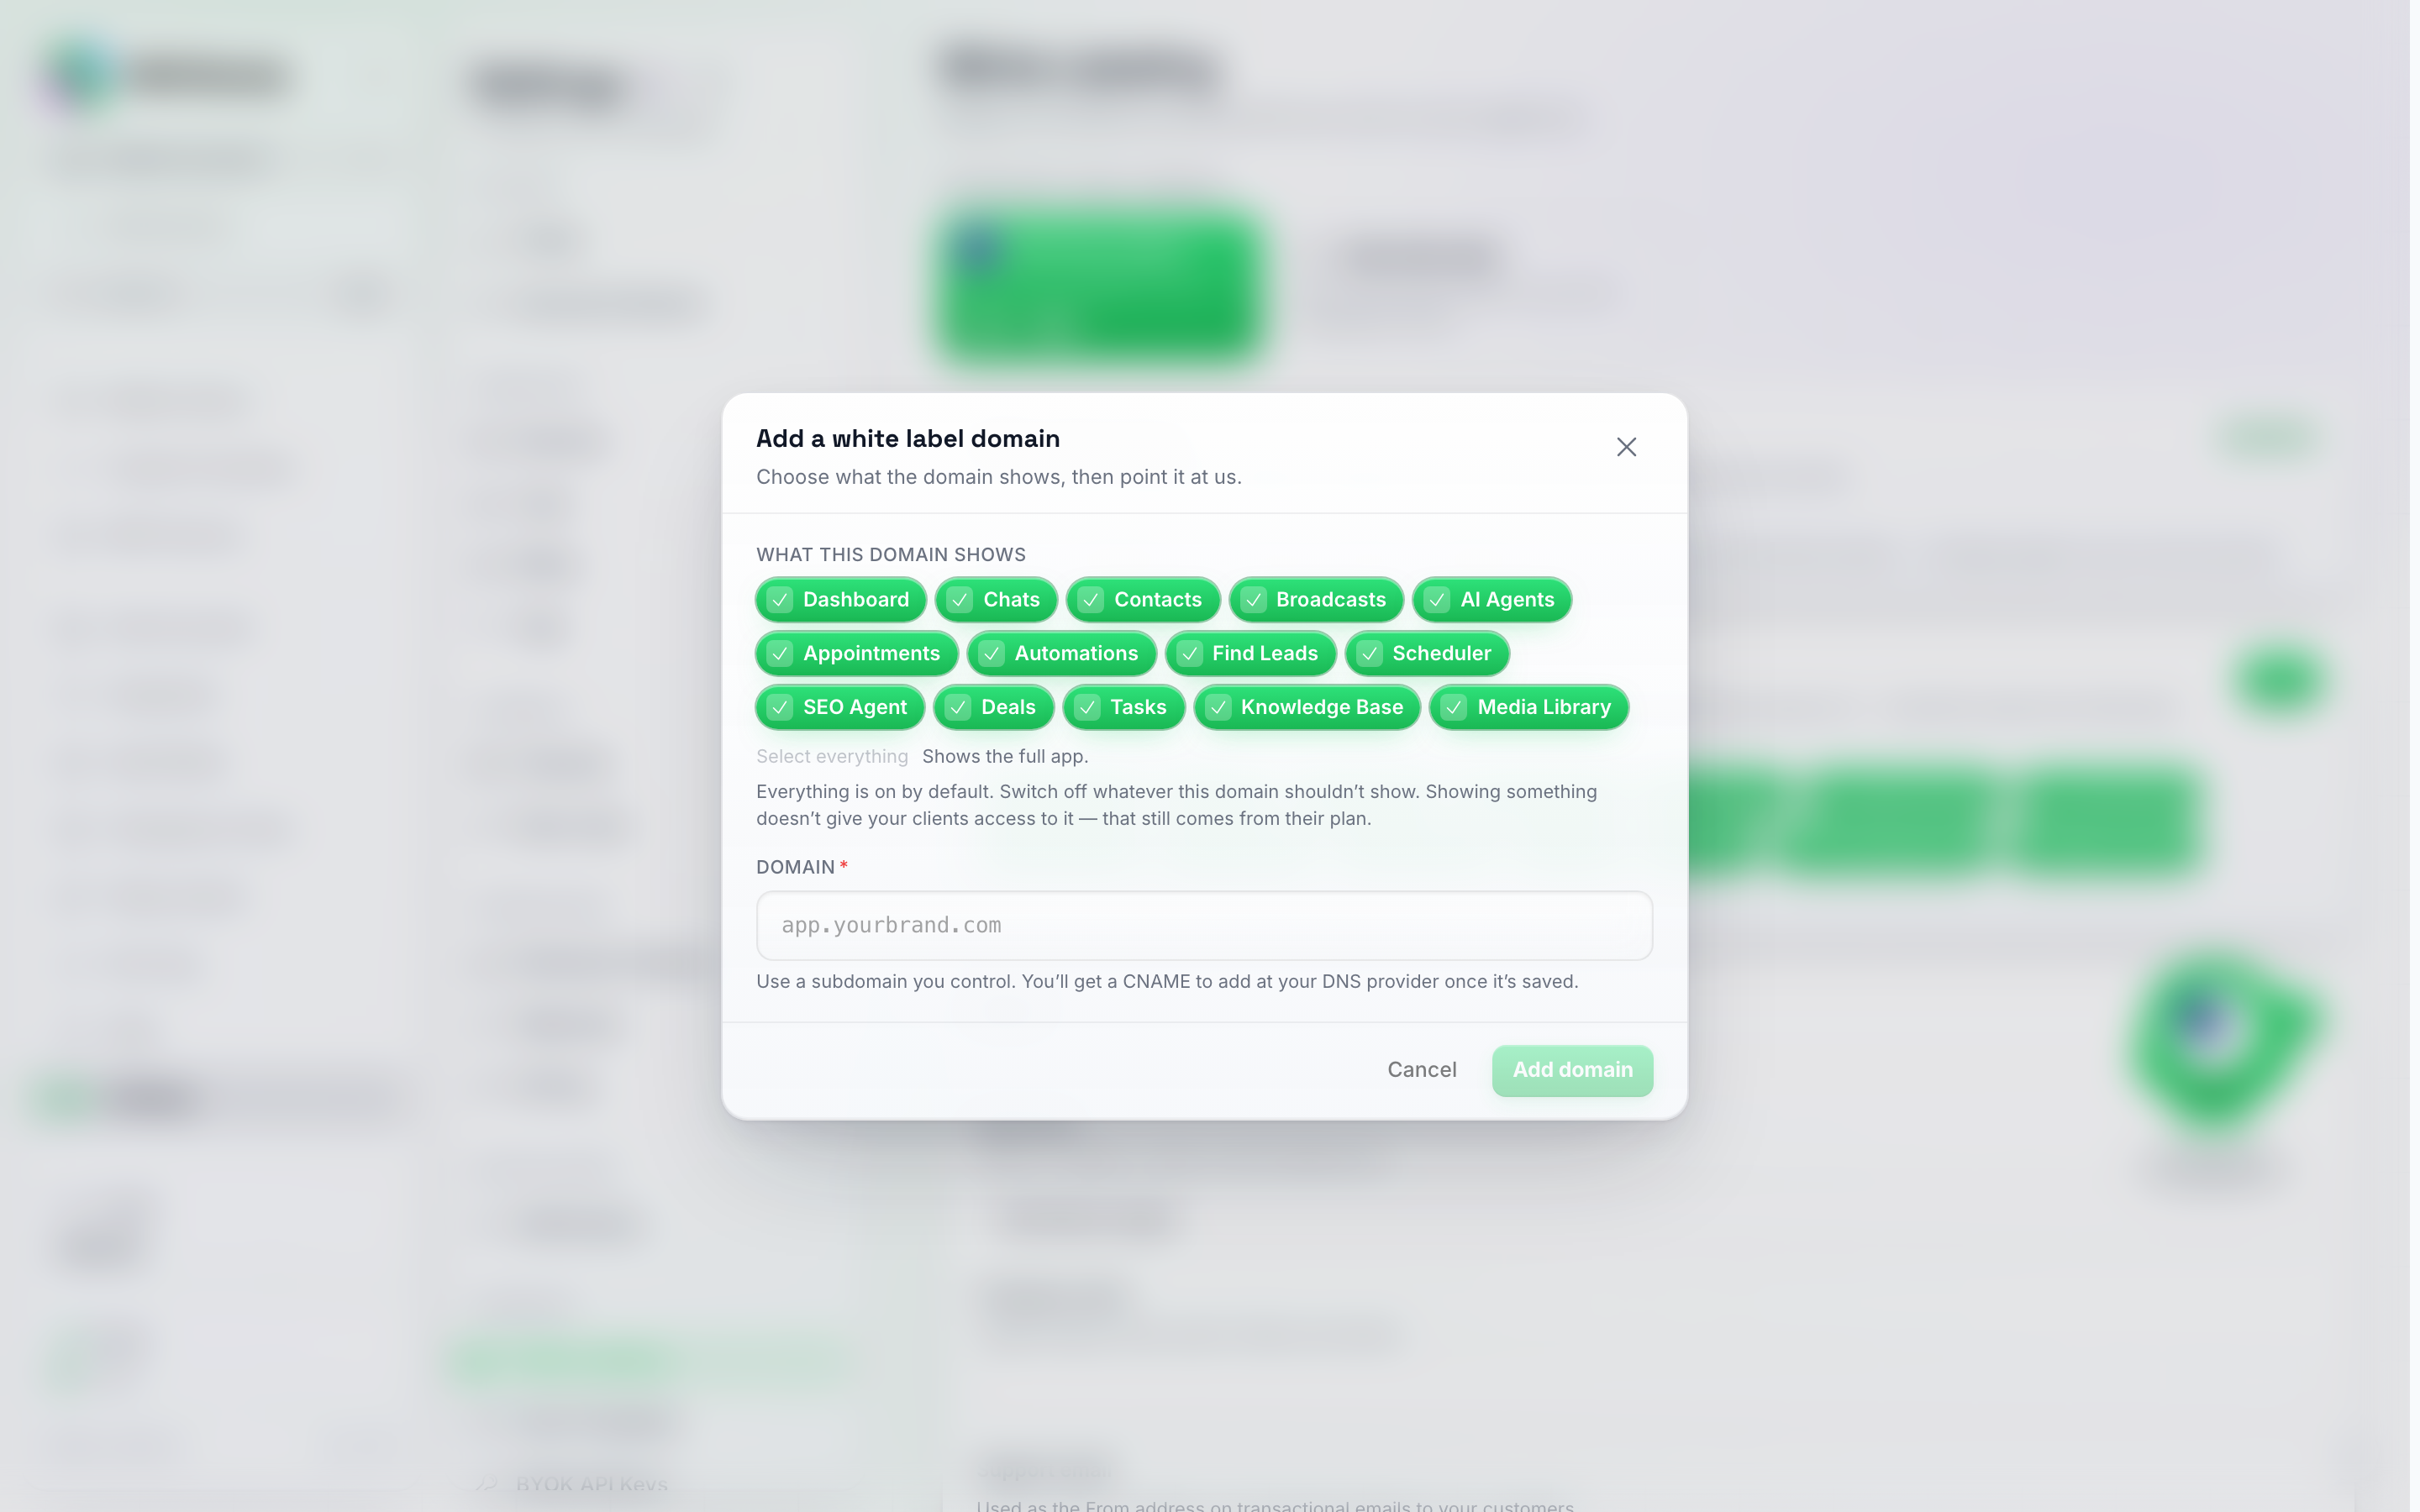
Adding a white label: tick the areas the domain should show, enter the subdomain, done.
What “showing” an area means
Clients signing in on a narrowed domain see only the areas you ticked — the navigation, the pages, everything else is simply not there. Two things to know:
- Showing an area doesn’t grant it. What a client can actually use is still decided by their plan’s features. The domain decides what’s visible, the plan decides what works.
- You can change it later. Select the domain’s card and the What this domain shows card lets you tick or untick areas any time. Clients see the change on their next page load.
- It never narrows your own view. Your agency tools — Sub-Accounts, SaaS Mode, Snapshots, the Champions Circle — stay in your menu on your own domain whatever you untick here. This card is only about your clients.
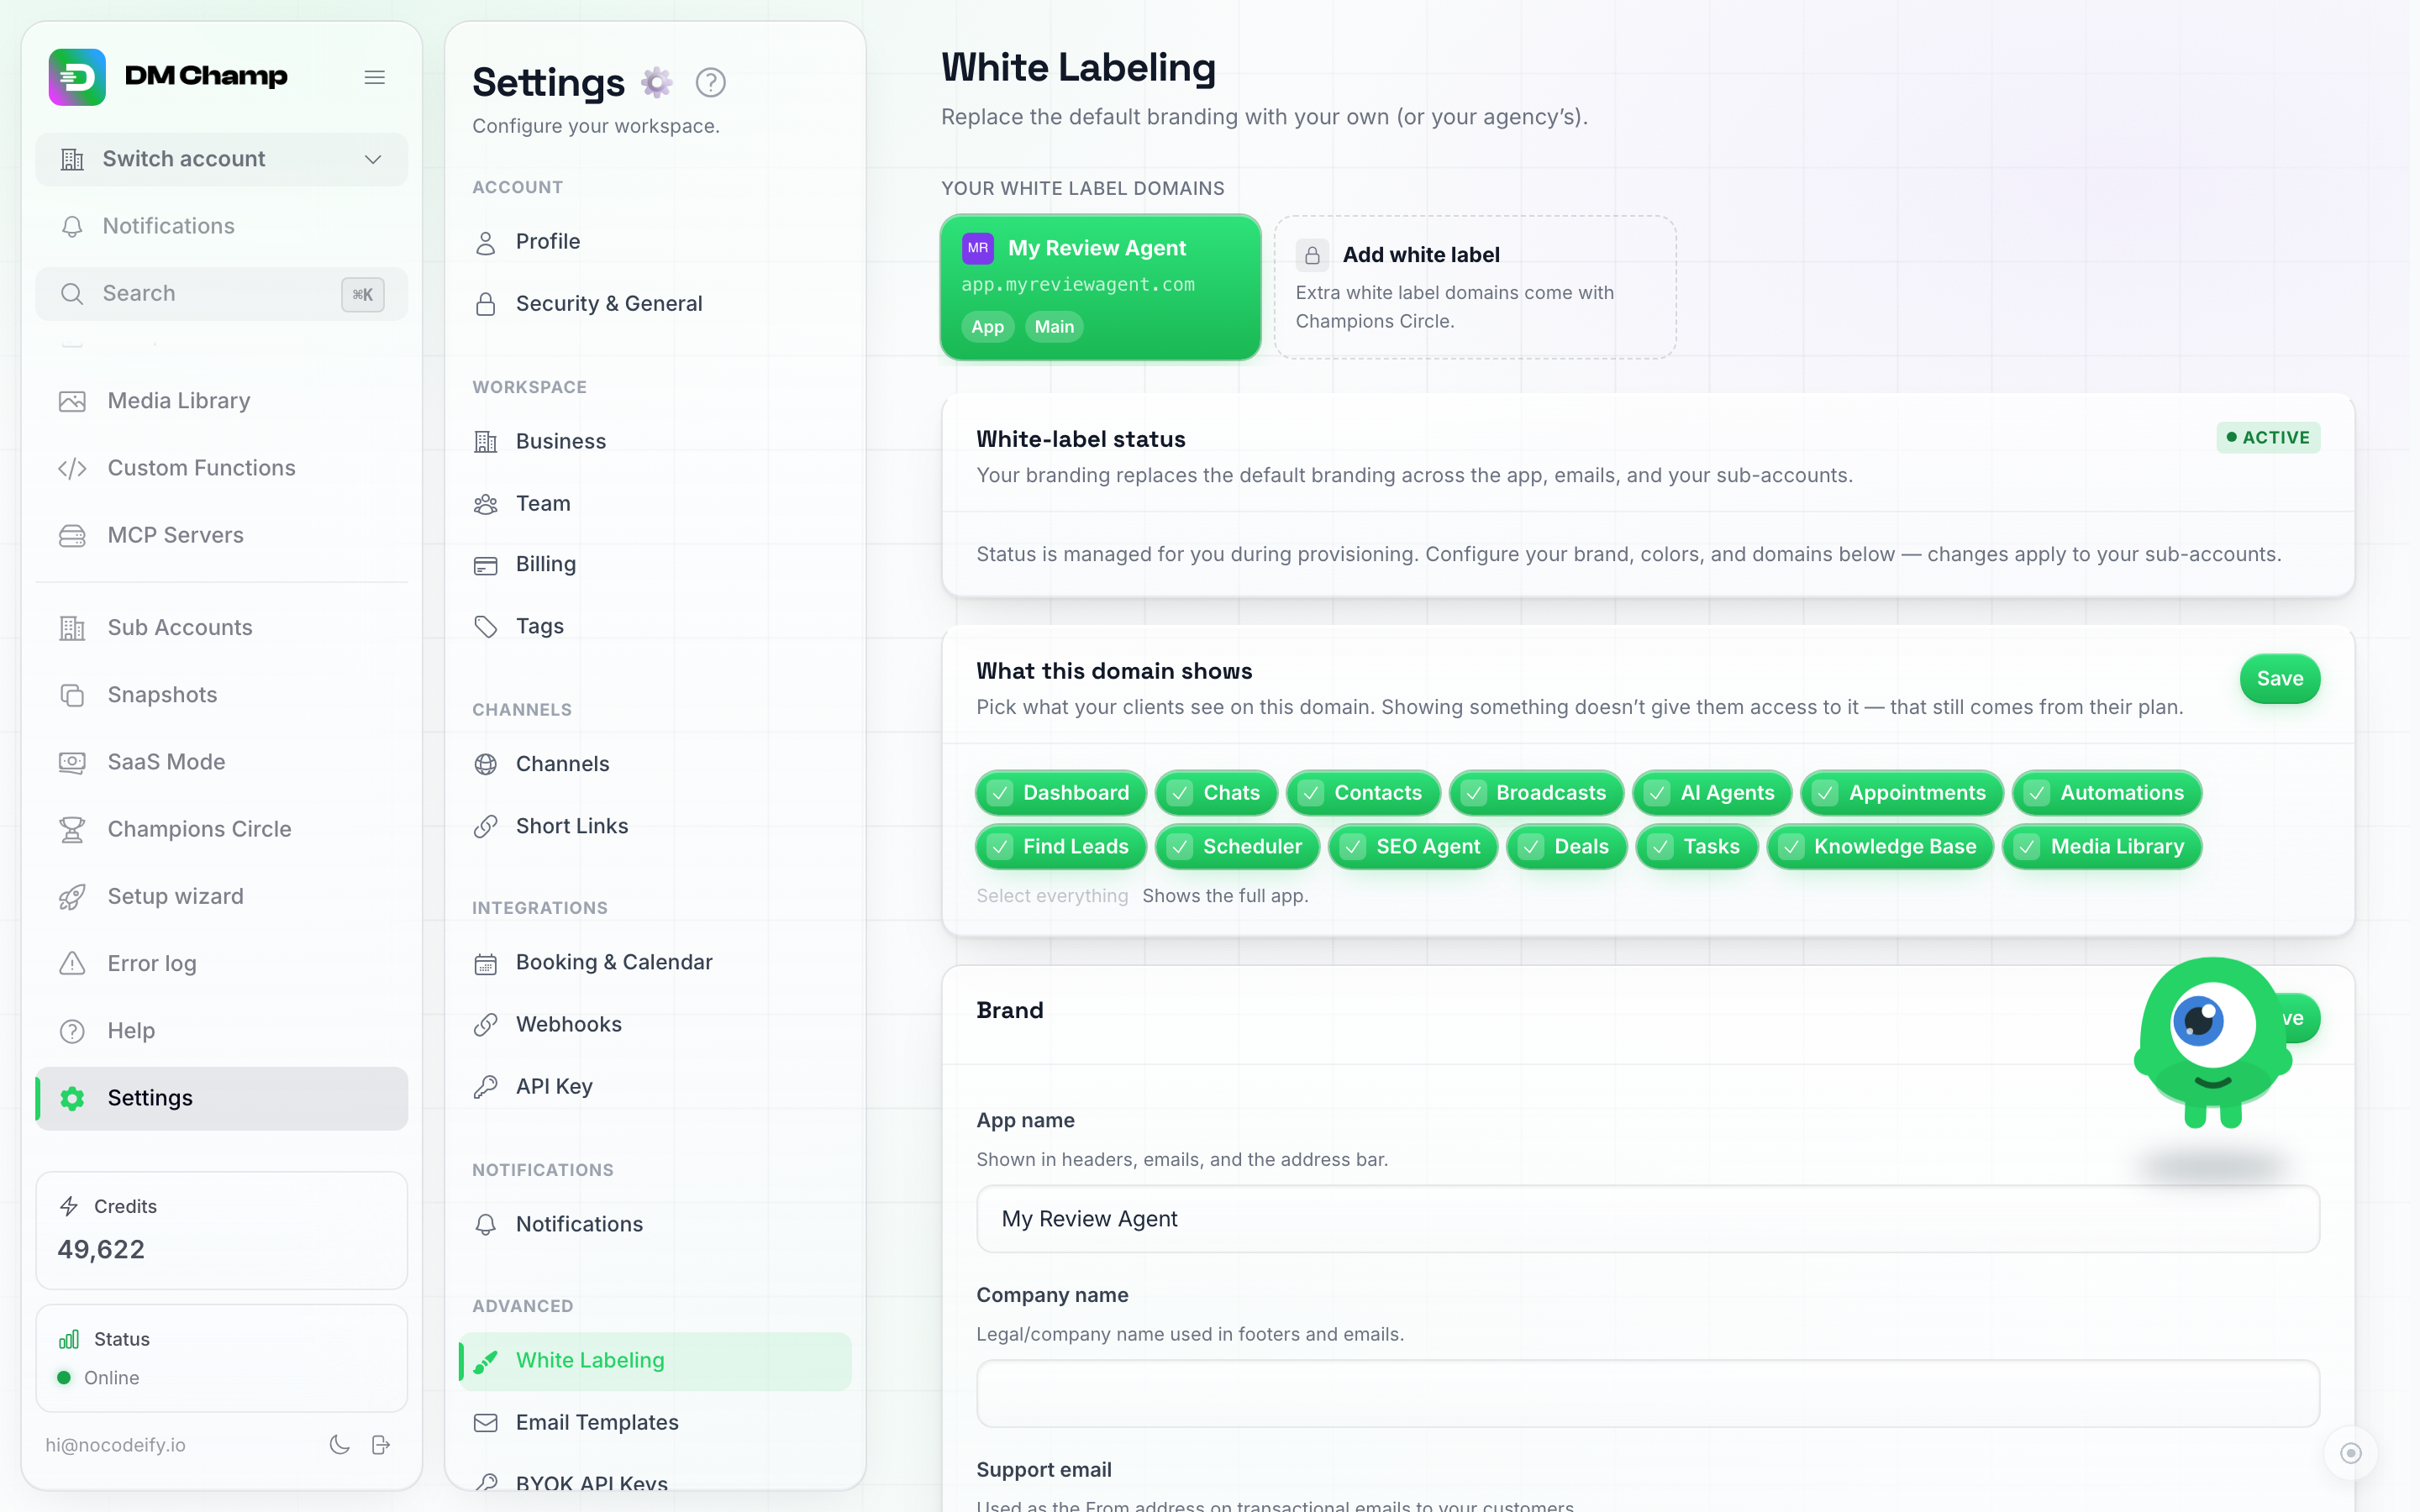
The What this domain shows card on a selected domain — tick or untick areas any time and Save.
Lead Finder White Label
If your account has Lead Finder (through the Champions Circle or a Find Leads grant), a domain can show Lead Finder only — your clients sign in there with their existing accounts and see nothing else: no chats, no AI agents. With its own logo, colours and sign-in page it reads as a completely separate product.
Add it like any other white label (above), ticking only Find Leads as what the domain shows. Its branding is edited the same way as your main domain’s — select its card in the domain row first. Branding on one domain never touches another.
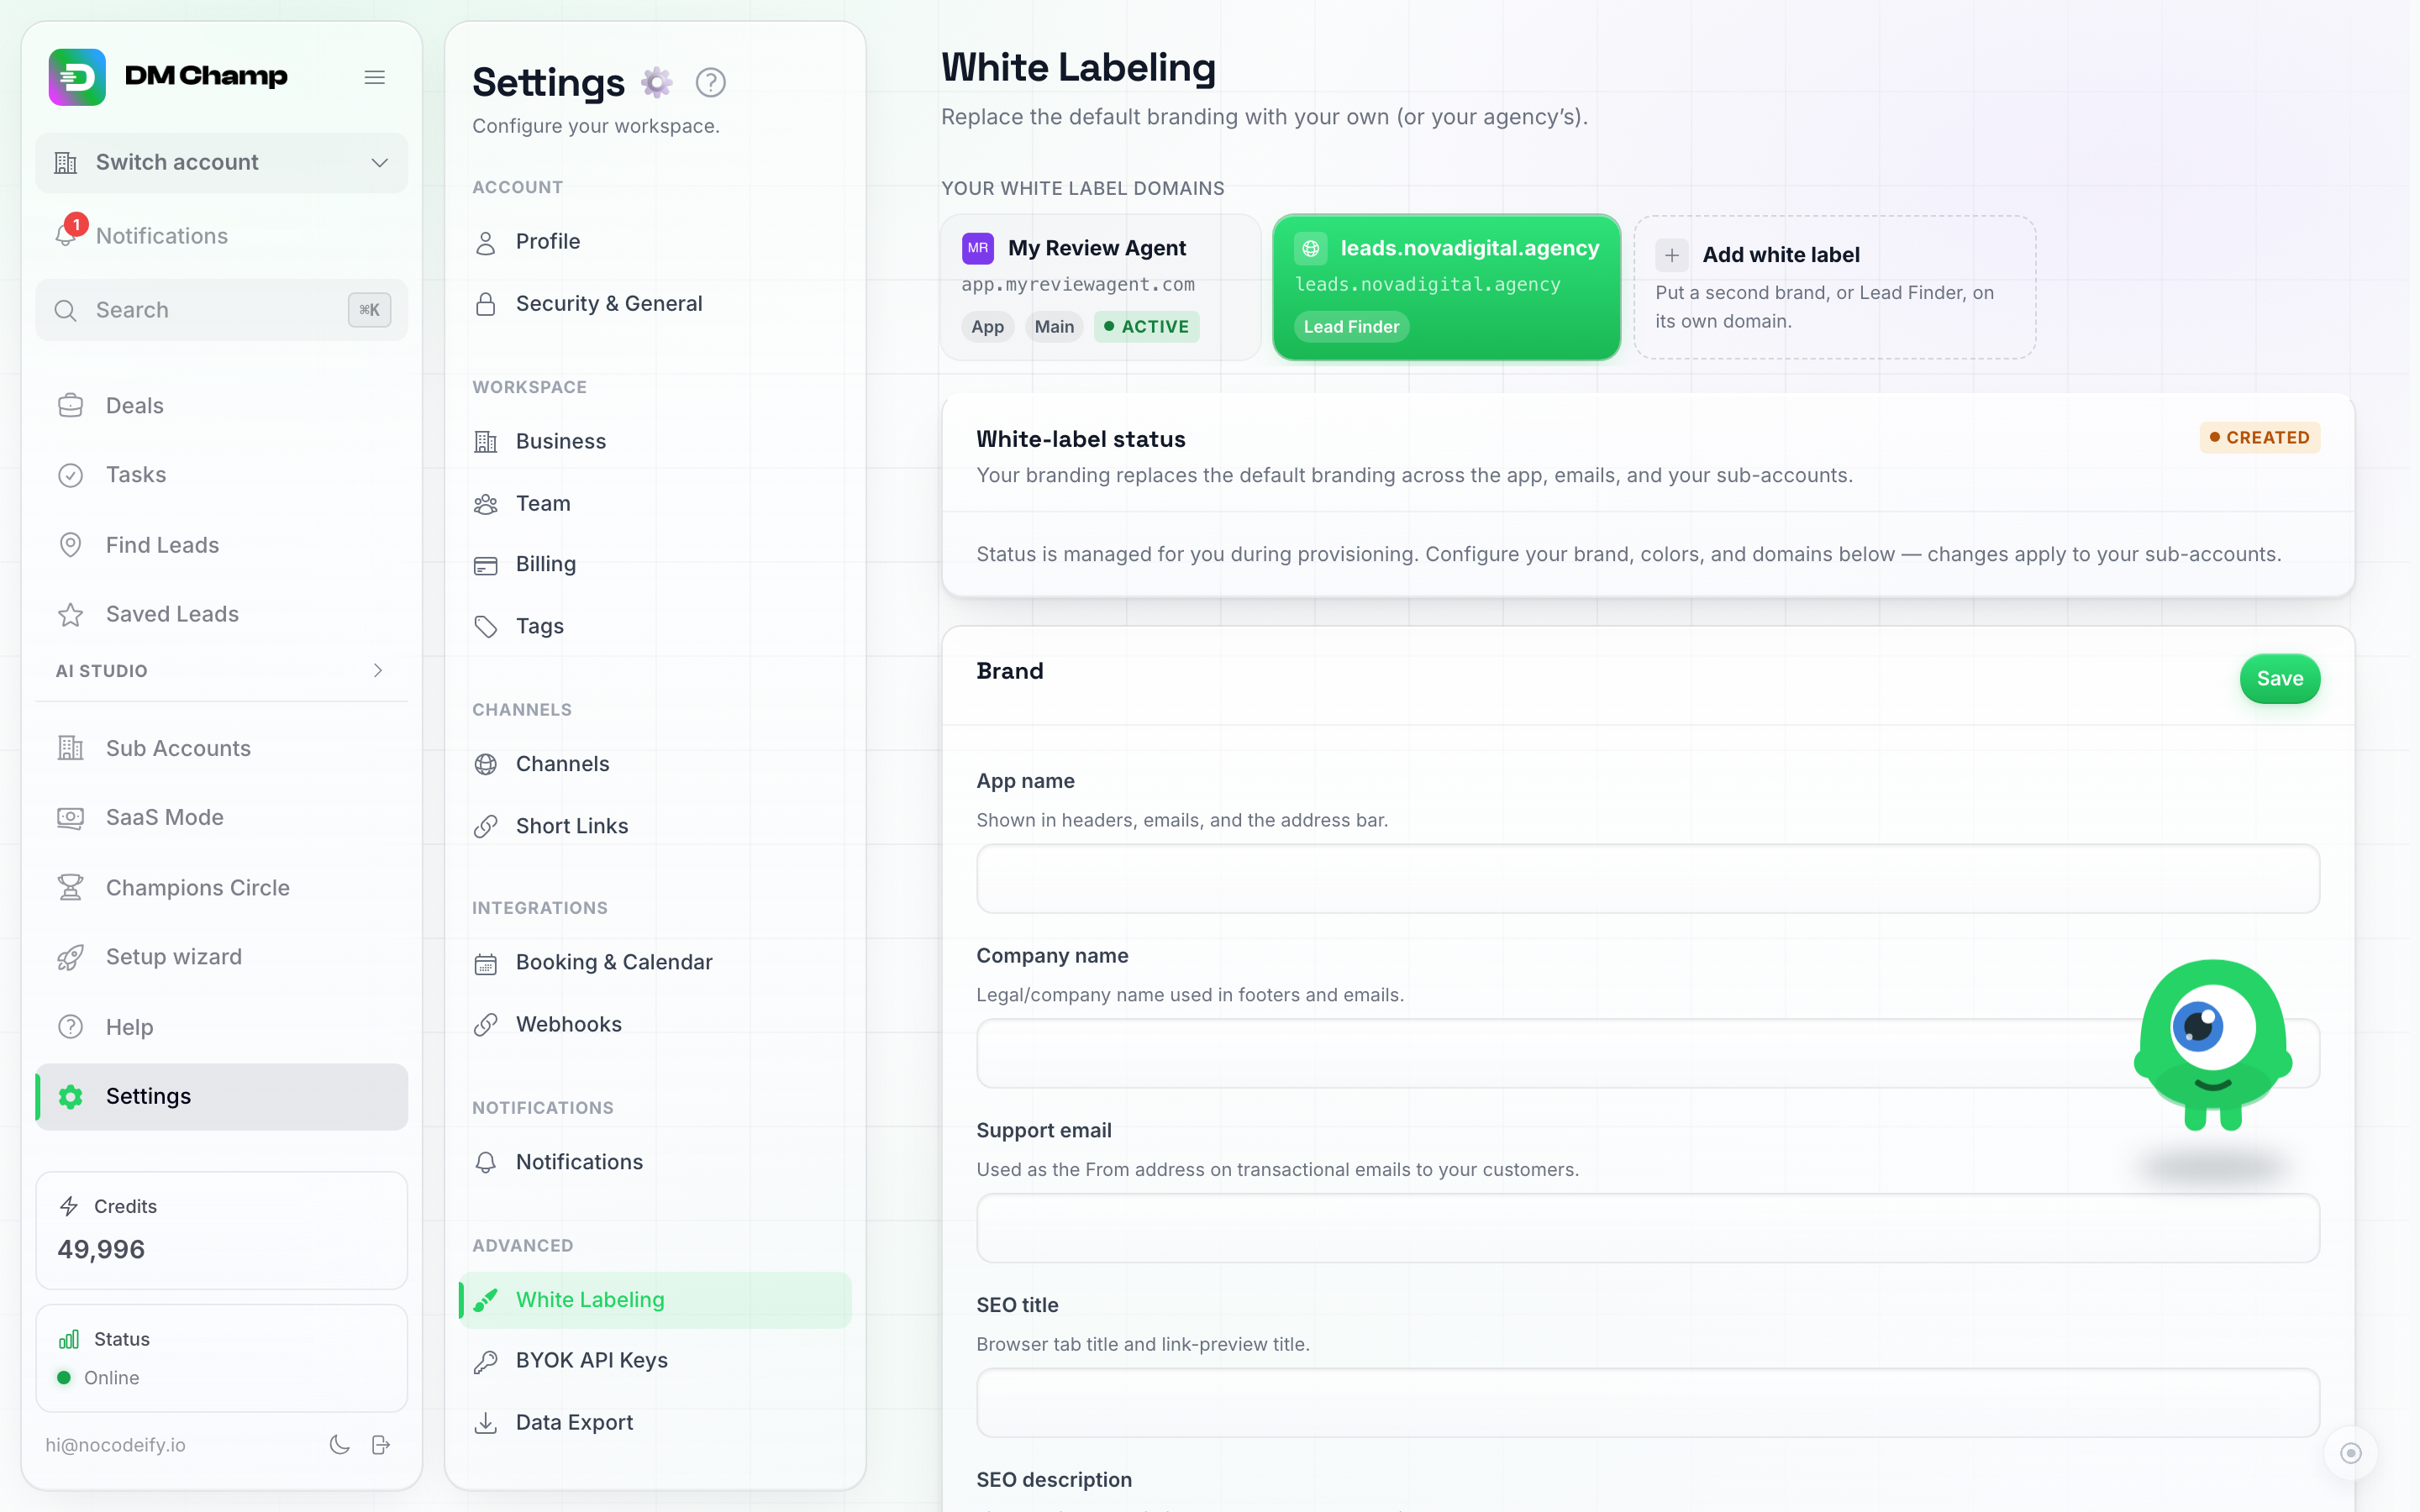
A Lead Finder domain selected in the row: everything below now configures that domain's own branding.
Who can sign in there
Anyone signing in on your Lead Finder domain needs Lead Finder access on their account. For your clients that means switching Find Leads on for their sub-account (Sub Accounts, Edit, Features) or including it in one of your plans. Accounts without access are sent back to the sign-in screen.
You can also sell plans directly on this domain: set a tier’s Sold on to your Lead Finder domain and its checkout, branding and the buyer’s sub-account assignment all follow it — clients there see those plans on their Credits page.
A few things worth knowing:
- Leads and credits live on the account, not the domain. A client’s saved leads and credit balance are the same whether they sign in on your main domain or your Lead Finder domain.
- Removing the domain doesn’t delete anything. Clients keep their accounts, leads and credits — they just can’t sign in at that address any more. You can set it up again later.
Email Sending Per Domain
Each white label domain has its own Email sending card: which mail setup that domain’s transactional emails (invites, password resets, notifications) go out through.
- Default (your main setup) — emails send the way they always have. If you’ve connected nothing, they go out from our servers carrying your branding.
- Connect a mail setup — connect Mailgun or your own SMTP server (any transactional provider works: Postmark, SES, SendGrid, Resend, or your own mailbox) so emails send from your own address, with your own domain’s reputation.
- Reuse across domains — give a setup a name and pick the same one on more than one domain if they should share a sender address. The picker shows which of your other domains already use each setup.
Which domain a client’s emails follow is decided by their sub-account’s White label assignment (see Sub Accounts) — clients assigned to your Lead Finder domain get that domain’s branding and sender.
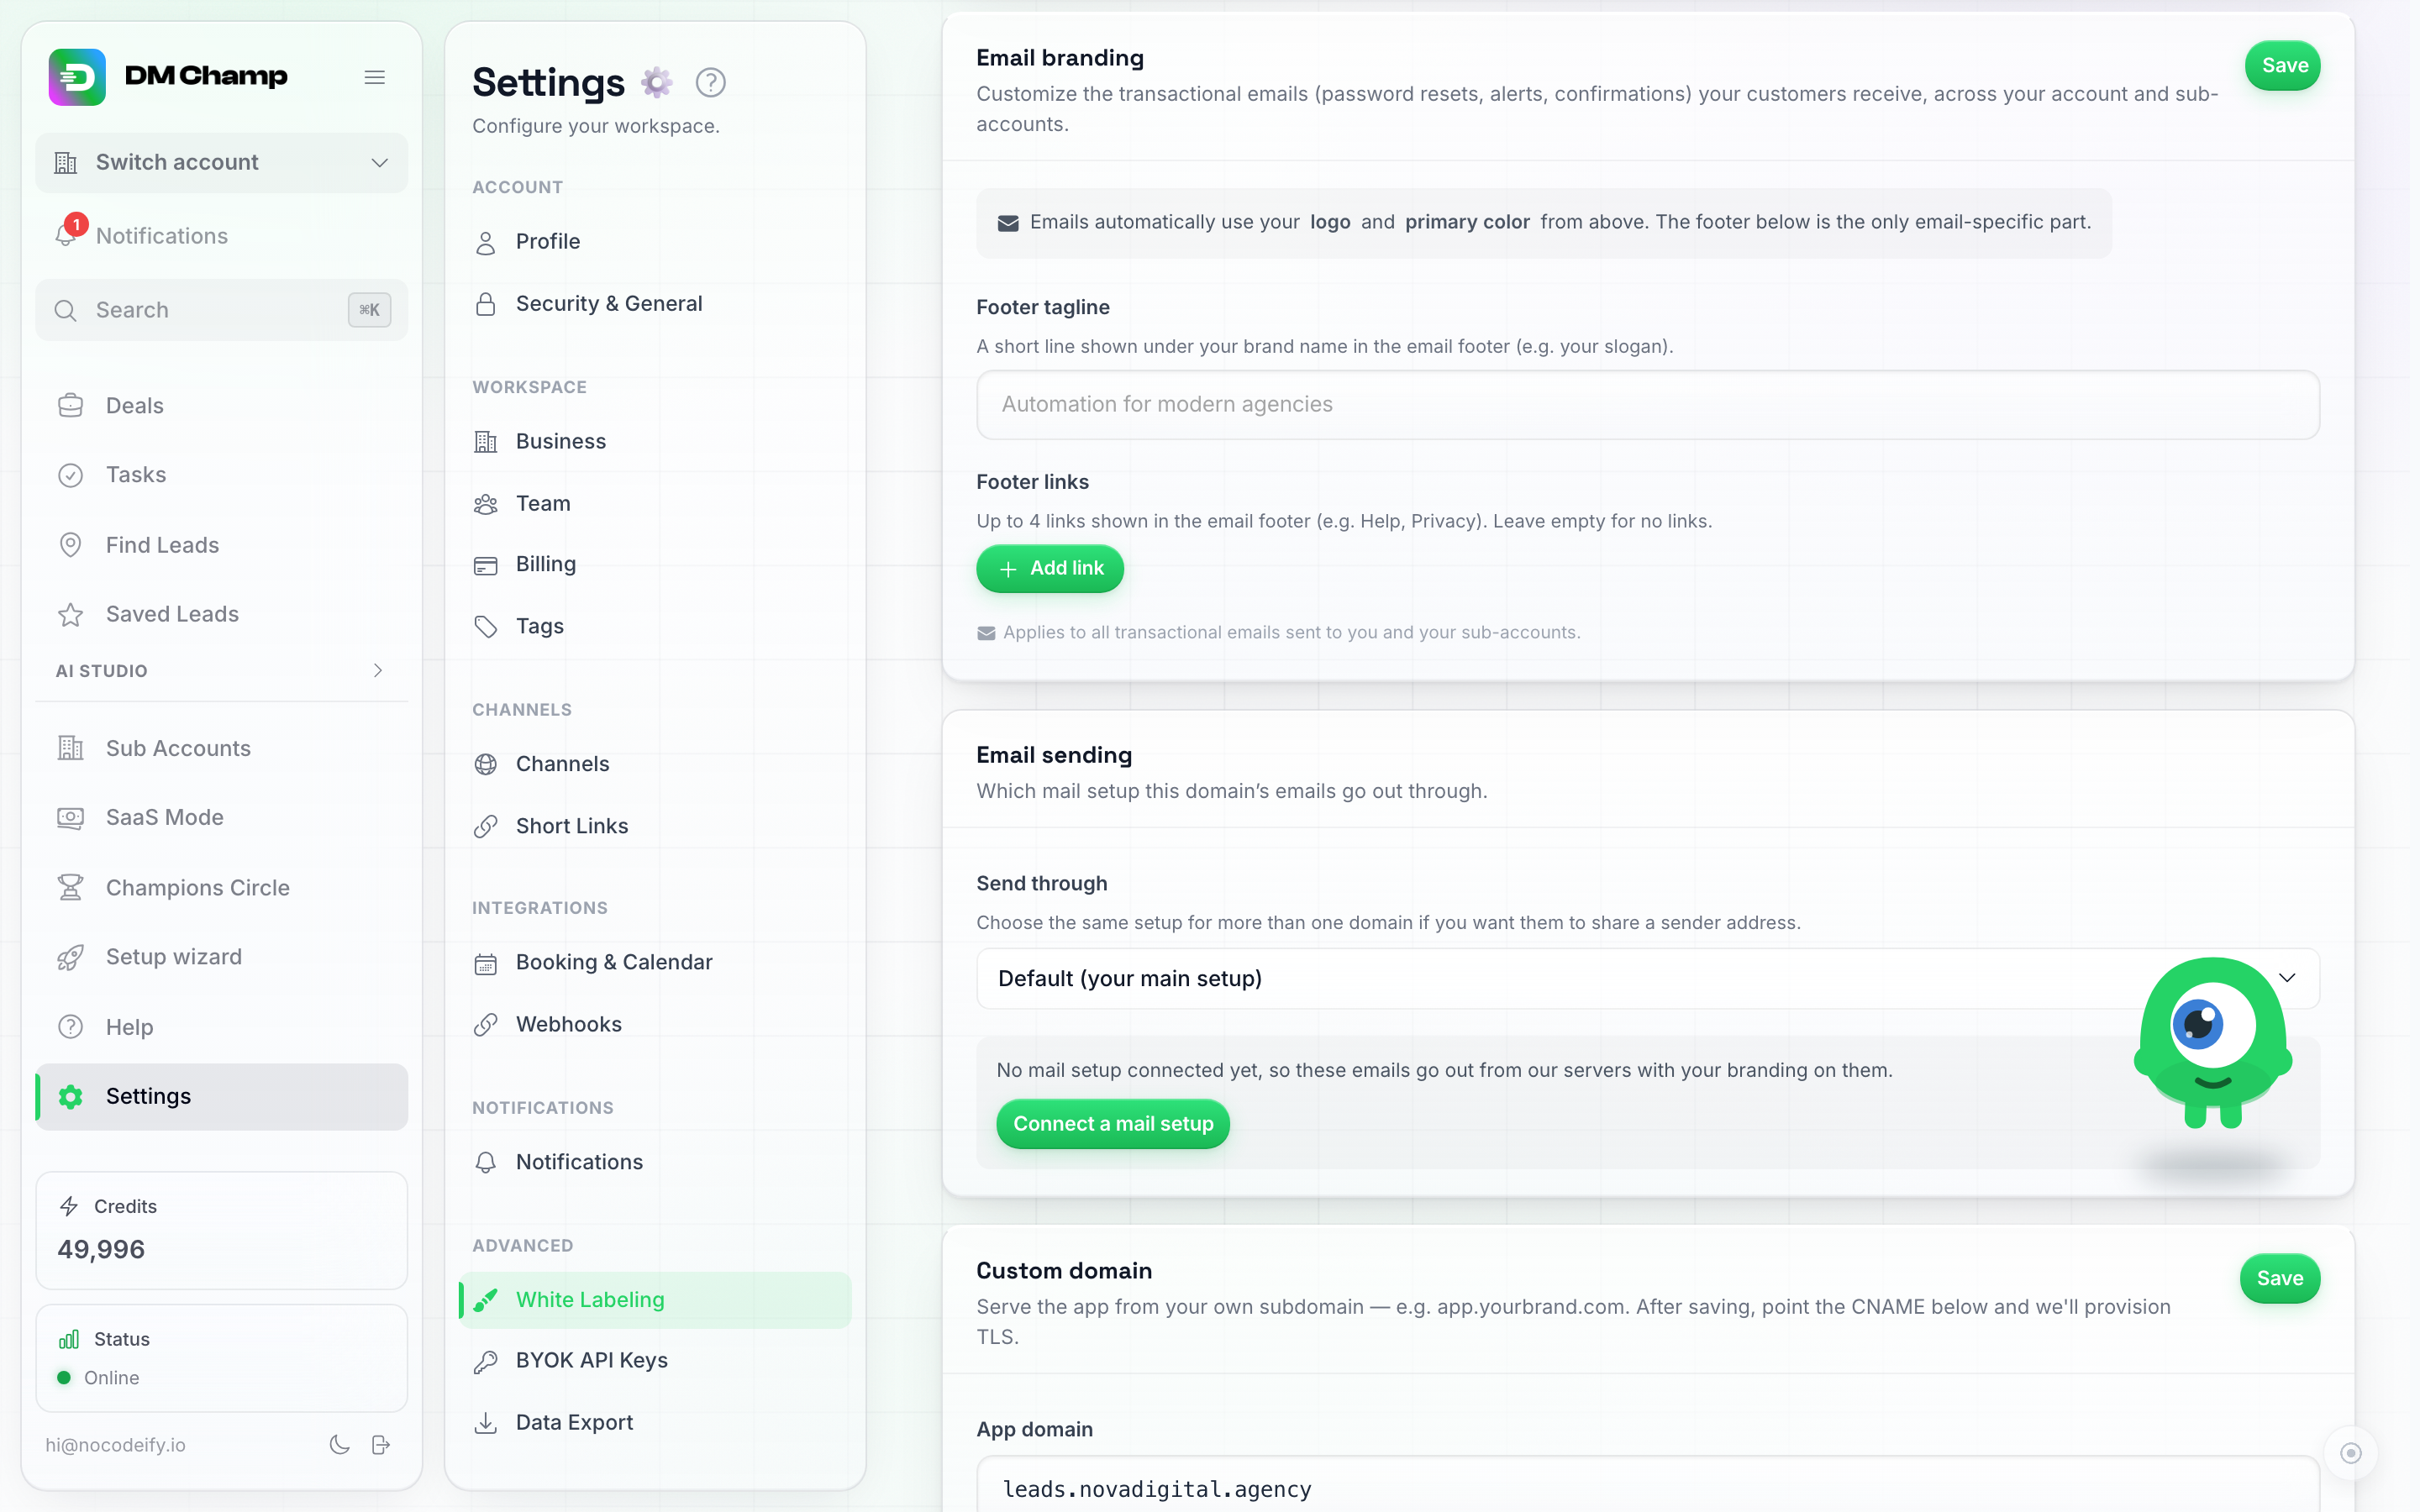
Email sending, per domain: use your main setup, connect a new one, or share one setup between domains.
Managed Mail Domain (Email Channel)
The Email channel’s managed address option gives an account an instant AI-answered inbox with no mailbox to connect — but by default that address sits on the platform’s shared mail domain, which is the one place your white label setup could still show through: it’s in the connect form and in the very address your clients hand out to their customers.
The Managed mail domain card (right under Email sending on each white label domain’s panel) fixes that: connect a mail domain of your own, and every managed inbox your clients on that domain create gets minted as [email protected] instead.
Two ways to set it up:
- Reuse a Mailgun setup you already connected. If your Email sending card runs through your own Mailgun, the same sending domain can carry the managed inboxes — we only ask you to add the receiving (MX) records, since sending was already verified.
- Host it for you. Enter a fresh subdomain (for example
mail.yourdomain.com) and we host it on our mail infrastructure under your name. You add the DNS records the card shows you — MX for receiving, plus SPF and DKIM so replies from those inboxes deliver properly.
Either way the card lists every DNS record with a copy button and a check mark once it’s seen, and a Verify records button to re-check after you’ve added them at your DNS provider. The card shows Active once the mail provider has verified the sending records (SPF and DKIM) and every receiving MX record checks out, and it is only checked when you click Verify records, not on a schedule, so a record you change or remove later is not picked up until you verify again. Active covers this managed mail domain only: from then on, new managed inboxes created by clients assigned to that white label domain get an address on your domain. It says nothing about your white label app domain (for example app.yourdomain.com), which is set up separately with its own CNAME record and its own check (see Custom Domain), nor about the Email sending card above.
What it costs. Letting us host the domain costs 100 credits a month per mail domain, taken from your own credit balance. Billing starts on 1 October 2026, so there is nothing to pay before that date. Running the managed inboxes through your own Mailgun account instead stays free.
A few things to know:
- Use a subdomain, not your root domain. Pointing your root domain’s MX records here would reroute your company’s normal email. A dedicated subdomain like
mail.orinbox.leaves your existing mailboxes untouched. - Existing managed inboxes keep their address. Connecting a domain changes what new inboxes are created on; an inbox a client already shared keeps working on its original address until they disconnect it.
- Removing the domain is blocked while any client inbox still lives on it — disconnect those first.
Google Calendar Consent Screen
When a client connects Google Calendar, Google opens a sign-in window that names the app asking for access. By default that is the platform’s own app, which carries the deliberately neutral name “DM Champ” rather than any brand of ours, so that is what a client on your domain sees at that moment. The Google Calendar consent screen card, at the bottom of the White Labeling page, lets you put your own Google OAuth client there instead: once it is saved, every calendar connect on your agency account and on all of your sub-accounts shows your project’s name and logo. Nothing else changes for your clients — same button, same two-way sync.
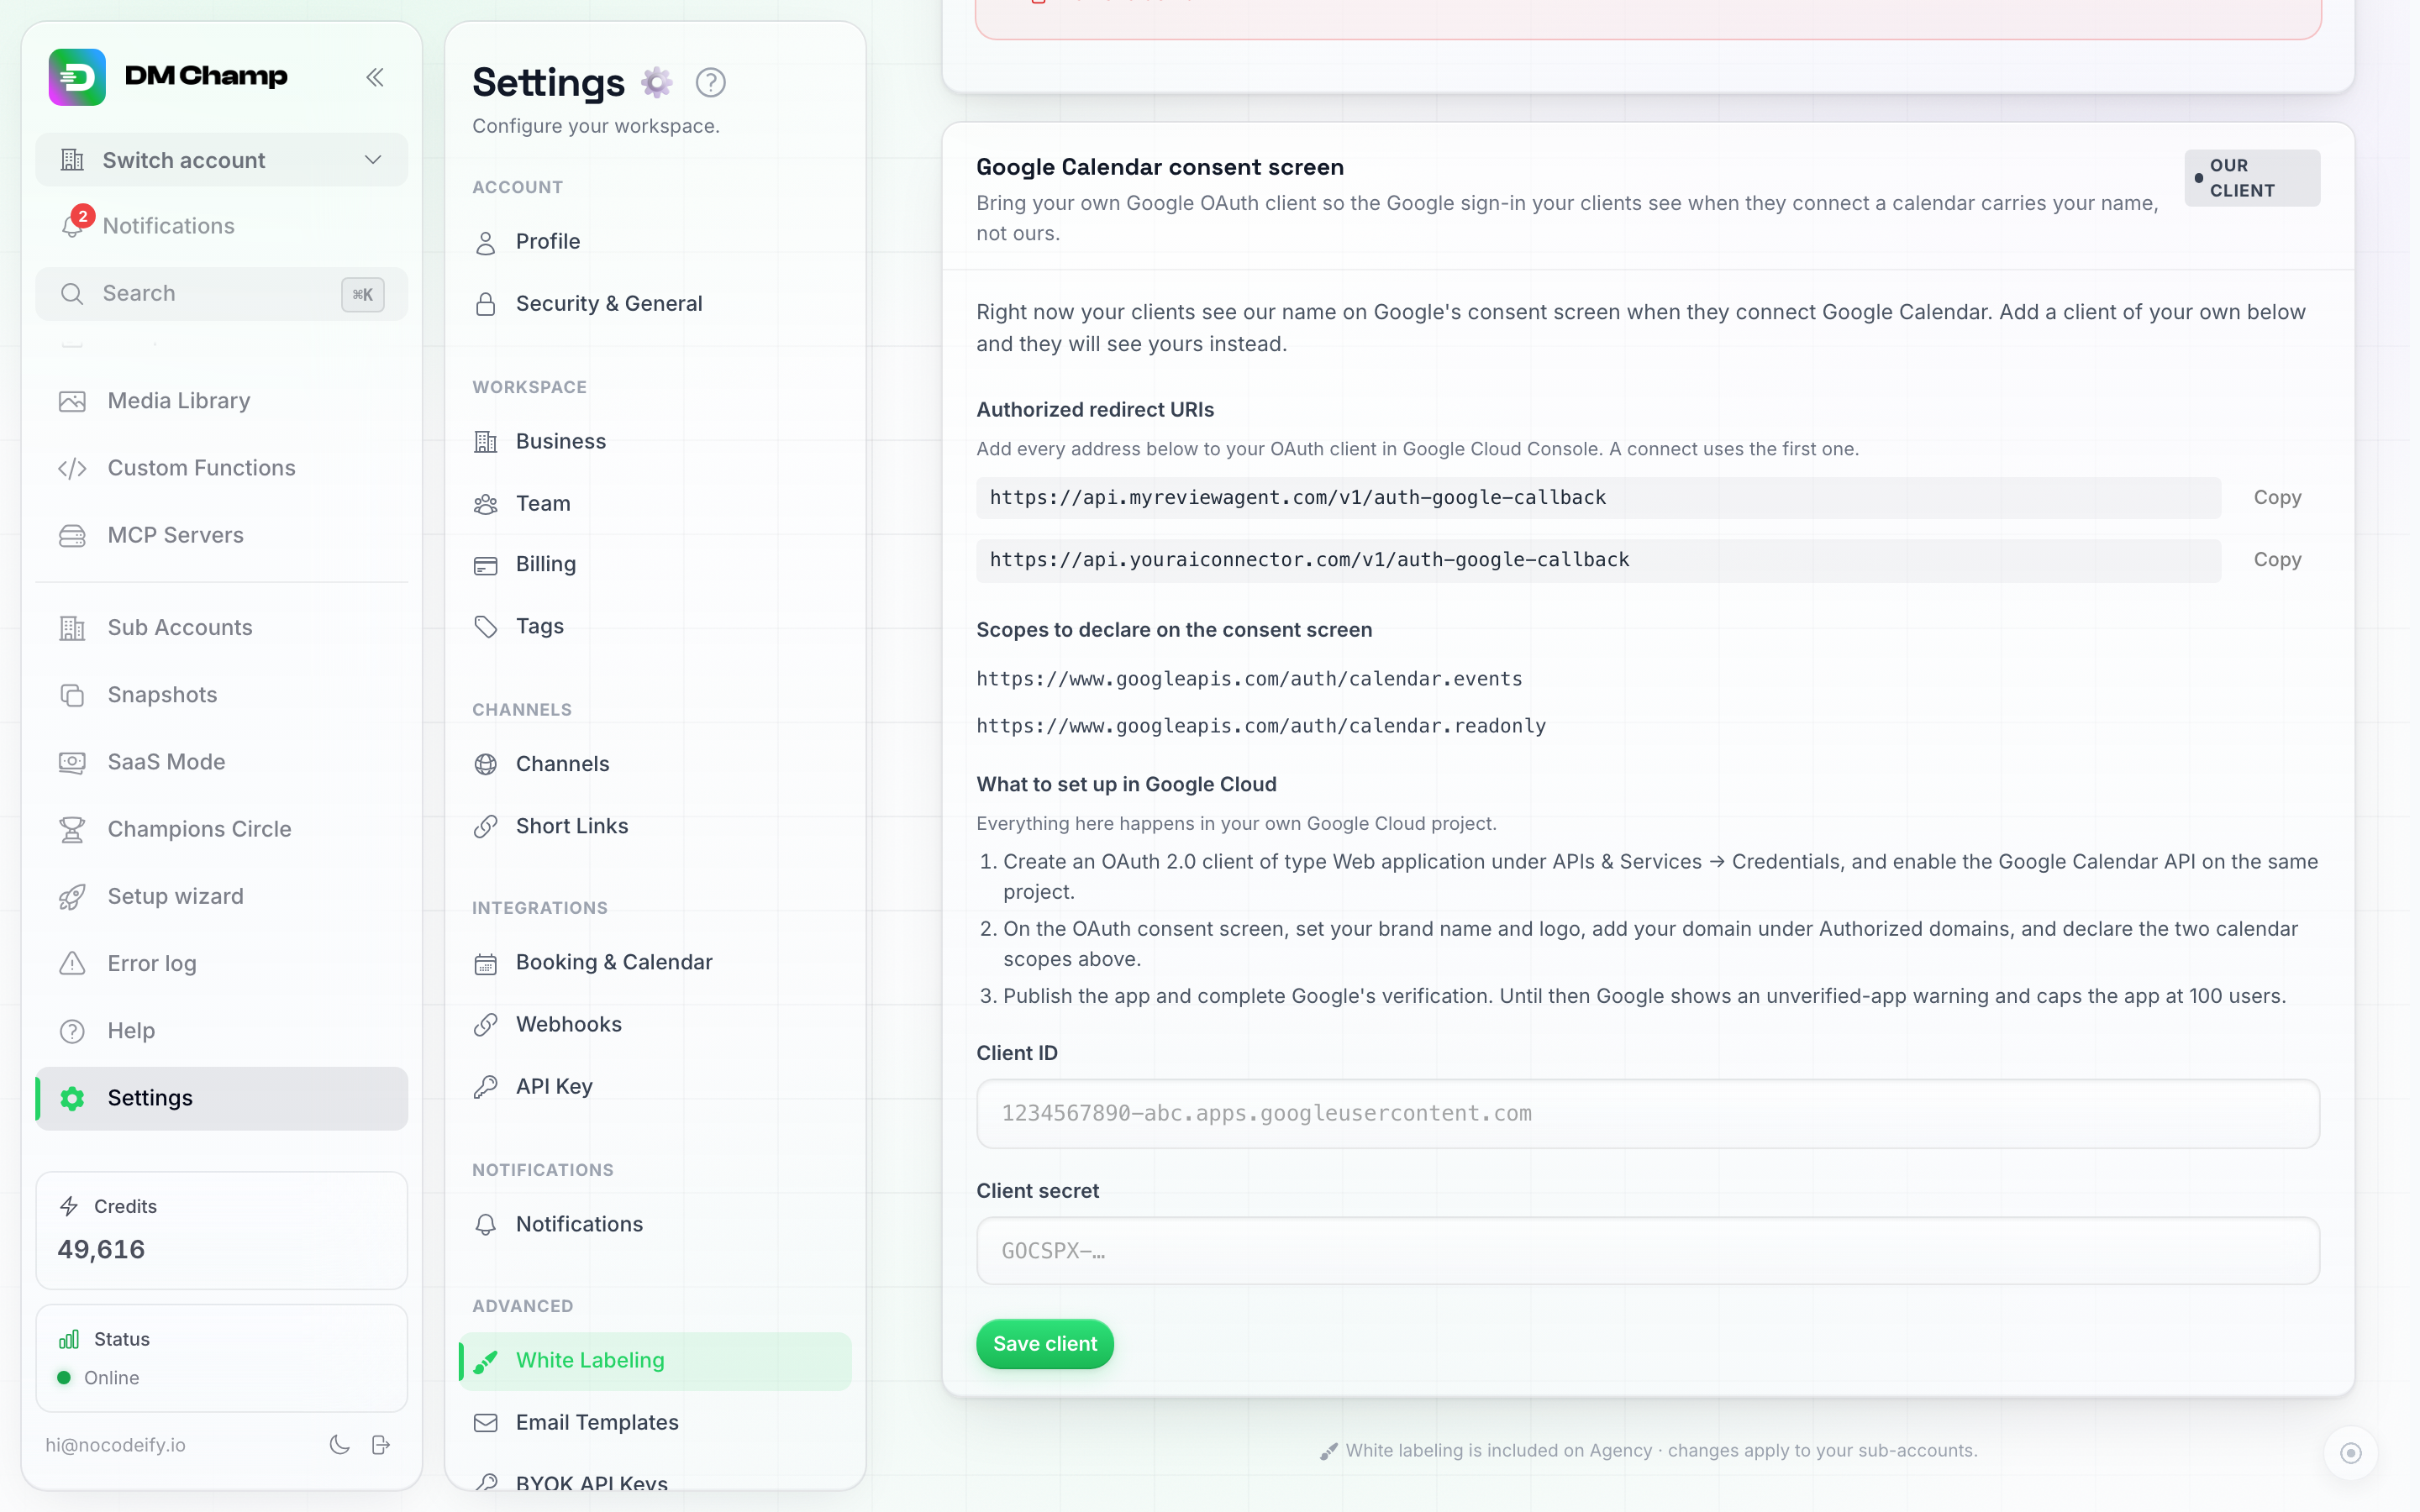
The card lists the redirect addresses to paste into Google first, then takes your Client ID and secret.
The card’s badge tells you which client is in use: Our client until you add one, Your client afterwards.
Setting it up
Everything on Google’s side happens in your own Google Cloud project, and the card walks you through it:
- Verify your
api.domain first (see Docs, API and MCP domains). Google only verifies a brand whose redirect address sits on a domain you own, so the connect has to come back throughapi.yourdomain.com. If the card lists only our neutral address, it says so in orange: add and verify yourapi.domain on the storefront above, and the branded address appears on its own. - Copy the redirect addresses. The card shows every address to add under Authorized redirect URIs on your OAuth client, each with a Copy button. The first one is the address a connect uses.
- In Google Cloud Console, create an OAuth 2.0 client of type Web application under APIs & Services → Credentials, paste the redirect addresses, and enable the Google Calendar API on the same project.
- On the OAuth consent screen (in Google Cloud Console it now sits under Google Auth Platform), set your brand name and logo and add your domain under Authorized domains on the Branding tab, then declare the two calendar scopes the card lists on the Data Access tab: click Add or remove scopes and paste both lines into Manually add scopes. The redirect addresses do not go here; they belong on your client (the Clients tab, step 3).
- Paste the Client ID and Client secret into the card and click Save client. We check the pair with Google before saving, so a wrong secret or a mistyped ID is refused on the spot with Google’s reason.
Google’s verification
A brand-new OAuth client starts in Google’s Testing mode: the sign-in window carries an “unverified app” warning and Google caps it at 100 users. To lose both, publish the app on the consent screen and submit it for verification. The calendar scopes count as sensitive, so Google reviews the app’s privacy policy, homepage and the domain the redirect lives on; that domain has to be one you can verify in Google Search Console, which is why step 1 matters. Verification typically takes a few days to a few weeks and is between you and Google.
Good to know
- Existing connections keep working. Calendars connected before you added your client stay on ours and keep syncing; only new connects (and reconnects) go through yours.
- Removing or replacing the client sends new connects back to our client, but calendars that were connected through the removed client stop syncing: only the client that issued a connection can keep it alive. Those clients see a reconnect prompt on their Booking & Calendar page.
- Calendar only. Connecting a Gmail mailbox for the Email channel keeps using our client.
Integration Names
Some integrations run on an account you resell under your own brand — Trafft’s white-label plan, for example, where your clients know Trafft as your product. The Integrations card lets you give such an integration your own name so the vendor’s name never shows up for your clients.
- In the Integrations card, fill in Booking provider name (Trafft) — for example your product’s name.
- Click Save.
From then on, on your white-label domain, that name replaces “Trafft” everywhere your clients would see it: the card on Booking & Calendar (including the Connect dialog), the booking provider picker on an AI Agent’s Bookings card, the provider badge on the Appointments page, the tool chips in Chats (for example “Booked via
Good to know:
- The name applies on your white-label domain. On DM Champ's own domain the vendor’s name is shown.
- Names are limited to 40 characters. Leave the field empty to show the vendor’s name again.
- The connection itself does not change. Your clients still connect with their own Trafft credentials (see Trafft).
- With a name set, the Connect dialog on your domain asks for the
.admin.wlbookings.comaddress — the one Trafft’s white-label plan gives your clients — instead of.admin.trafft.com. A client who types just the company part, e.g.acme, is connected asacme.admin.wlbookings.com. Error messages from the connection use your name too.
Help Menu Visibility
The last card on the panel, with three toggles:
| Toggle | Effect when off |
|---|---|
| Show help menu | Hides the “Help” navigation entry from your sub-accounts. You always see it. |
| Show API reference | Hides the API Reference page and its sidebar link from your branded docs site. |
| Show changelog | Hides the Changelog section from your branded docs site. |
Most agencies turn the last two off — clients don’t need to see internal feature feeds or developer docs. These toggles save immediately; there’s no separate Save button for this card.
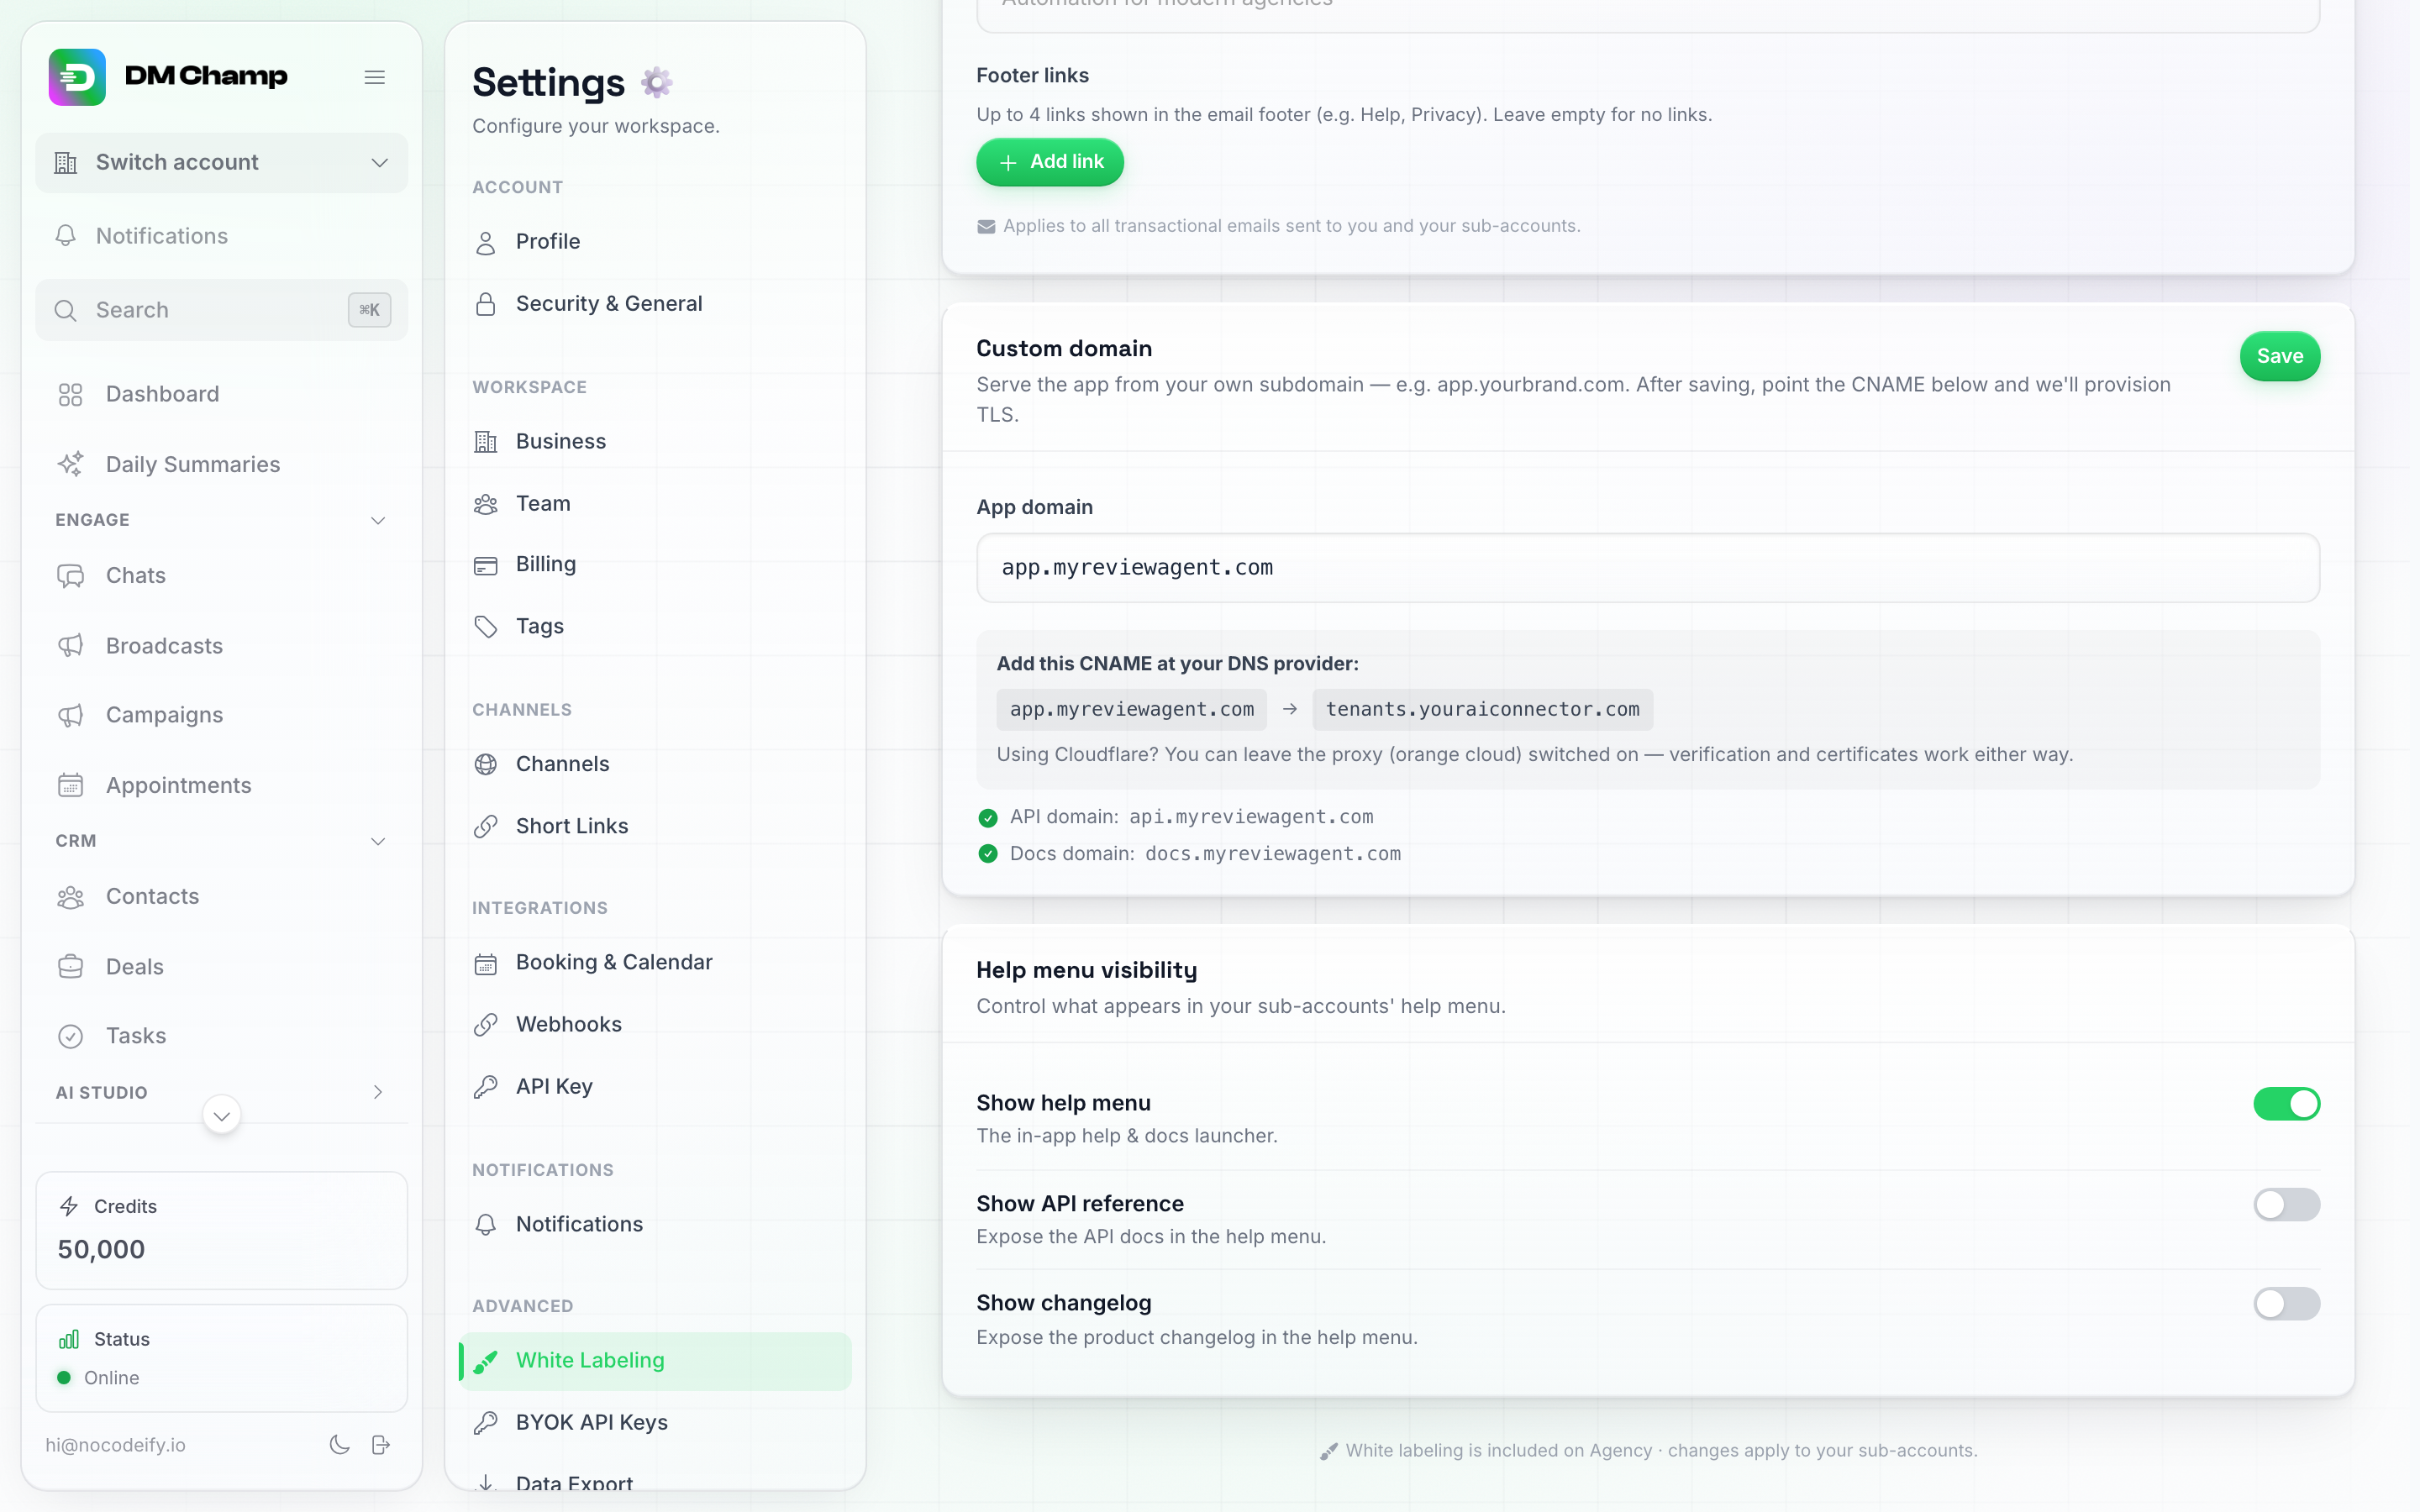
A live agency's Help Menu Visibility card: help menu on, API reference and changelog switched off — the common setup.
Custom Link
Adds a button of your own to your sub-accounts’ sidebar. It opens a page you choose, for example your own billing portal or client area, in a new browser tab. Useful when you bill your clients outside the platform and want them to find your top-up page from inside the app.
The card sits right below Help Menu Visibility and has three settings:
| Setting | What it does |
|---|---|
| Button label | The text on the button, up to 40 characters. Left empty, the button reads “Open portal”. |
| Link URL | The page the button opens. It must start with https:// or http://. Leave it empty to hide the button. |
| Use as the billing link | When on, the Credits card at the bottom of your sub-accounts’ sidebar opens the same page instead of the in-app billing page. |
Click Save on the card to apply the changes.
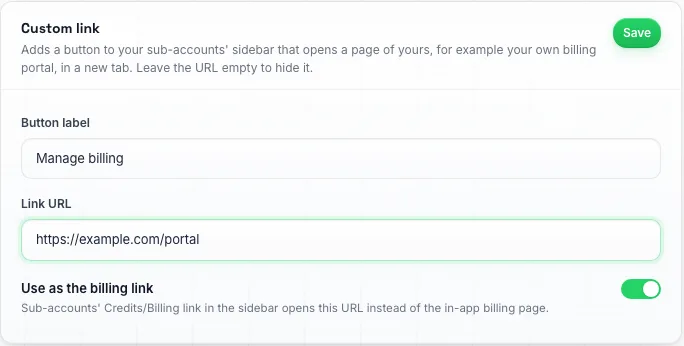
The Custom link card, set up to send clients to the agency's own billing portal.
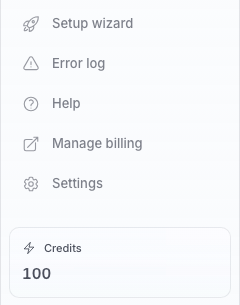
What a sub-account sees: the button sits right below Help and opens in a new tab.
Good to know:
- Only your sub-accounts see the button and the redirected Credits card. You still see your own sidebar and billing page as usual.
- The button appears on your white-label domain. A sub-account that signs in on DM Champ's own domain does not see it.
- The button sits right under Help in the sidebar, or at the end of the menu when you have turned the help menu off.
- Turning on “Use as the billing link” does not change what your clients can do in the app. It only changes where the Credits card sends them.
Support Chat for Your Clients
Lets your clients message you from inside their dashboard. You pick one of your own chat widgets, and your sub-accounts see it as a chat bubble in the bottom right corner of the app on your white-label domain. Their messages arrive in your own inbox, like any other chat on your widget.
The card sits right below Custom Link and has one setting:
| Setting | What it does |
|---|---|
| Chat widget | The chat widget your clients see. Pick your widget to switch it on, or Off to hide it. It is off until you turn it on. |
Click Save on the card to apply the change. Your clients see the bubble the next time they open or refresh the app.
Good to know:
- You need a chat widget of your own first. If you don’t have one yet, create it in your own account under Settings → Channels, on the Chat Widget card, then come back to pick it. See Chat Widget.
- Only your sub-accounts and their team members see the bubble, and only on your white-label domain. You never see it yourself, not even while you are signed in to a client’s account.
- When a client is signed in, their name and email are filled in on the chat for them, so you know who is writing.
- The bubble keeps the look, greeting and AI agent of your widget. Whatever answers chats on your widget answers your clients here too.
- The bubble is hidden on the Chats page and inside the automation builder, where it would cover buttons in the same corner. It comes back on every other page.
Client Assistant for Your Clients
Gives your clients an AI helper inside their own account that answers their how-do-I questions under your name, your colour and your mascot. It shows directions in the left menu, can open pages for them and answers in their language. When it cannot solve something, it brings you in. It is off until you switch it on, and nothing is charged before that.
The card sits right after Support Chat for Your Clients and has these settings:
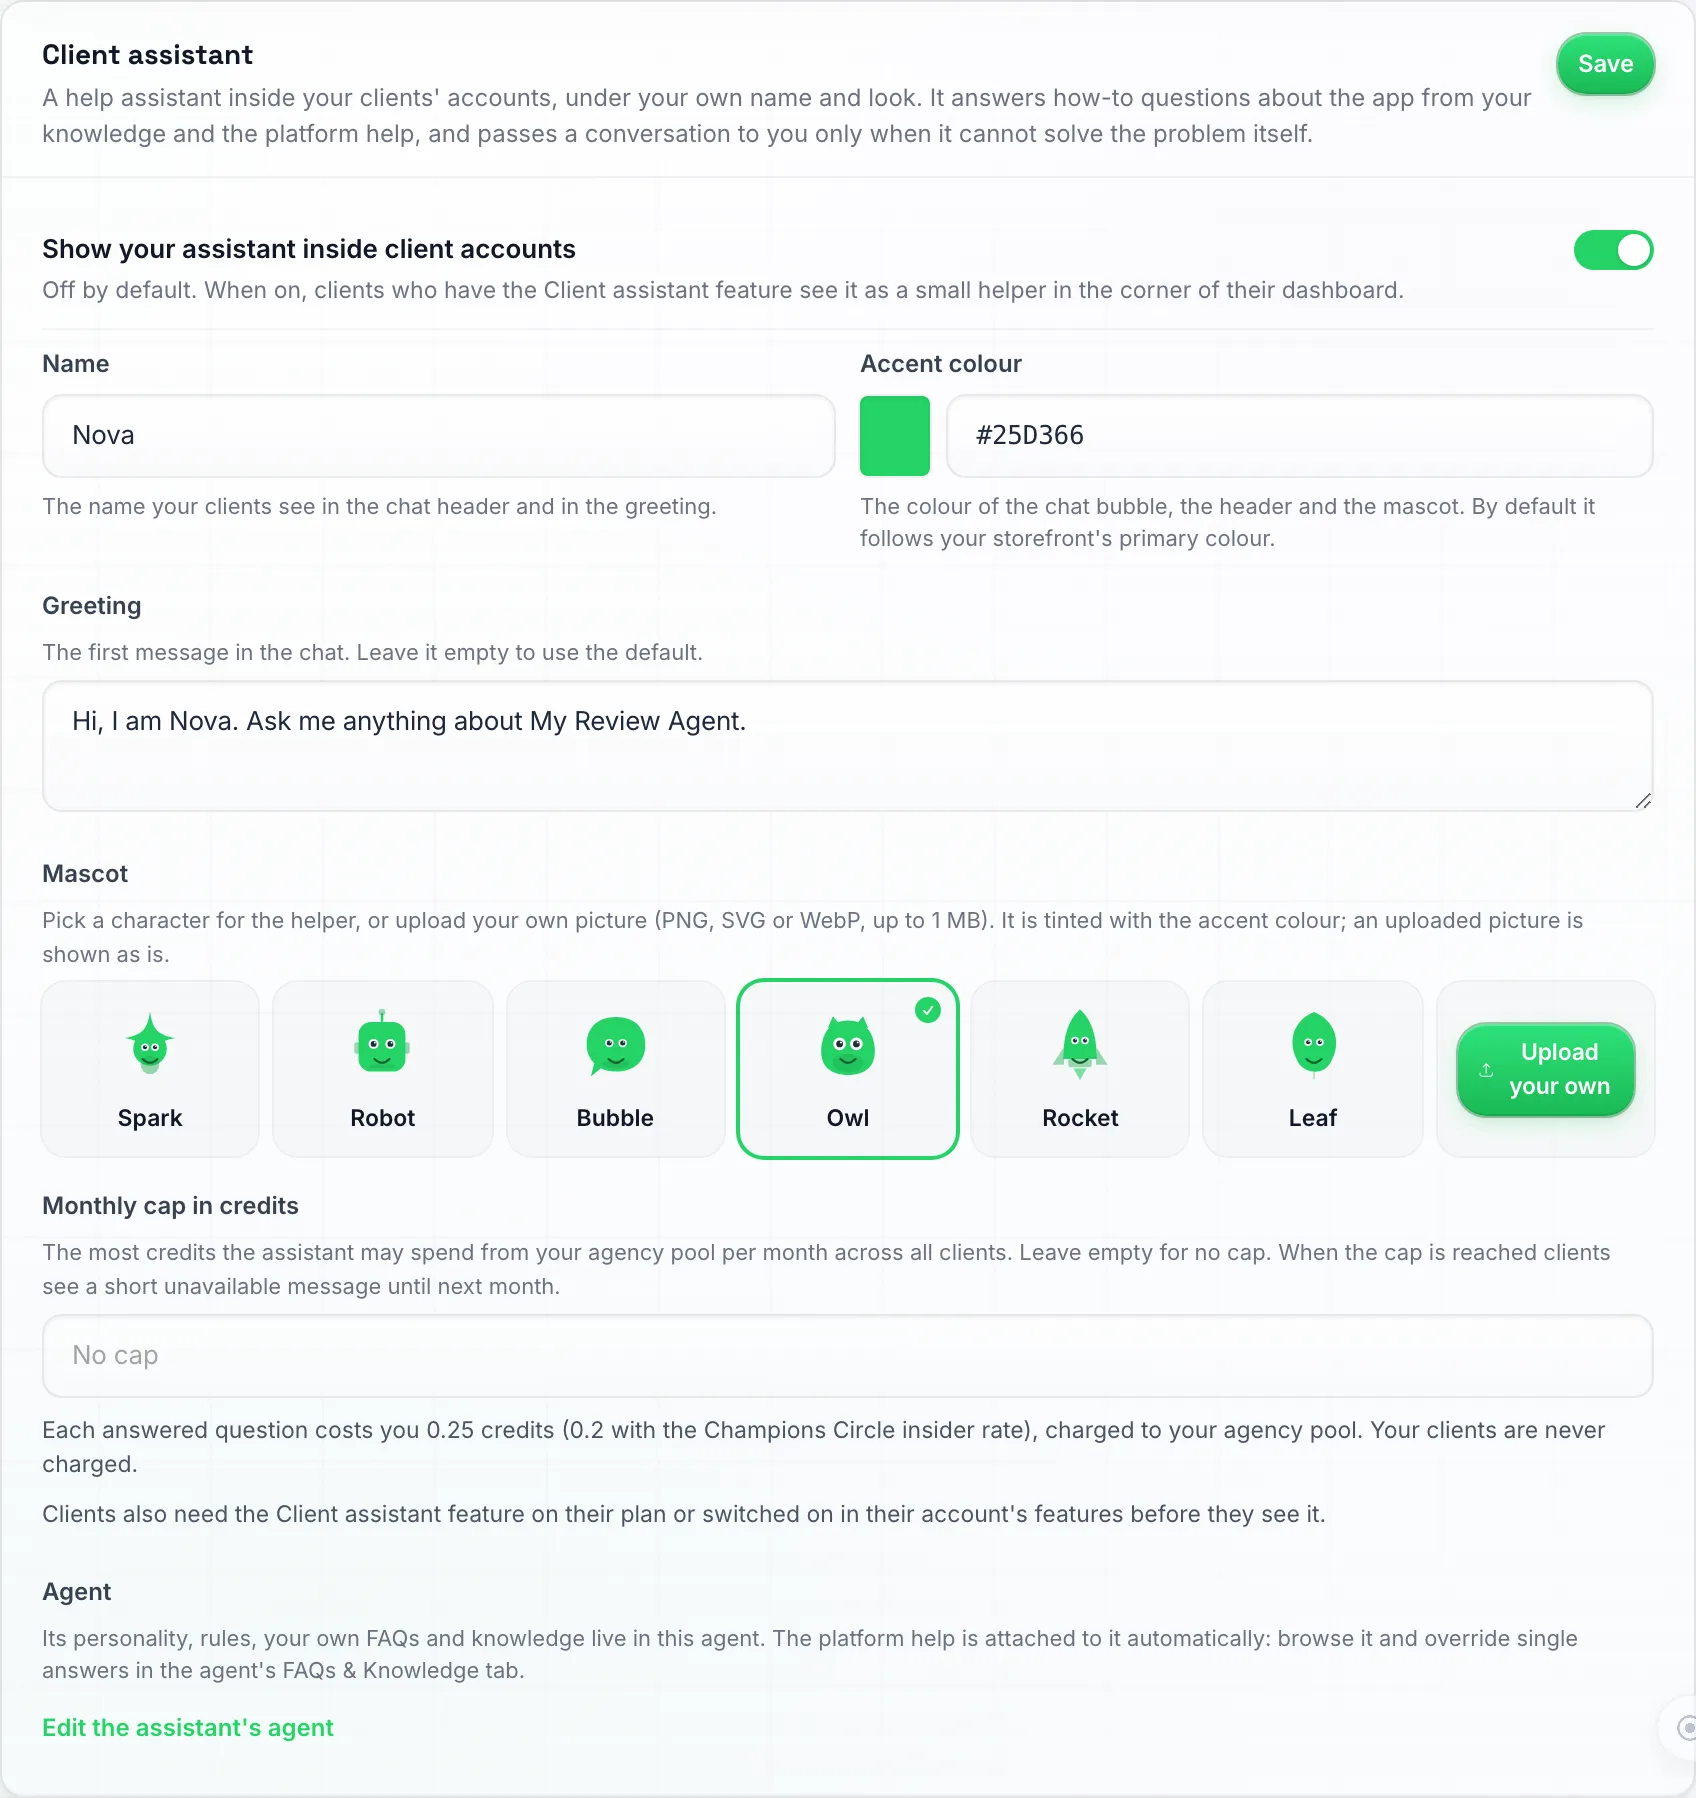
The Client assistant card: switch, name, accent colour, greeting, the six built-in mascots or your own upload, and the monthly cap. Save sits top right.
| Setting | What it does |
|---|---|
| Show your assistant inside client accounts | Switches the assistant on for your storefront. Off by default. |
| Name | What the assistant calls itself, up to 40 characters. Default: “Assistant”. |
| Greeting | The first message your clients see, up to 200 characters. Leave it empty for a default greeting with the name. |
| Accent colour | The colour of the bubble, the header and the mascot. Default: your storefront’s primary colour. |
| Mascot | Pick one of six built-in characters (Spark, Robot, Bubble, Owl, Rocket, Leaf), tinted with your accent colour, or upload your own image (PNG, SVG or WebP, up to 1 MB). An uploaded image is shown as a still picture; only the built-in mascots move their eyes. |
| Monthly cap in credits | The most the assistant may spend from your pool in a month, counted across all your clients together (one cap, not one per client). Leave it empty for no cap. |
| Edit the assistant’s agent | Opens the assistant’s agent in your own account, where you shape how it answers. |
Click Save on the card to apply the change.
Shape how it answers
The first time you save with the switch on, a Client assistant agent is created in your own account under AI Agents from a neutral template. Edit it like any other agent: personality, goal, rules, reply length, when to hand off to a person, its own FAQs and knowledge sources (your plans and prices, onboarding steps, support hours). Changes go through draft and publish, with versions and a test chat.
The Client assistant only answers inside your clients’ accounts. It never answers contacts on a channel, so it has no entry points and cannot be picked as a channel or contact agent. You switch it on per client in that sub-account’s features, under Productivity.
The assistant answers from two layers of knowledge:
- Platform help: how-to answers about every part of the app, kept current for you and read-only. You can browse and search the list in the agent editor.
- Your agent’s own FAQs and knowledge sources. When both answer the same question, yours wins.
To change a single platform answer, click Override on that entry in the Platform help list. It creates your own FAQ in its place, which you then edit. If the platform answer changes later, your override shows Platform answer changed since you overrode it, so you can check whether yours still holds.
Switch it on per client
The storefront switch alone does not show the assistant to anyone. Each client also needs the Client assistant feature, set in a pricing tier’s features (Productivity group) or on the client’s Edit → Features. A second feature, Client assistant can make changes, lets the assistant change the client’s account for them (agents, knowledge, contacts, settings) after the client confirms each change. Without it, the assistant answers and shows the client where to click. Both features are off by default, and a tier’s feature list applies at purchase and renewal like every other feature. See Sub-Accounts.
What your clients see
The assistant appears as a floating helper with your name, greeting, colour and mascot, inside the client’s account on your white-label domain only. It never names the platform behind the app, and it only links to your own help docs (your docs domain, or the neutral help site when you have none). It only explains features the client’s plan includes and pages you show in their menu. When a client asks about something outside their plan, it says that is not part of their plan and to contact you.
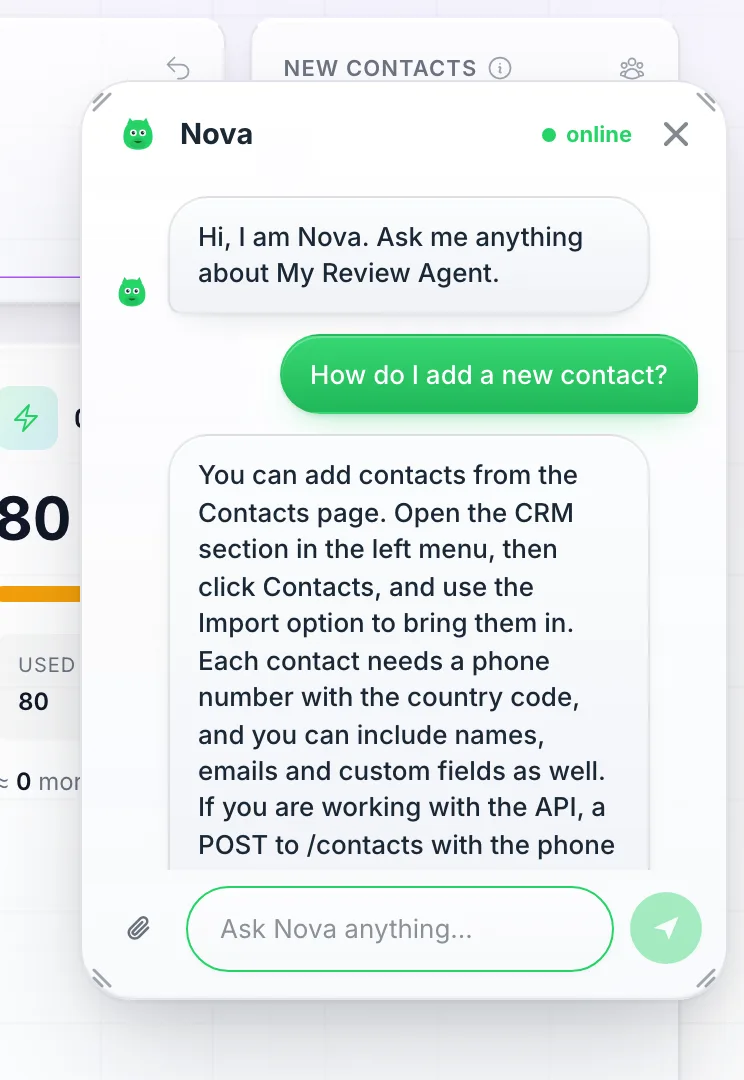
What a client sees: the panel carries your assistant's name and mascot, answers with directions in their menu and offers to open the page.
When the assistant brings you in
The assistant works the problem itself first, even when a client asks for a person. Only when it is stuck after a real attempt does it offer the client two routes: leave you a note while the chat stays open, or pause the chat until someone from your team replies. Either way the conversation is in your own Chats inbox as a chat widget conversation under your Client assistant agent, named after the client, and you get a Human alert by email, push or in-app, following your notification settings. A note also creates a task on your task board. The holding message your client sees names your app name and support email from White Labeling → Brand, so fill those in.
What it costs
Each answered question costs you 0.25 credits from your pool, or 0.2 credits for Champions Circle agencies through the insider rate, applied automatically. That is one charge per answered question. Your clients are never charged and there is no client rate for it. The charges show in your agency usage report, per client, as Client assistant question.
Clients can also drag the mascot onto a part of the page to have it explained. Each drop counts as one answered question and is charged the same way. Clients never see a credit balance or how much of your cap is left.
When your pool is empty or the monthly cap is reached, your clients see “Your assistant is unavailable right now, please contact
Good to know:
- When the assistant is on for a client, that client does not see the Support Chat for Your Clients bubble. The assistant is the way in, and its hand-offs land in the same inbox.
- When you switch into a client account that has the assistant, you see the client’s branded assistant, exactly what they see, not Champ. Champ stays yours in your own account.
Plan Requirements for White-Labeling
White-labeling is unlocked by the White labeling feature on your plan, not by a plan name. It is included on the Agency and Agency Unlimited plans and on AppSumo tiers 3, 4, 5 and 6. It is not included on the Business plan or on AppSumo tiers 1 and 2. To check, open Settings → Billing and look for White labeling under What’s included in your plan.
If your plan doesn’t include White labeling and you want to white-label the platform:
- In the sidebar, click Settings.
- In the Settings menu, click Billing (under Workspace).
- Click Get Started on the Agency or Agency Unlimited tile and complete checkout.
- White Labeling now appears under Advanced in the Settings menu.
How It Works for Your Clients
Once white-labeling is active:
- Your clients access the platform at your custom domain (e.g.,
app.youragency.com). - They see your company name, favicon, and branding throughout the interface.
- They have no indication of the underlying platform powering their experience.
- All functionality works identically — chats, broadcasts, appointments, and AI features are all available.
- You manage their accounts as sub-accounts from your Sub Accounts page.
Install as a Mobile App (PWA)
Your white-label domain doubles as a fully white-labeled mobile app. Clients can install it to their phone’s home screen in a few taps — no App Store, no developer license needed — and it opens like a native app with your agency’s logo and name.
💡 The mobile app is a Progressive Web App (PWA), not an App Store app. To publish a true App Store / Play Store listing under your own brand, you’d need to pay for Apple’s and Google’s developer licenses and submit your own builds. The PWA install is the practical alternative — 95% of the value, none of the licensing hassle.
Before You Start
- Make sure your custom domain is connected and live (see Custom Domain above).
- Set your agency logo and app name in the Brand card — these are what your clients see on the install screen and on their home screen.
Install on Android (Chrome)
- Open your white-label domain (
app.youragency.com) in Chrome on the phone — notapp.dmchamp.com. The white-label domain is what makes the install branded. - You may see an install prompt appear automatically. If you do, tap Install and you’re done.
- If no prompt appears, tap the three-dot menu in the top-right of Chrome → Add to phone (or Install app).
- Confirm with Install in the bottom sheet.
- The icon now appears on the home screen with your agency’s logo and name.
Install on iPhone (Safari)
- Open your white-label domain in Safari — not
app.dmchamp.com. - Tap the Share button (the square with the up-arrow at the bottom of the screen).
- Scroll the share sheet down/right until you see Add to Home Screen and tap it.
- Confirm with Add.
- The icon now appears on the home screen with your agency’s logo and name.
Enable Push Notifications
Once the app is installed and opened from the home screen, you can turn on native push notifications:
- Open the installed app from the home screen.
- Go to Settings → Notifications.
- Toggle on Web Push for any categories you want to be notified about (Human Alerts, New Contacts, Credit Alerts, etc.).
- Approve the browser permission prompt when it appears.
- Click Send Test Notification to confirm it works. You should get a push on the lock screen within a few seconds, with your agency’s logo as the notification icon.
⚠️ Always test from the white-label domain, not
app.dmchamp.com. Push subscriptions are tied to the domain you registered them on, so testing from the master domain won’t trigger pushes for the installed white-label app and can show misleading errors.
What Clients Can Do Inside the App Today
The installed app currently supports the chat experience end-to-end (replying to contacts, AI bot handover, push notifications). More features are being rolled into the mobile experience over time. For everything else, clients can still open the full dashboard at your white-label domain in any browser.
Troubleshooting
My domain isn’t going live
- Double-check the CNAME record at your registrar matches exactly what the Custom domain card shows — same host, same target (
tenants.youraiconnector.com). - Give DNS some time to propagate — usually under an hour with modern registrars (Cloudflare, Namecheap), occasionally longer elsewhere.
- If your domain is on Cloudflare with the proxy (orange cloud) enabled, that’s fine — leave it on. But check SSL/TLS → Overview and make sure the encryption mode is Full (strict). Flexible is the usual cause of a “too many redirects” error on a domain whose DNS is otherwise correct.
- If you visited the domain before it finished provisioning, your browser may have cached a broken page — try an incognito/private window.
- Still stuck after 24 hours? Contact support with the domain name and a screenshot of the Custom domain card.
I changed my domain and now nothing loads
Check the CNAME for the new address exists at your registrar and points at tenants.youraiconnector.com — a renamed domain needs its own record, the old one doesn’t carry over. If the record is correct and the address still won’t load after an hour (a certificate warning, or a page that never appears), contact support with the old and new domain names.
The logo doesn’t show on my login page
Upload a logo in the Logo & Favicon card and hard-refresh your custom domain (Ctrl+Shift+R / Cmd+Shift+R) — until a logo is uploaded, the login page shows a broken-image icon where it belongs.
Emails say “DM Champ” instead of my brand
The App name field on the Brand card is empty. Emails, page titles and the home-screen shortcut show the neutral placeholder “DM Champ” until you fill it in. Type your brand name, click Save on the Brand card, and send a fresh test email from Email templates — the sender name, the footer and the dark-mode logo all follow the App name.
Google’s sign-in window still shows the platform’s name when a client connects a calendar
No Google OAuth client of your own is saved yet, or the client was connected before you added one. Add your client on the Google Calendar consent screen card at the bottom of the White Labeling page (see Google Calendar Consent Screen); connections made before that keep using our client until the client disconnects and reconnects.
The email header shows my logo but the footer looks generic
Same cause as above: an empty App name. Fill it in and save the Brand card.
Need Help?
If you need assistance setting up white-labeling or configuring your custom domain, reach out via our email support.