Your First 30 Minutes
A focused, six-step path from a fresh account to your first real AI-handled conversation. No rabbit holes, no advanced settings — just the shortest line between “I just signed up” and “the bot just replied to a real person on my behalf.”
Each step has a time estimate and a link to the deeper page if you want more detail later. Plan for about 30 minutes total. If you hit a wall on any step, skip ahead — you can come back to it.
Prefer to see it? Click through the whole flow:
What you’ll have at the end
- One channel connected (WhatsApp, SMS, Instagram, or Messenger)
- One AI bot configured with your business basics
- One AI Agent live on that channel
- One test conversation where the bot replied to you in real time
That’s the whole loop. Once that loop works once, everything else in this platform is a refinement on top of it.
New here? This walkthrough uses AI Agents, the bot you build once and reuse. A Broadcast is the separate thing you create when you want to message a list. Campaigns Have Moved to Broadcasts & Agents explains how the two fit together.
Step 1 — Connect a channel (≈ 5 min)
The bot can’t reply to anyone until it has a way to receive messages. Pick one channel for now — you can add more later.
- Fastest start: WhatsApp Web. Scan a QR code with your phone and you’re connected in under two minutes. Best for testing, personal numbers, and small-volume outreach.
- For scale: WhatsApp Business API. Higher official limits and lower ban risk. Takes longer to set up — Meta verification involved — but it’s the right channel if you’re planning real volume.
- Other options: SMS, Instagram DMs, Facebook Messenger, or the Chat Widget for your website.
You can connect a channel from Settings → Channels → Channels, where every channel gets its own card with a Connect button — click Settings near the bottom of the left sidebar to get there.
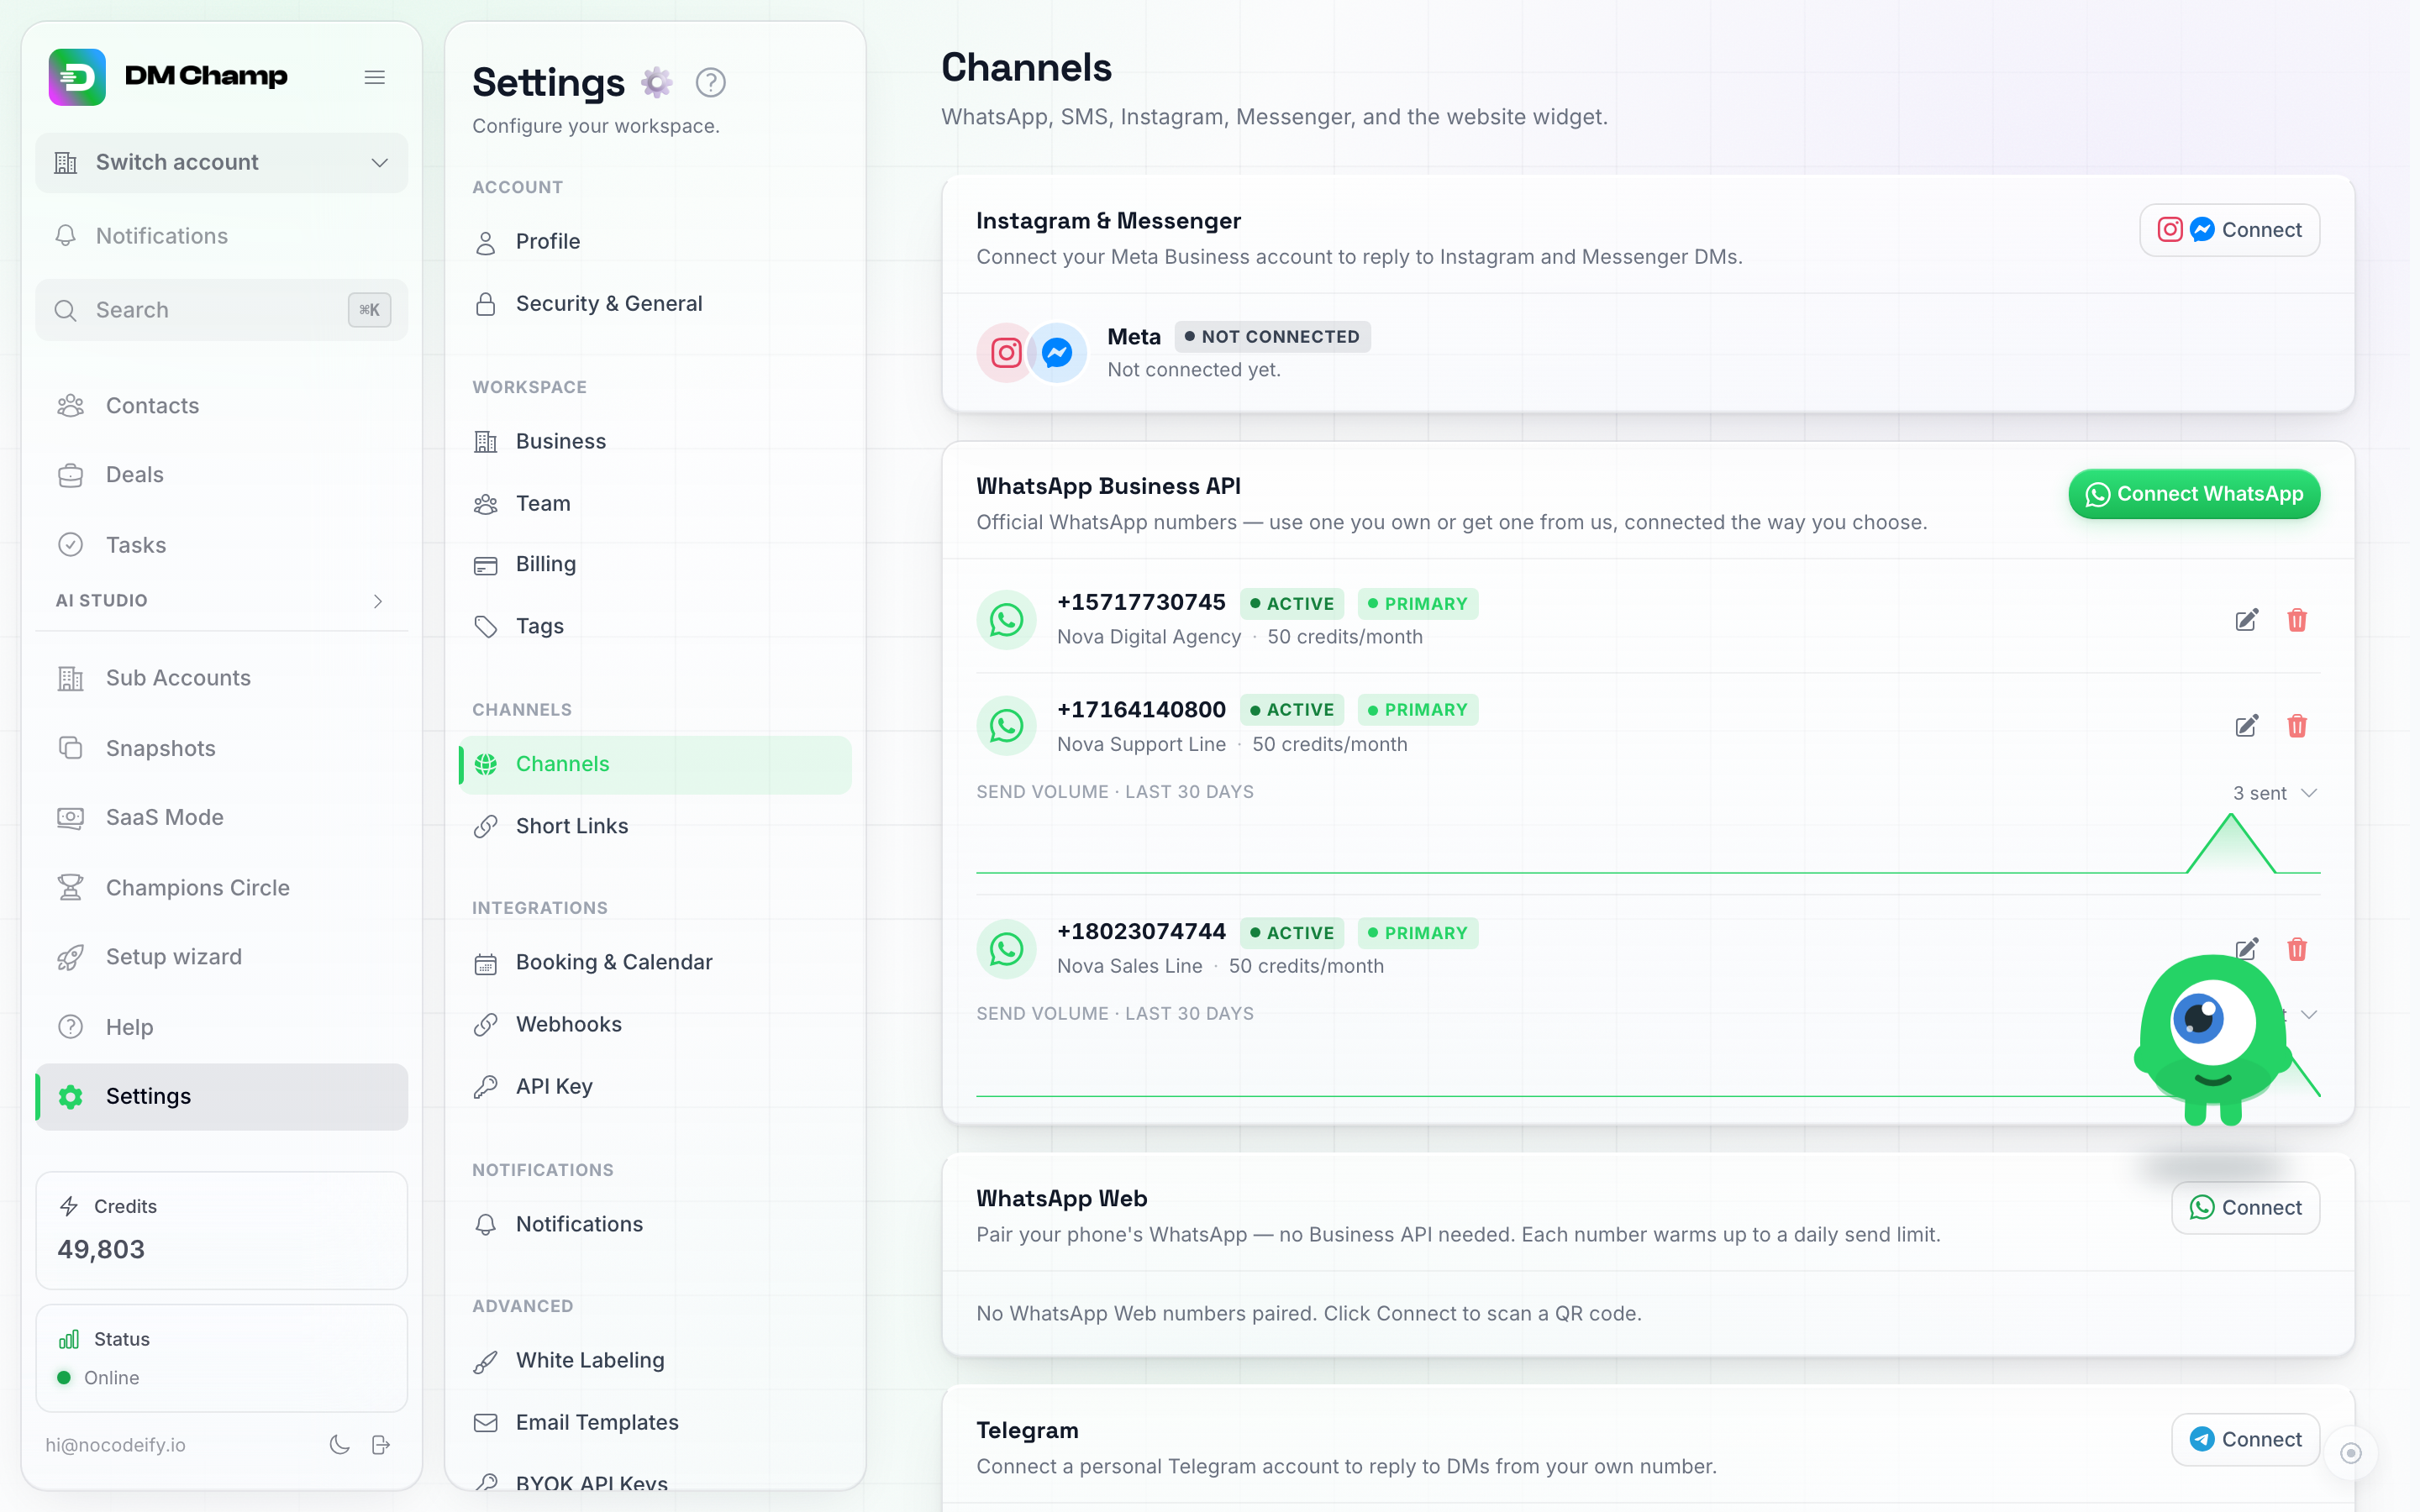
Settings → Channels → Channels — pick one channel and click its Connect button.
Heads up — WhatsApp Web only: If you’re connecting a brand-new SIM that has never received a WhatsApp message, text it from your personal phone 3–5 times and wait a few hours before connecting it. Otherwise Meta (the company behind WhatsApp) will ban it within minutes of your first outbound message. The full reasoning lives in the Scaling WhatsApp Outreach Safely guide — read that page before you connect anything serious.
Step 2 — Tell the bot what to say (≈ 10 min)
The bot needs a playbook: who you are, what you sell, and how you want it to talk. Think of it like onboarding a new sales rep on their first day — except this rep reads it once and remembers everything forever.
You configure the bot inside an AI Agent, so this happens together with Step 3 below: open AI Agents in the left sidebar (under AI Studio), create or open an Agent, then use its AI Instructions step — the first one in the editor. It’s a structured editor, not one big text box: four collapsible sections, each with a handful of focused fields (click Edit as text if you’d rather write it as one plain-text block). Fill in:
- Persona & Goal. The bot’s name/role and personality (business basics, tone of voice — casual, professional, playful, direct), and the goal of the conversation. Book a call? Qualify a lead? Answer questions? Drive to a payment link? Be specific — “help the visitor” is too vague.
- Business Context. Facts about your company the AI can lean on — your offering, who it’s for.
- Conversation Behavior. How the AI should steer and guard the chat, including hard limits: don’t quote prices, don’t make promises about delivery dates, don’t argue, etc.
- Escalation & Wrap-up. When to hand off to a human and when to stop.
Keep it focused — one page of clear instructions beats five pages of waffle. The AI Bot Setup page has the full breakdown of every available setting, but you can ignore the advanced toggles for now.
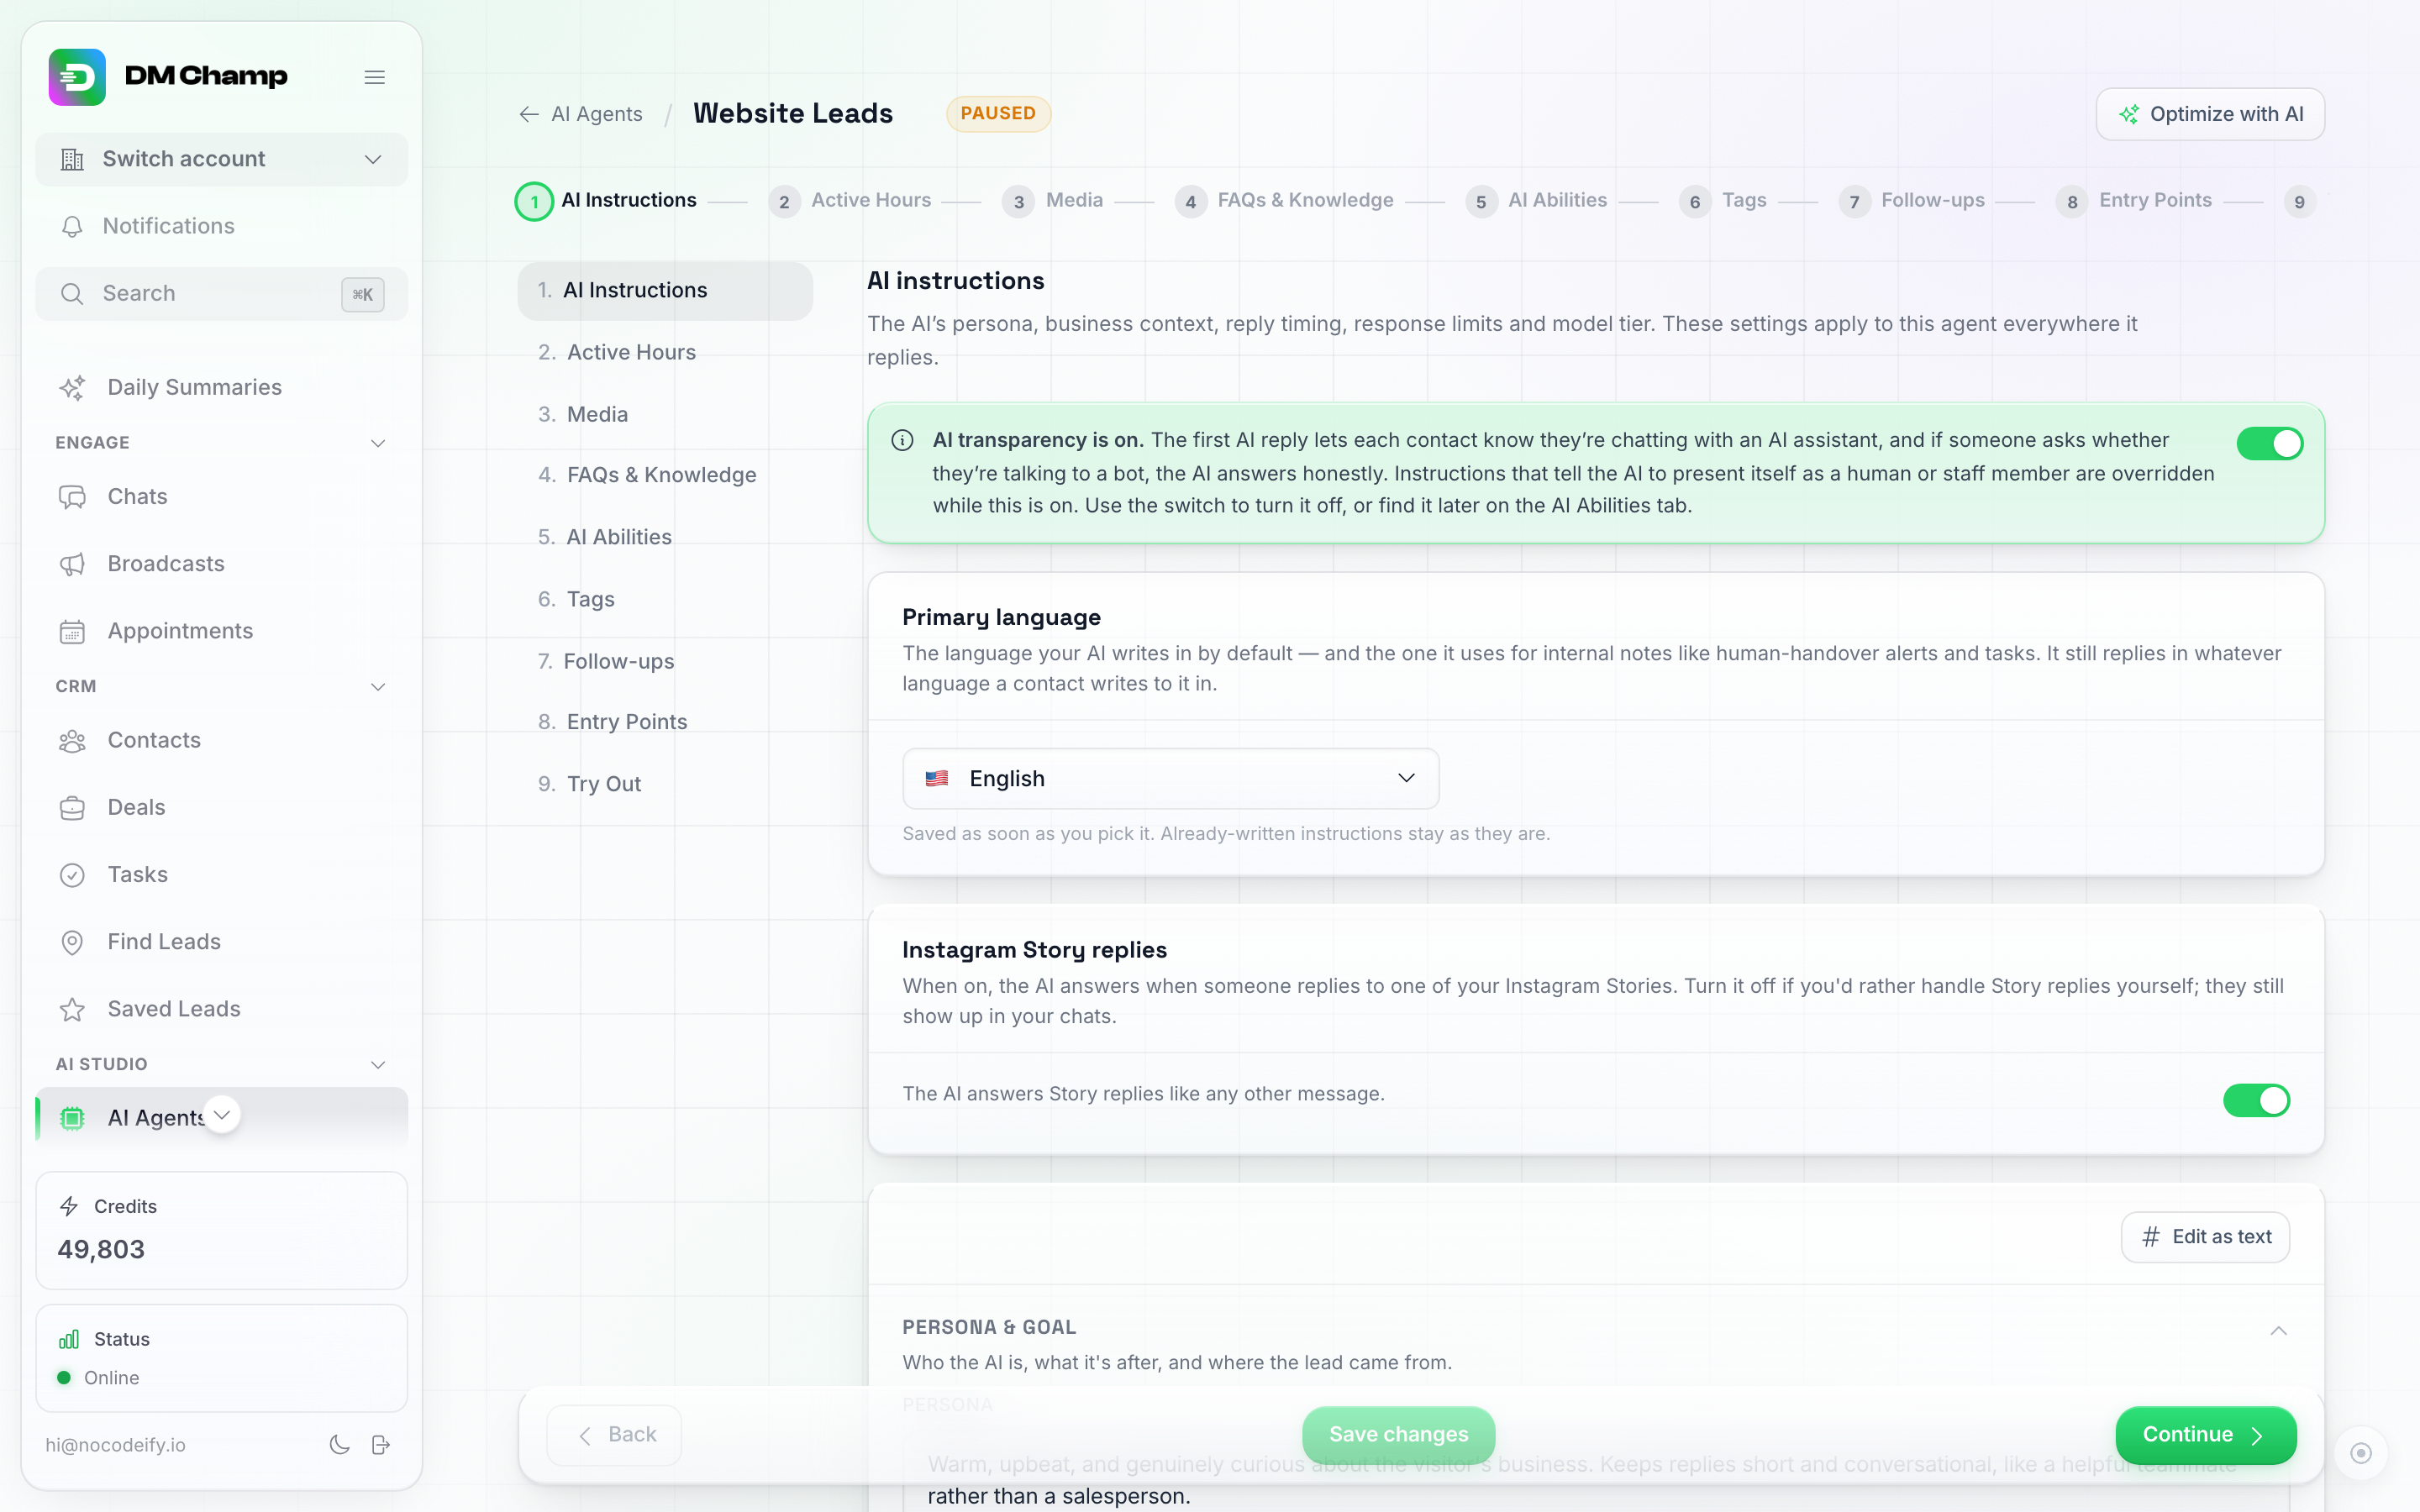
AI Instructions — the playbook, broken into structured sections: who you are, what you sell, your tone, your goal, and your hard limits.
Scroll down within the same step and you’ll also find reply timing, response limits, AI response speed, and the AI quality model tier — they all live on this one step.
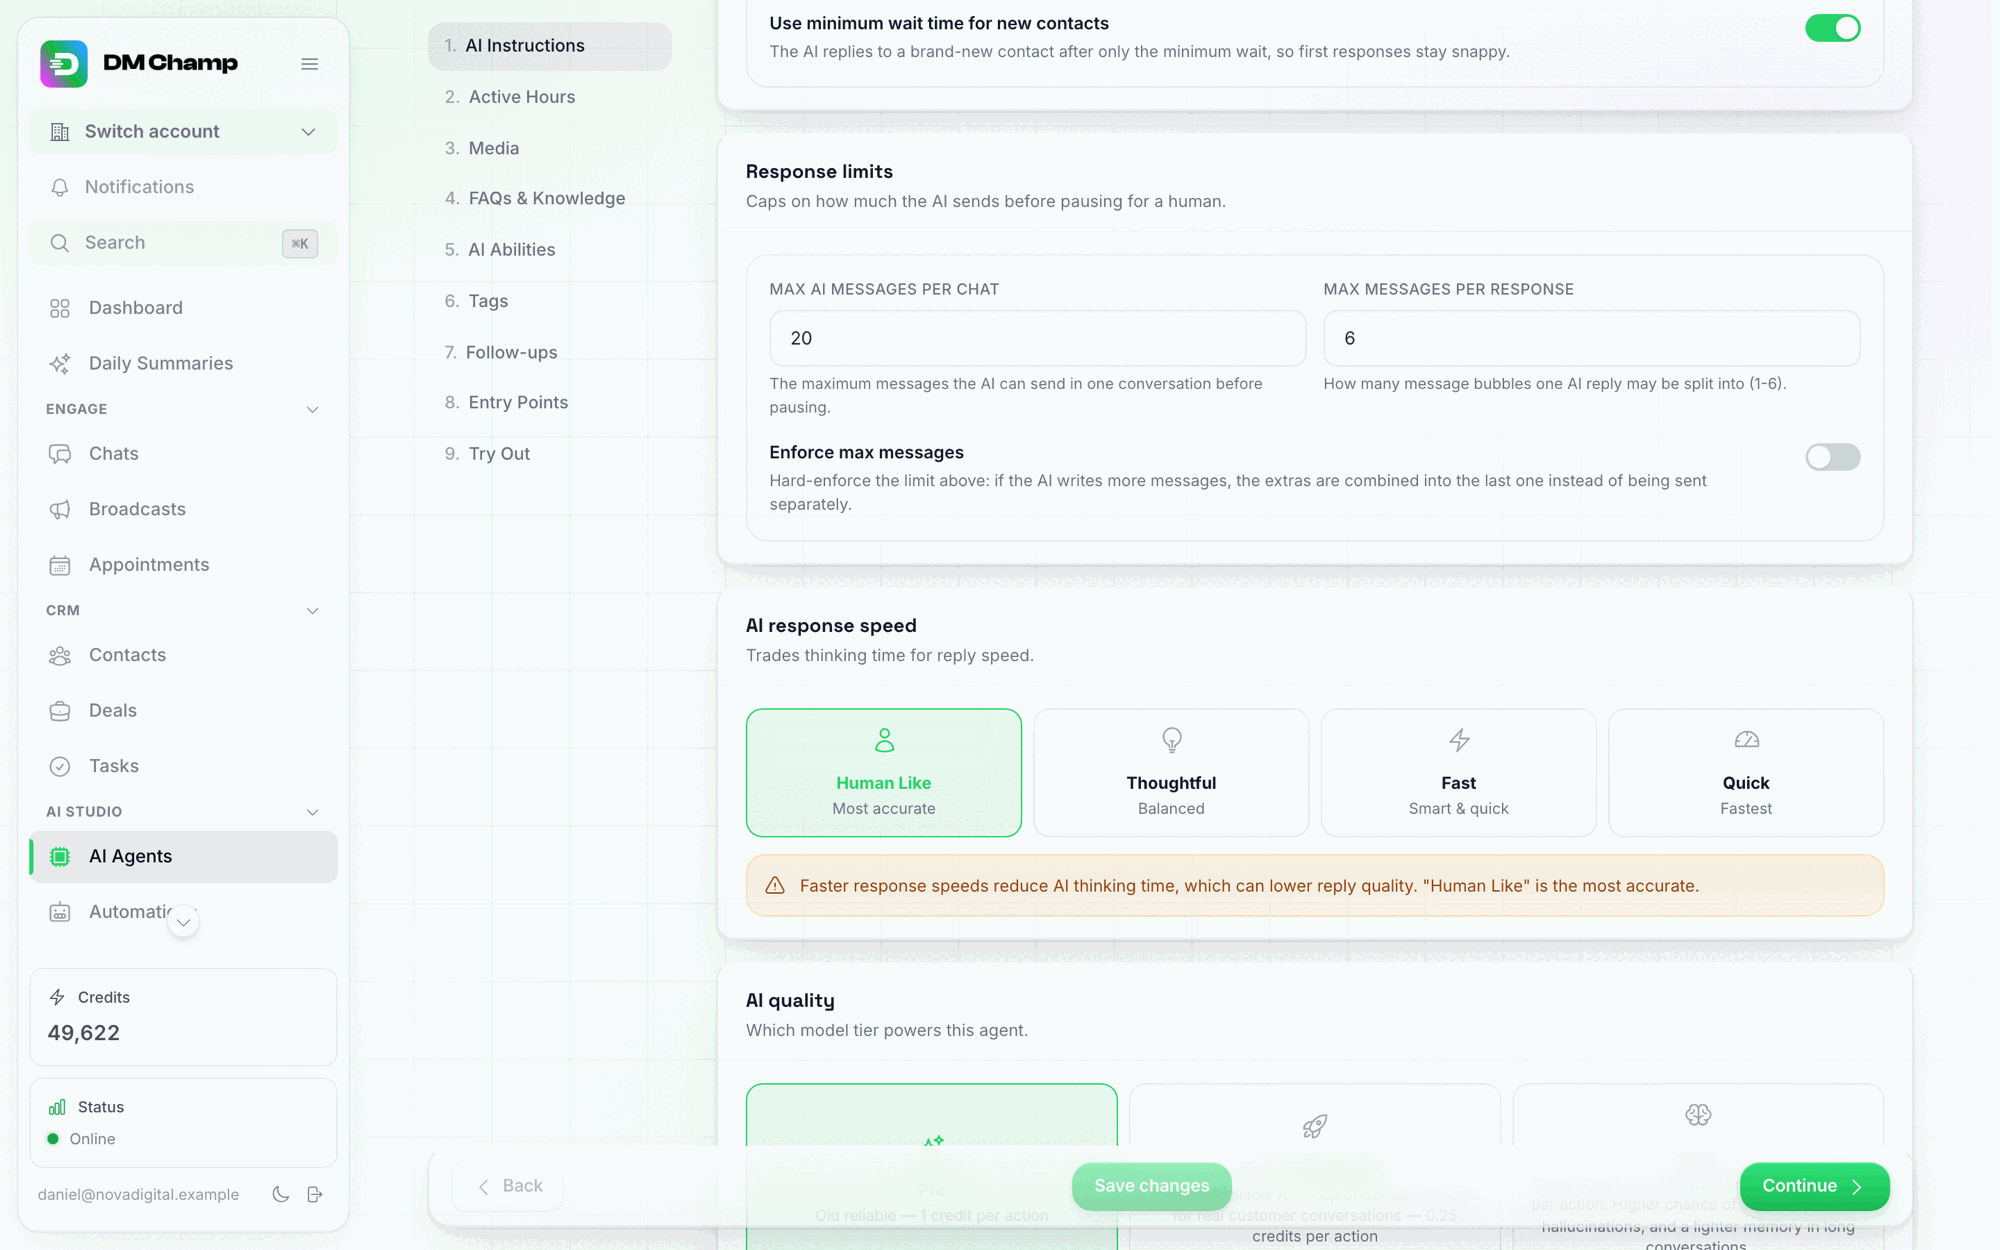
Further down the same step — reply timing, response limits, AI response speed, and AI quality (model tier) all live here too.
Recommended starter settings: Response delay 5–30 seconds (makes replies feel human, not instant-bot), for AI Quality pick Max if it’s offered on your account, or Mini if you’re watching credits, and if you only see Pro, choose Pro; max messages per conversation 20 (the bot pauses and alerts you in the app for handoff if a chat runs long — turn on email alerts in Settings → Notifications if you want an email too).
Reusable by design: because the playbook lives on the AI Agent, you can point a Broadcast — or a second channel — at the same Agent later without rewriting any of it.
Step 3 — Create your first AI Agent (≈ 5 min)
An AI Agent tells the platform “when a message comes in on this channel, use this bot to reply.” Without an Agent answering the channel, nothing happens — the bot is just sitting there with no instructions to fire.
- Open AI Agents in the left sidebar, under AI Studio (if you’ve folded that group away, click AI Studio to open it).
- Click New agent in the top right.
- The quickest route is Build from your website: type your website address, click Build agent, and wait the minute or two it takes to read your pages and write the agent for you — you land in its editor with the instructions already filled in. Prefer to write everything yourself? Pick Start blank, give the agent a name and language, and click Create agent.
- Finish by telling the platform this agent should answer the channel you connected in Step 1 — open the agent’s Entry Points step and add a rule for that channel, or pick the agent for that channel in the Who answers new conversations panel on the AI Agents page. See Entry Points.
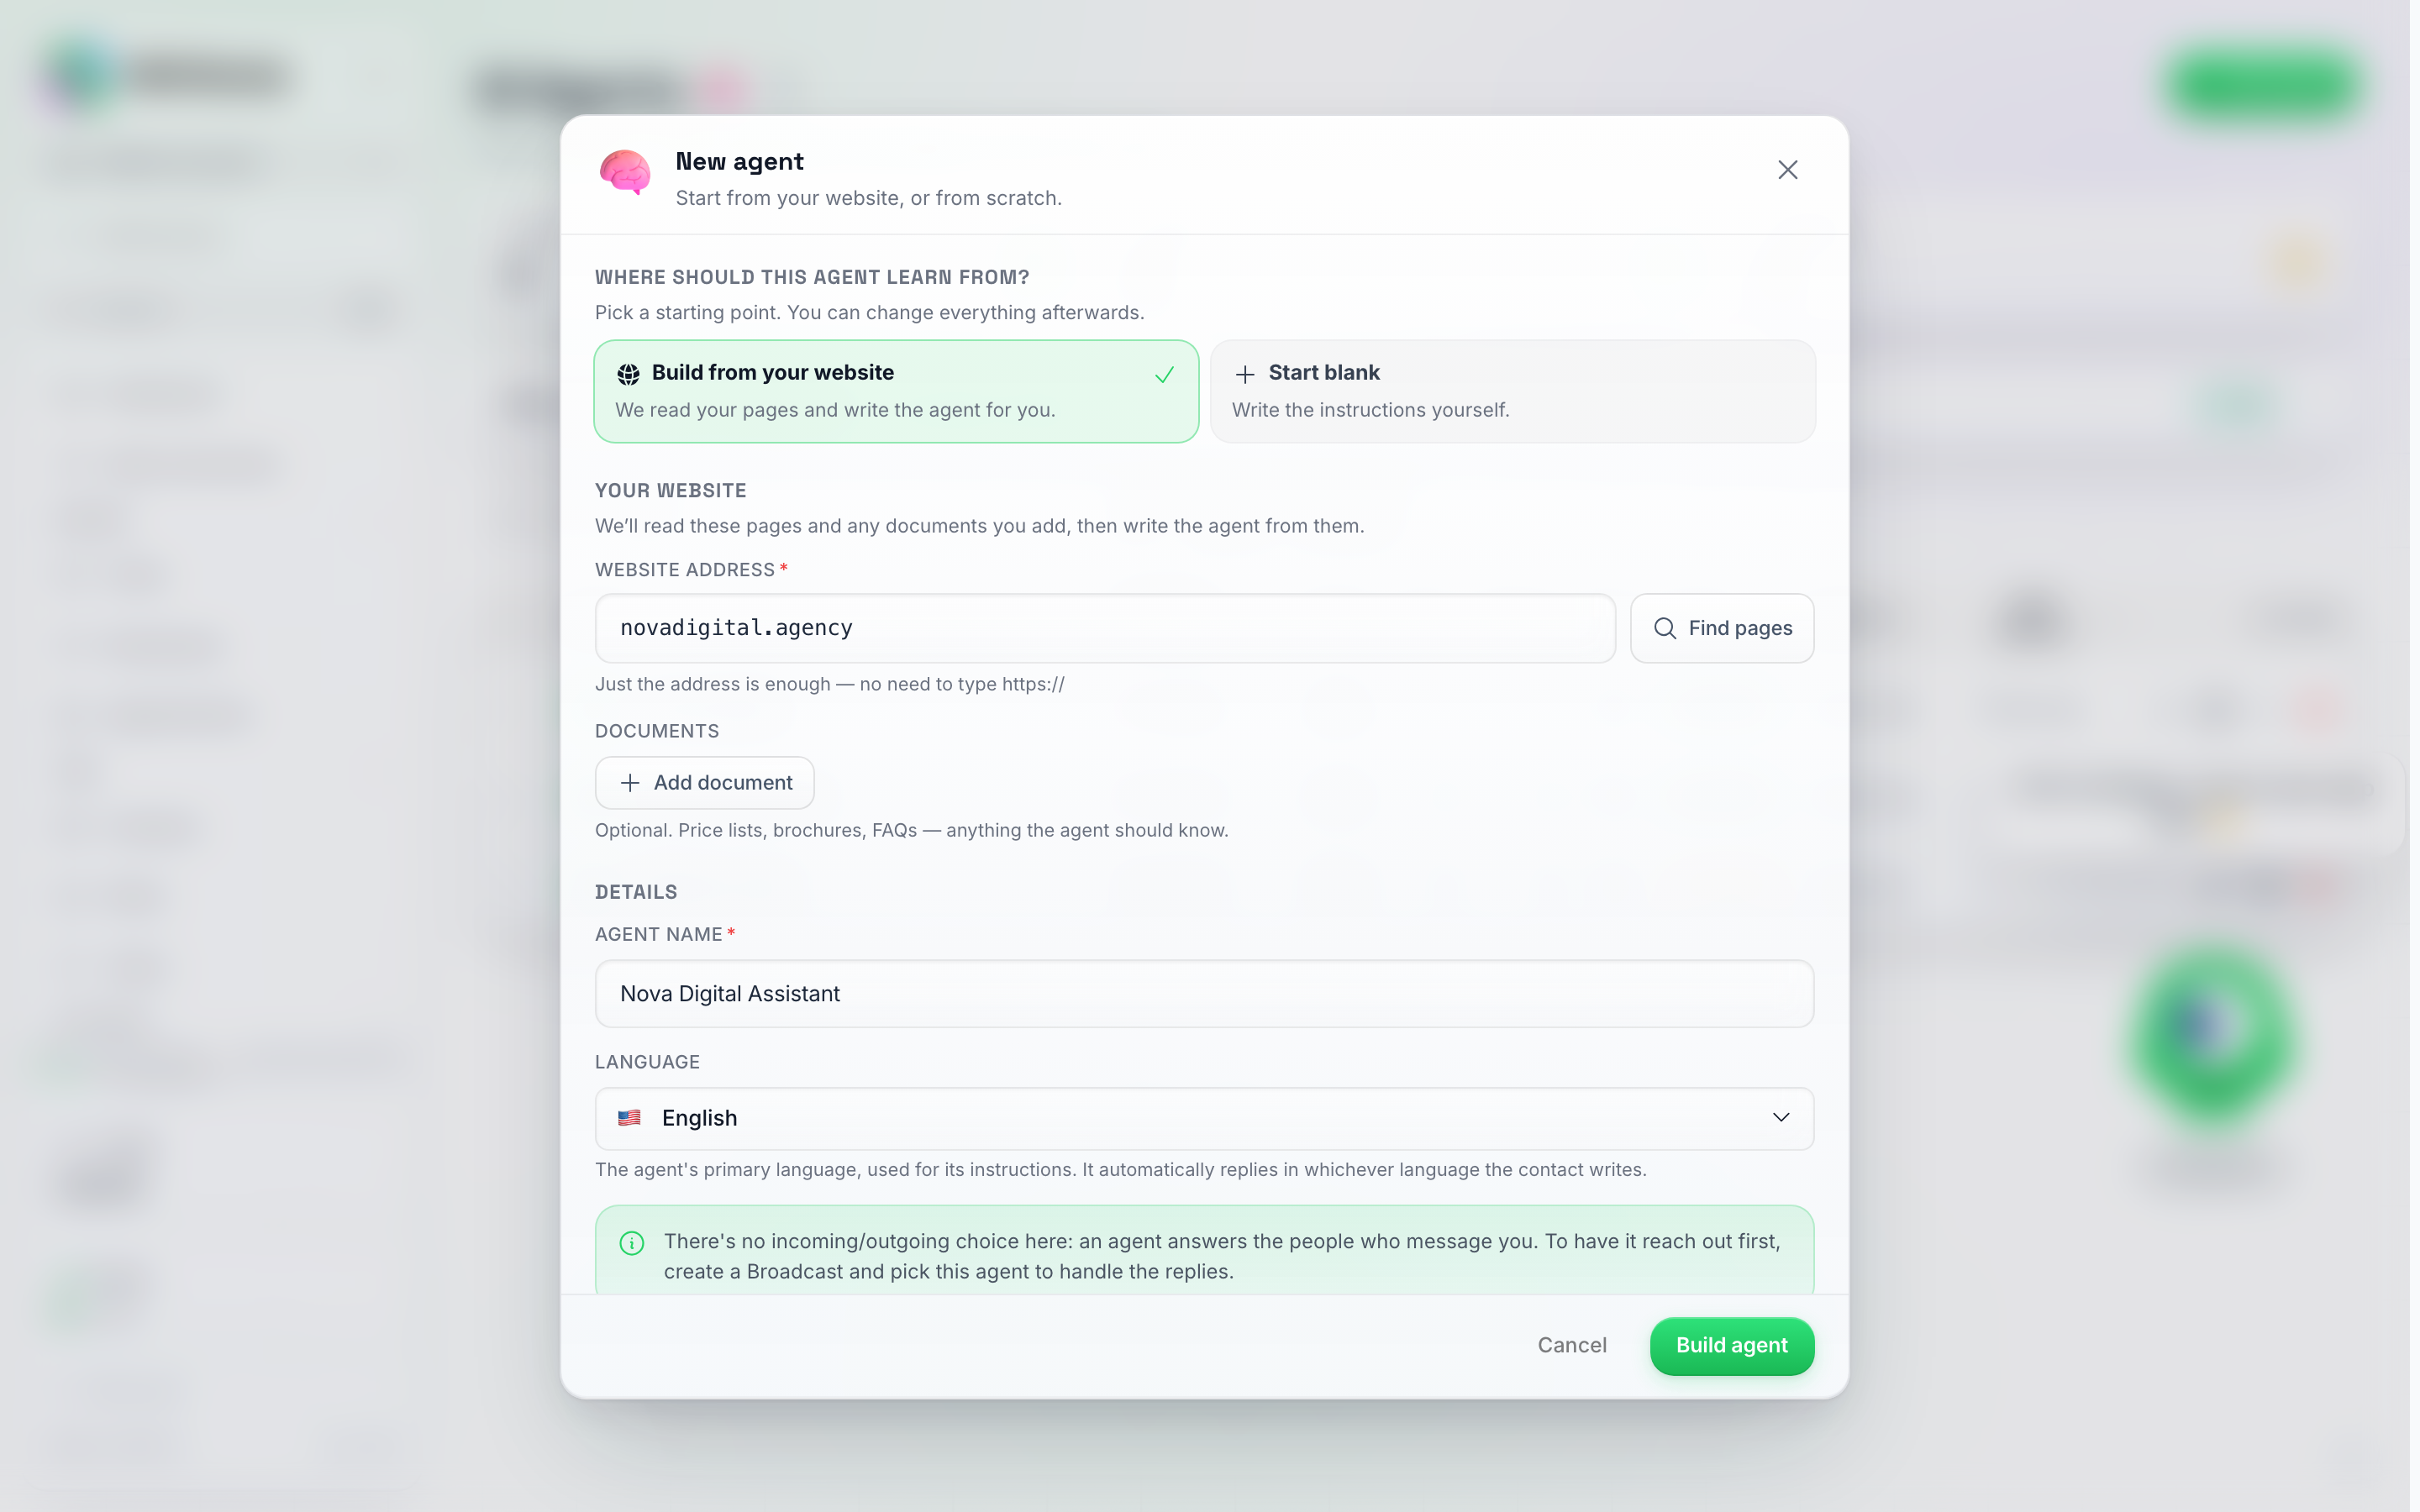
What "New agent" opens — give it your website address and it writes the agent for you, or pick Start blank to write it yourself. It still replies in whatever language the contact writes.
The agent editor’s steps run down the left: AI Instructions, Active Hours, Media, FAQs & Knowledge, AI Abilities, Tags, Follow-ups, Entry Points, and Try Out. Fill in AI Instructions, then skip straight to Try Out — you can safely leave every other step for later.
Full guide: AI Agents.
Step 4 — (Optional) Add a couple of FAQs (≈ 5 min)
If there are 3–5 questions every lead asks (“What does it cost?”, “Do you ship internationally?”, “How long does setup take?”), add them now: open the Agent you created in Step 3 and go to its FAQs & Knowledge step. The bot will pull from these whenever a question matches.

FAQs & Knowledge — a few structured Q&As tighten up the bot's most common answers.
You can skip this step and the bot will still work — it just falls back on the playbook for everything. But FAQs make the answers tighter and more consistent on the questions you actually get asked every day.
Full guide: Managing FAQs.
Step 5 — Test it in Try Out (≈ 3 min)
Before letting a real lead anywhere near it, talk to your bot yourself.
Open the Agent you created in Step 3 and click its Try Out step, the last one. Type the kind of message a real prospect would send — vague, half-typed, with a typo. See how the bot responds. Then try the awkward cases:
- A question your playbook doesn’t cover
- A blunt “How much?” with no context
- A rude or off-topic message
- A request to talk to a human
Try Out puts your AI instructions in a pane right beside the test chat, so you can edit the playbook (Step 2) or add an FAQ (Step 4) and immediately re-send the same message to see if the reply improved — no separate save step, no leaving the page. If a reply is genuinely bad, click the thumbs-down under it to open Optimize with AI, which rewrites the instruction that caused it for you to review and publish. Both work on every agent, with nothing to link or set up first.
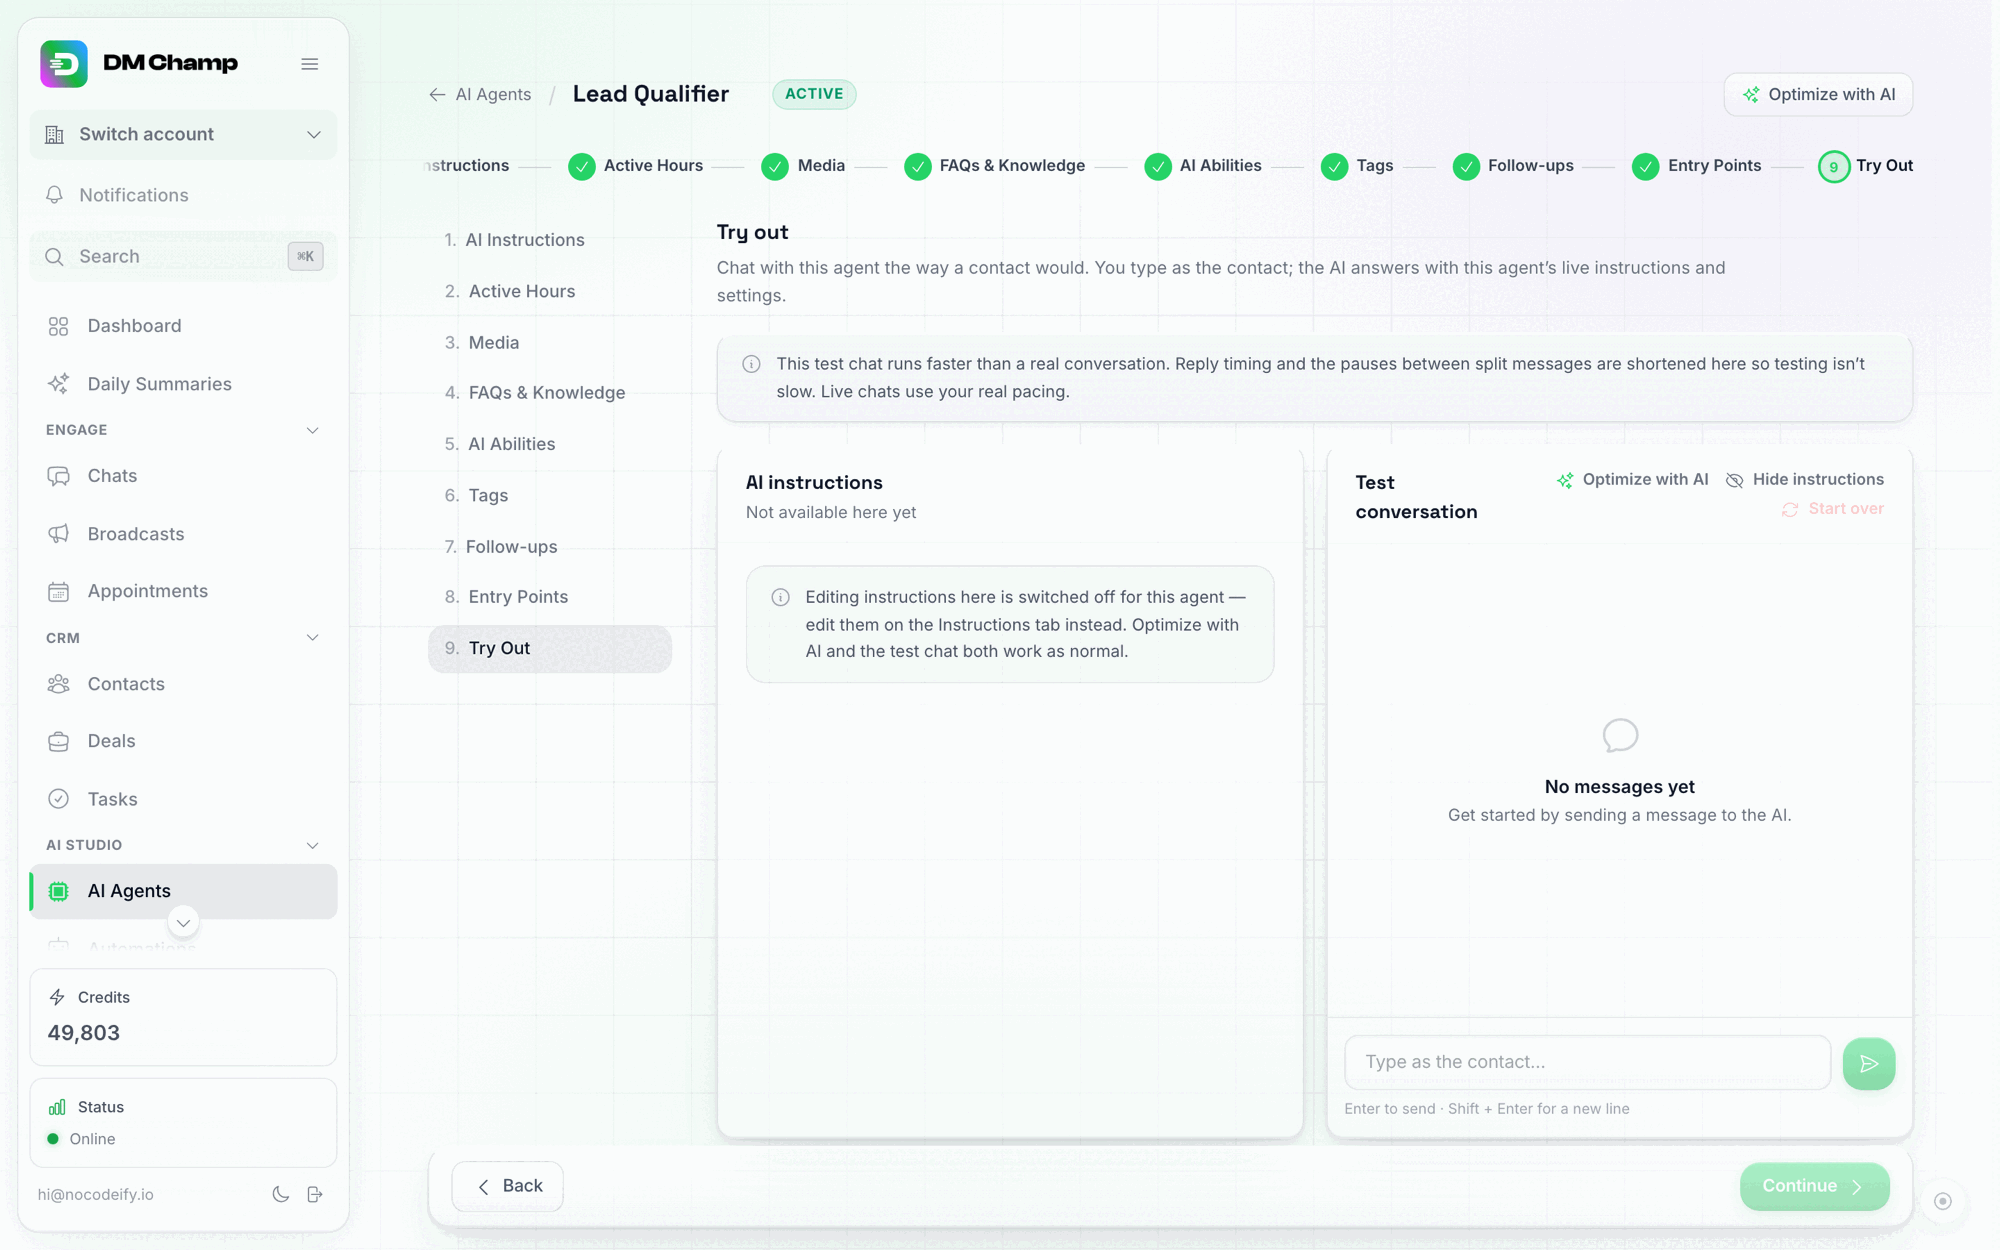
Try Out — talk to your bot's configuration and edit the playbook right beside the test chat.
Full guide: Chat Playground.
Step 6 — Send yourself a real message (≈ 2 min)
Try Out is great but it’s not the real channel. Time to round-trip a message through actual infrastructure.
- From your personal phone, message the number/account you connected in Step 1.
- Wait. (Remember Step 2’s response delay — the bot may pause 5–30 seconds on purpose.)
- Read the reply. Reply back. Keep the conversation going for a few turns.
If the bot replies the way you’d want it to reply to a real prospect, you’re done. You have a working AI conversation loop.
If something feels off, open Chats in the left sidebar — the conversation shows you exactly what the bot is doing, lets you take over manually, and lets you stop a reply mid-typing if needed. See Chat Interface.
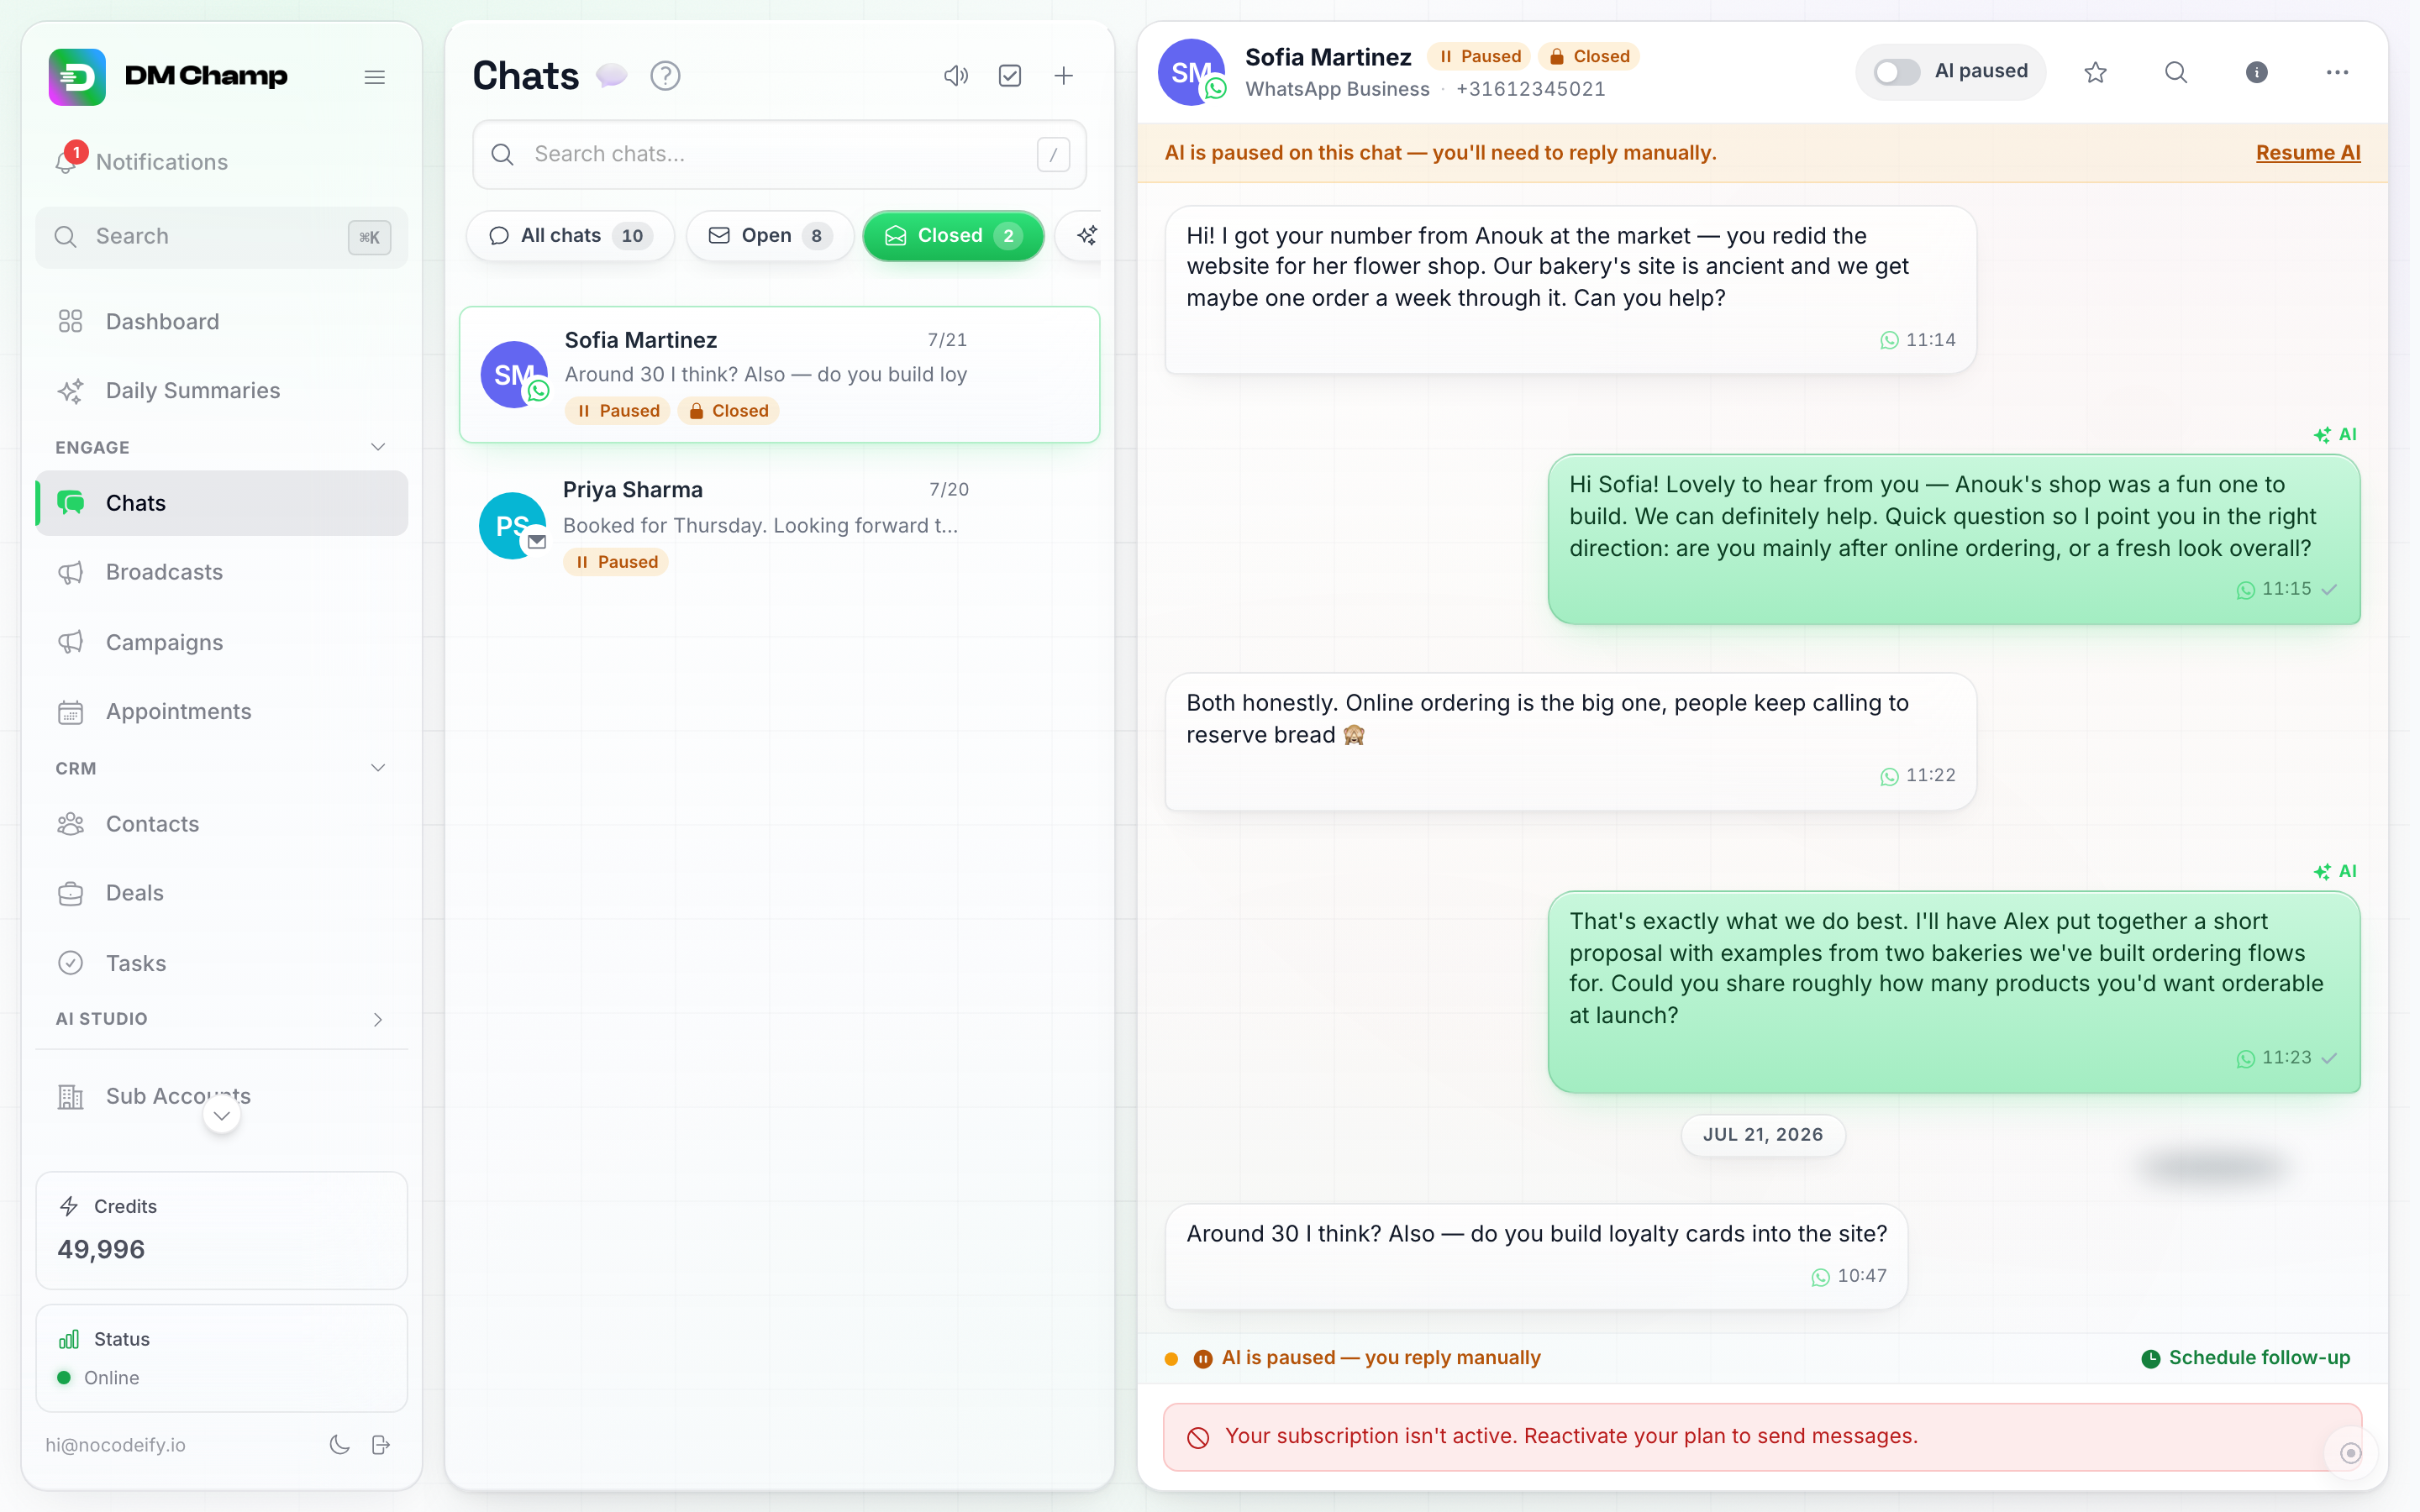
An open conversation in Chats — the status bar makes it obvious when the AI is paused and a human needs to reply.
What now?
You have the loop running. The rest of the platform is sharpening it:
- More leads: Set up Follow-Ups so the bot keeps nudging contacts who go silent. Set up Funnels for multi-step automated flows.
- More channels: Add a second channel from Settings → Channels → Channels. The same agent can answer on multiple channels at once.
- More volume: Read Scaling WhatsApp Outreach Safely before you push past a few hundred messages a day — it’s the most expensive page on this docs site to skip.
- More tools: Hook the bot up to your CRM (the software you use to track customers and deals) with Webhooks, give it the ability to look things up in real time with Custom Functions, or let it book real appointments with the Booking System.
- More people: Invite teammates in Team Management so they can step in on chats the bot escalates.
- Reaching out first: once your first bot is proven, read Campaigns Have Moved to Broadcasts & Agents — it’s how you pair this agent with a Broadcast to message a whole list.
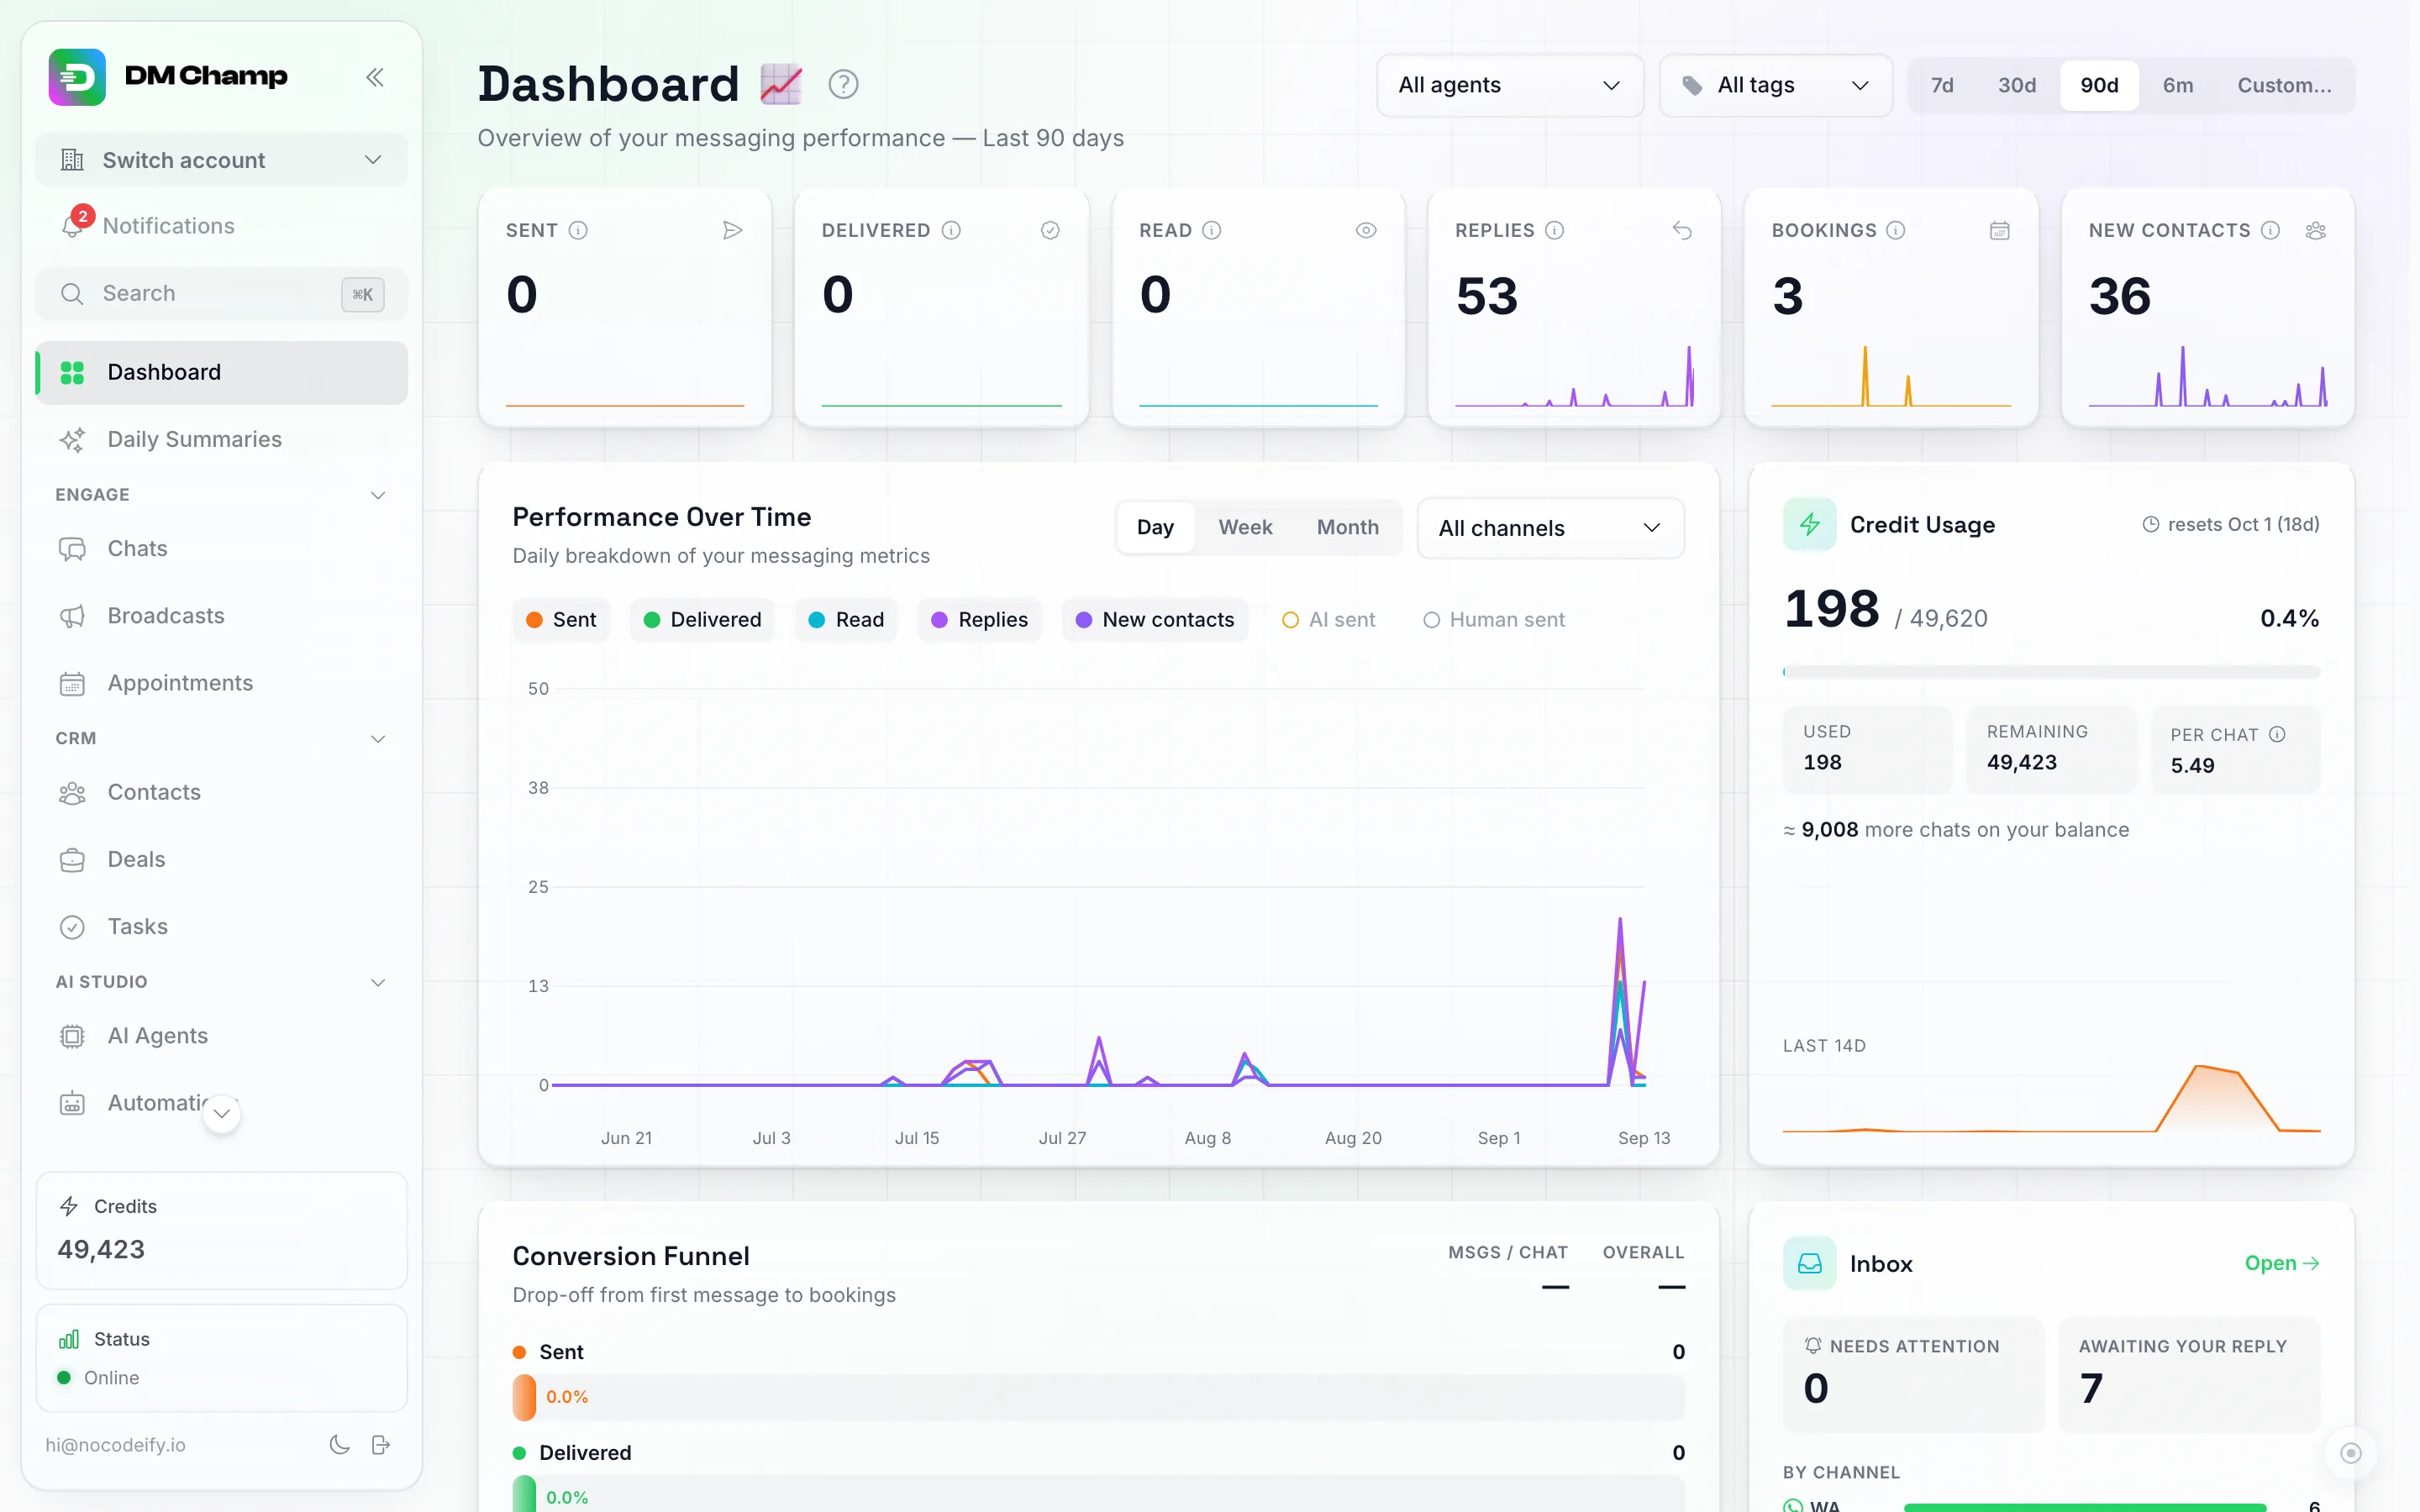
Your Dashboard once the loop is live — this is where you'll watch it perform.
Welcome aboard.