Agency Accounts
What Are Agency Accounts?
Agency accounts let you manage multiple client accounts from a single dashboard. Instead of logging into separate accounts for each client, you get a centralized view where you can create sub-accounts, monitor their AI agents, allocate credits, and switch between clients instantly.
This is designed for marketing agencies, consultants, and resellers who manage the app on behalf of multiple businesses.
Prefer to see it? Click through the whole flow:
The two pages that make this work — Sub Accounts and SaaS Mode — each have their own place in the sidebar rather than being tucked inside Settings. This page is the overview; the day-to-day mechanics live on Sub-Account Management.
Shared Credit System
One of the key differences between agency accounts and regular accounts is how credits work:
- Credits are shared between your agency account and all sub-accounts.
- When a sub-account uses credits (for AI responses, broadcasts, etc.), the credits are deducted from your agency’s balance.
- Sub-accounts do not see the credit balance — they only see their usage. You, as the agency, manage the overall credit pool.
Example: You have 1,000 credits in your agency account. Client A’s AI agent answers 50 replies to a broadcast (50 credits). Client B’s AI bot responds to 30 conversations (30 credits). Your remaining balance is 920 credits.
Creating Sub-Accounts
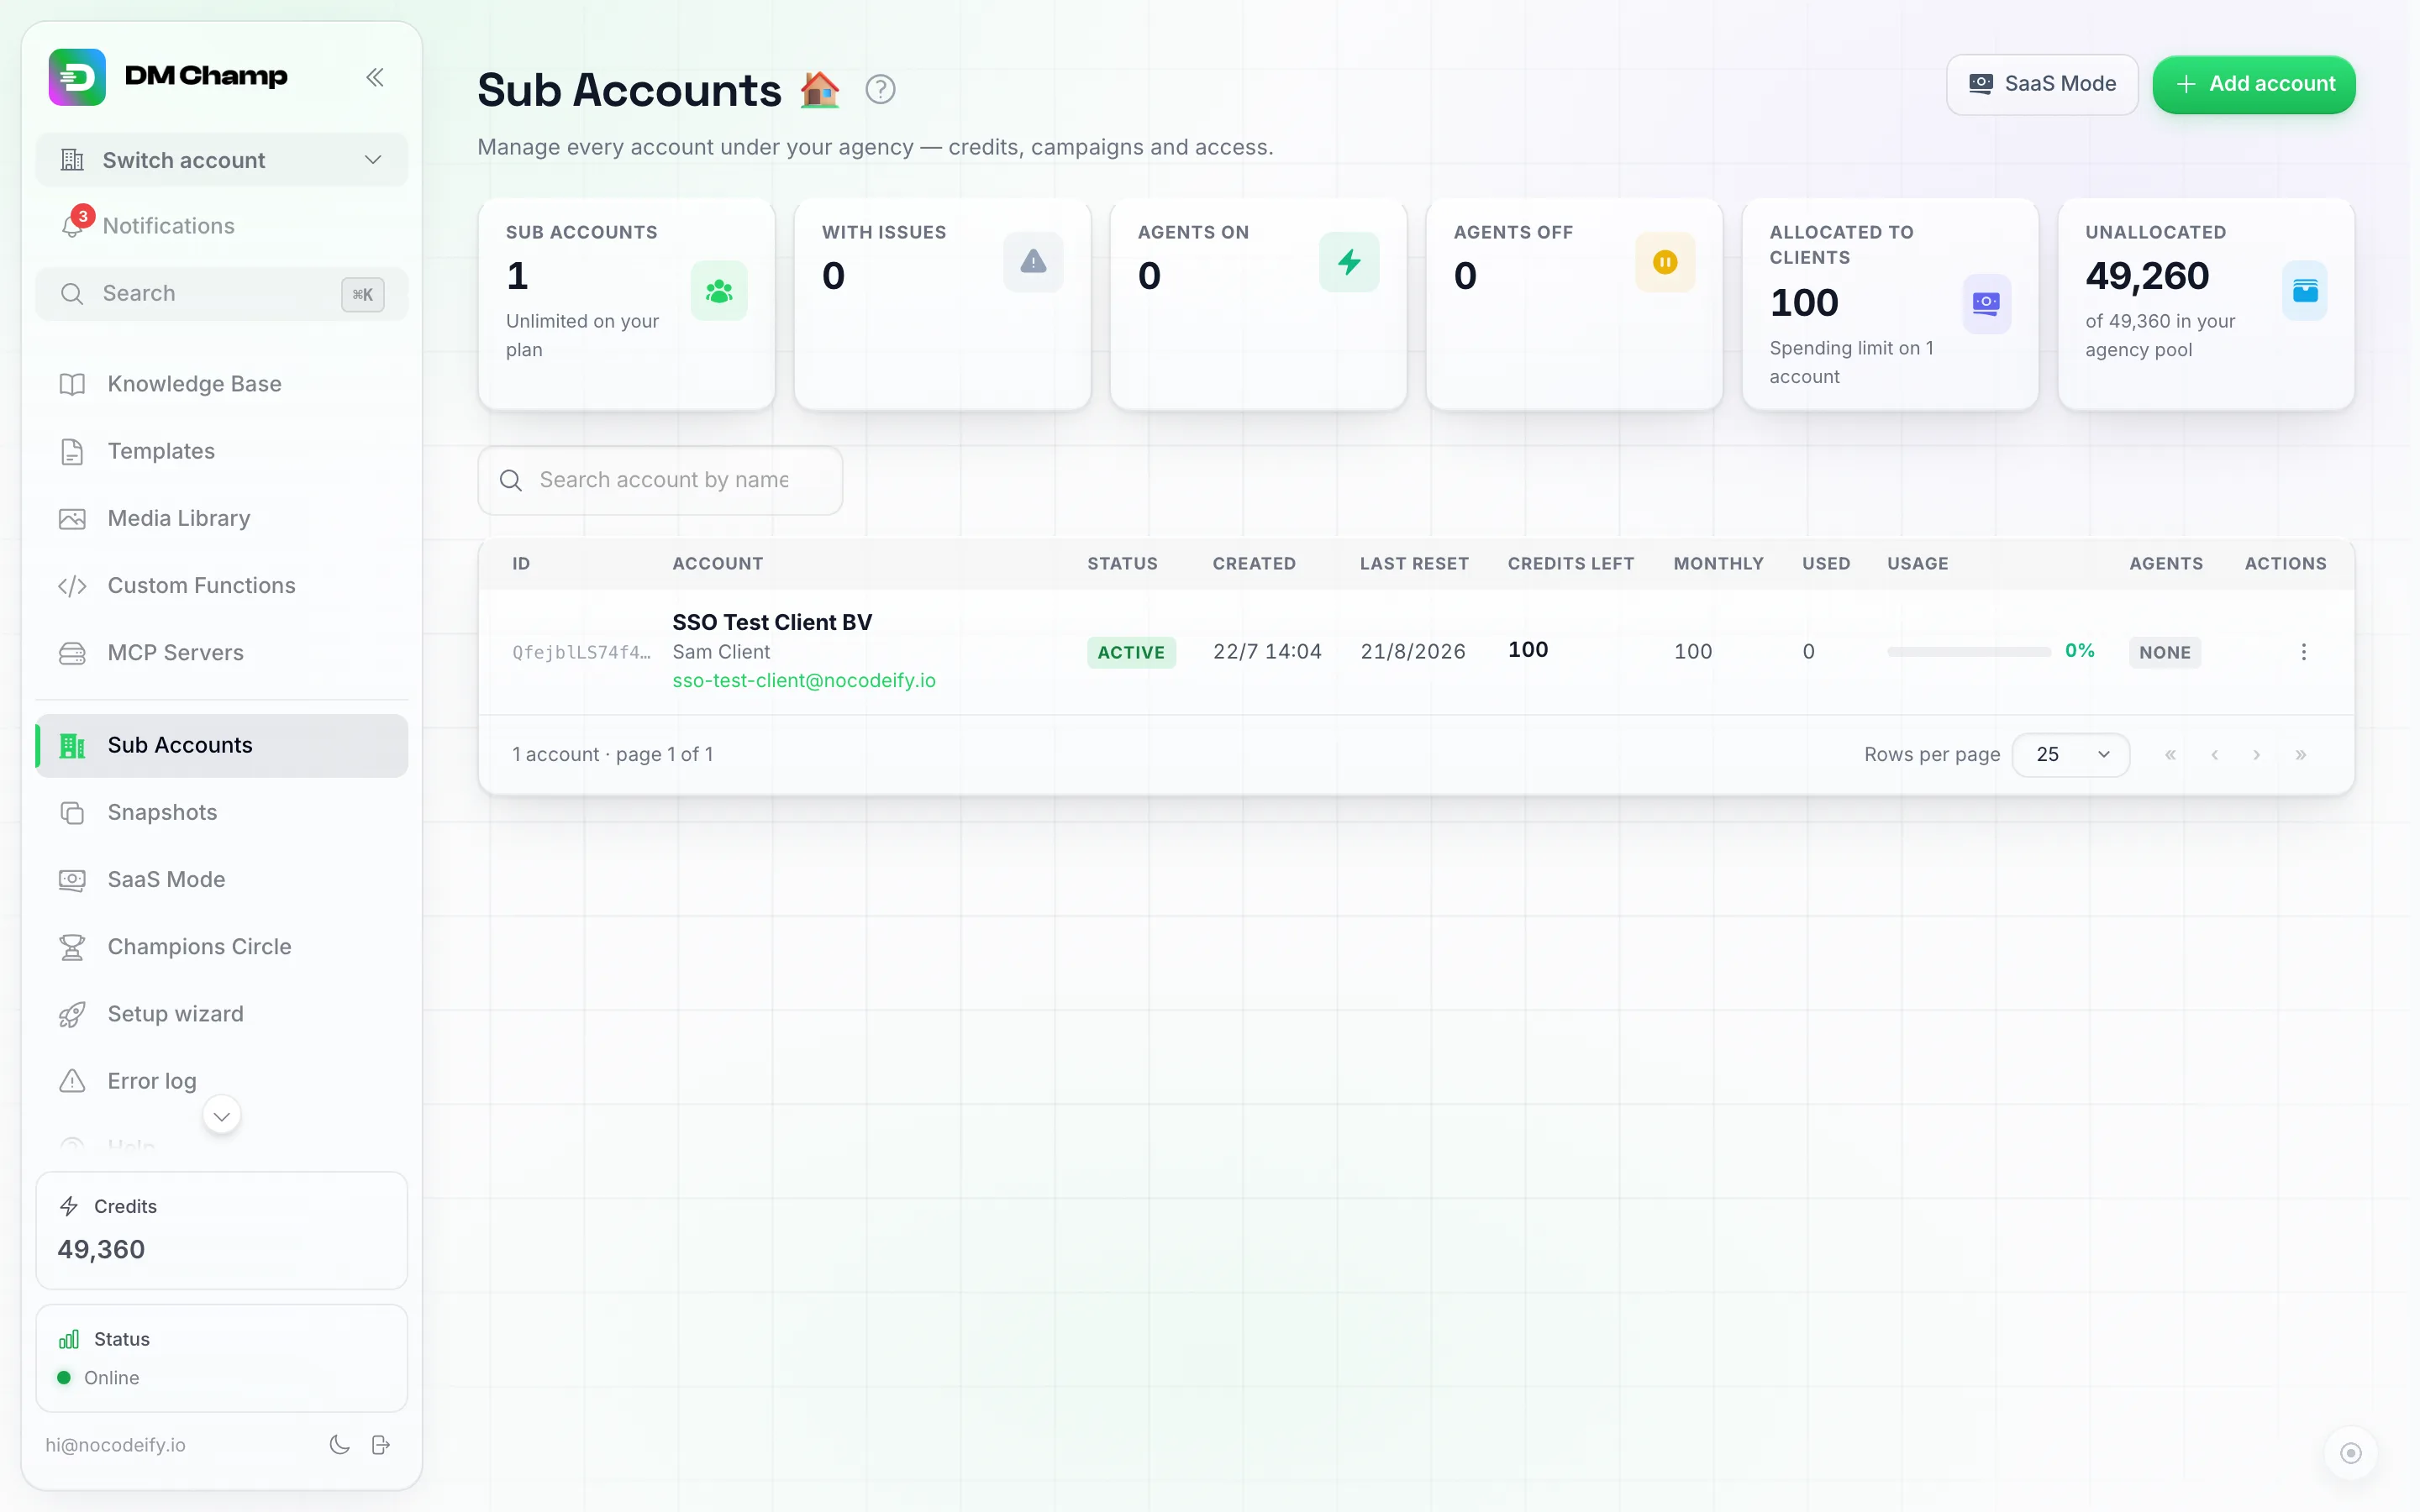
The Sub Accounts page: stat tiles up top (the two on the right split your credit pool into what clients' limits already claim and what is still free), an Add account button, and a shortcut into SaaS Mode.
- Click Sub Accounts in the main sidebar — it’s its own page, right above Settings.
- Click the green Add account button (top right).
- Fill in your customer’s details across the 3-step modal: account (name, email), business (business name, address, description), and features.
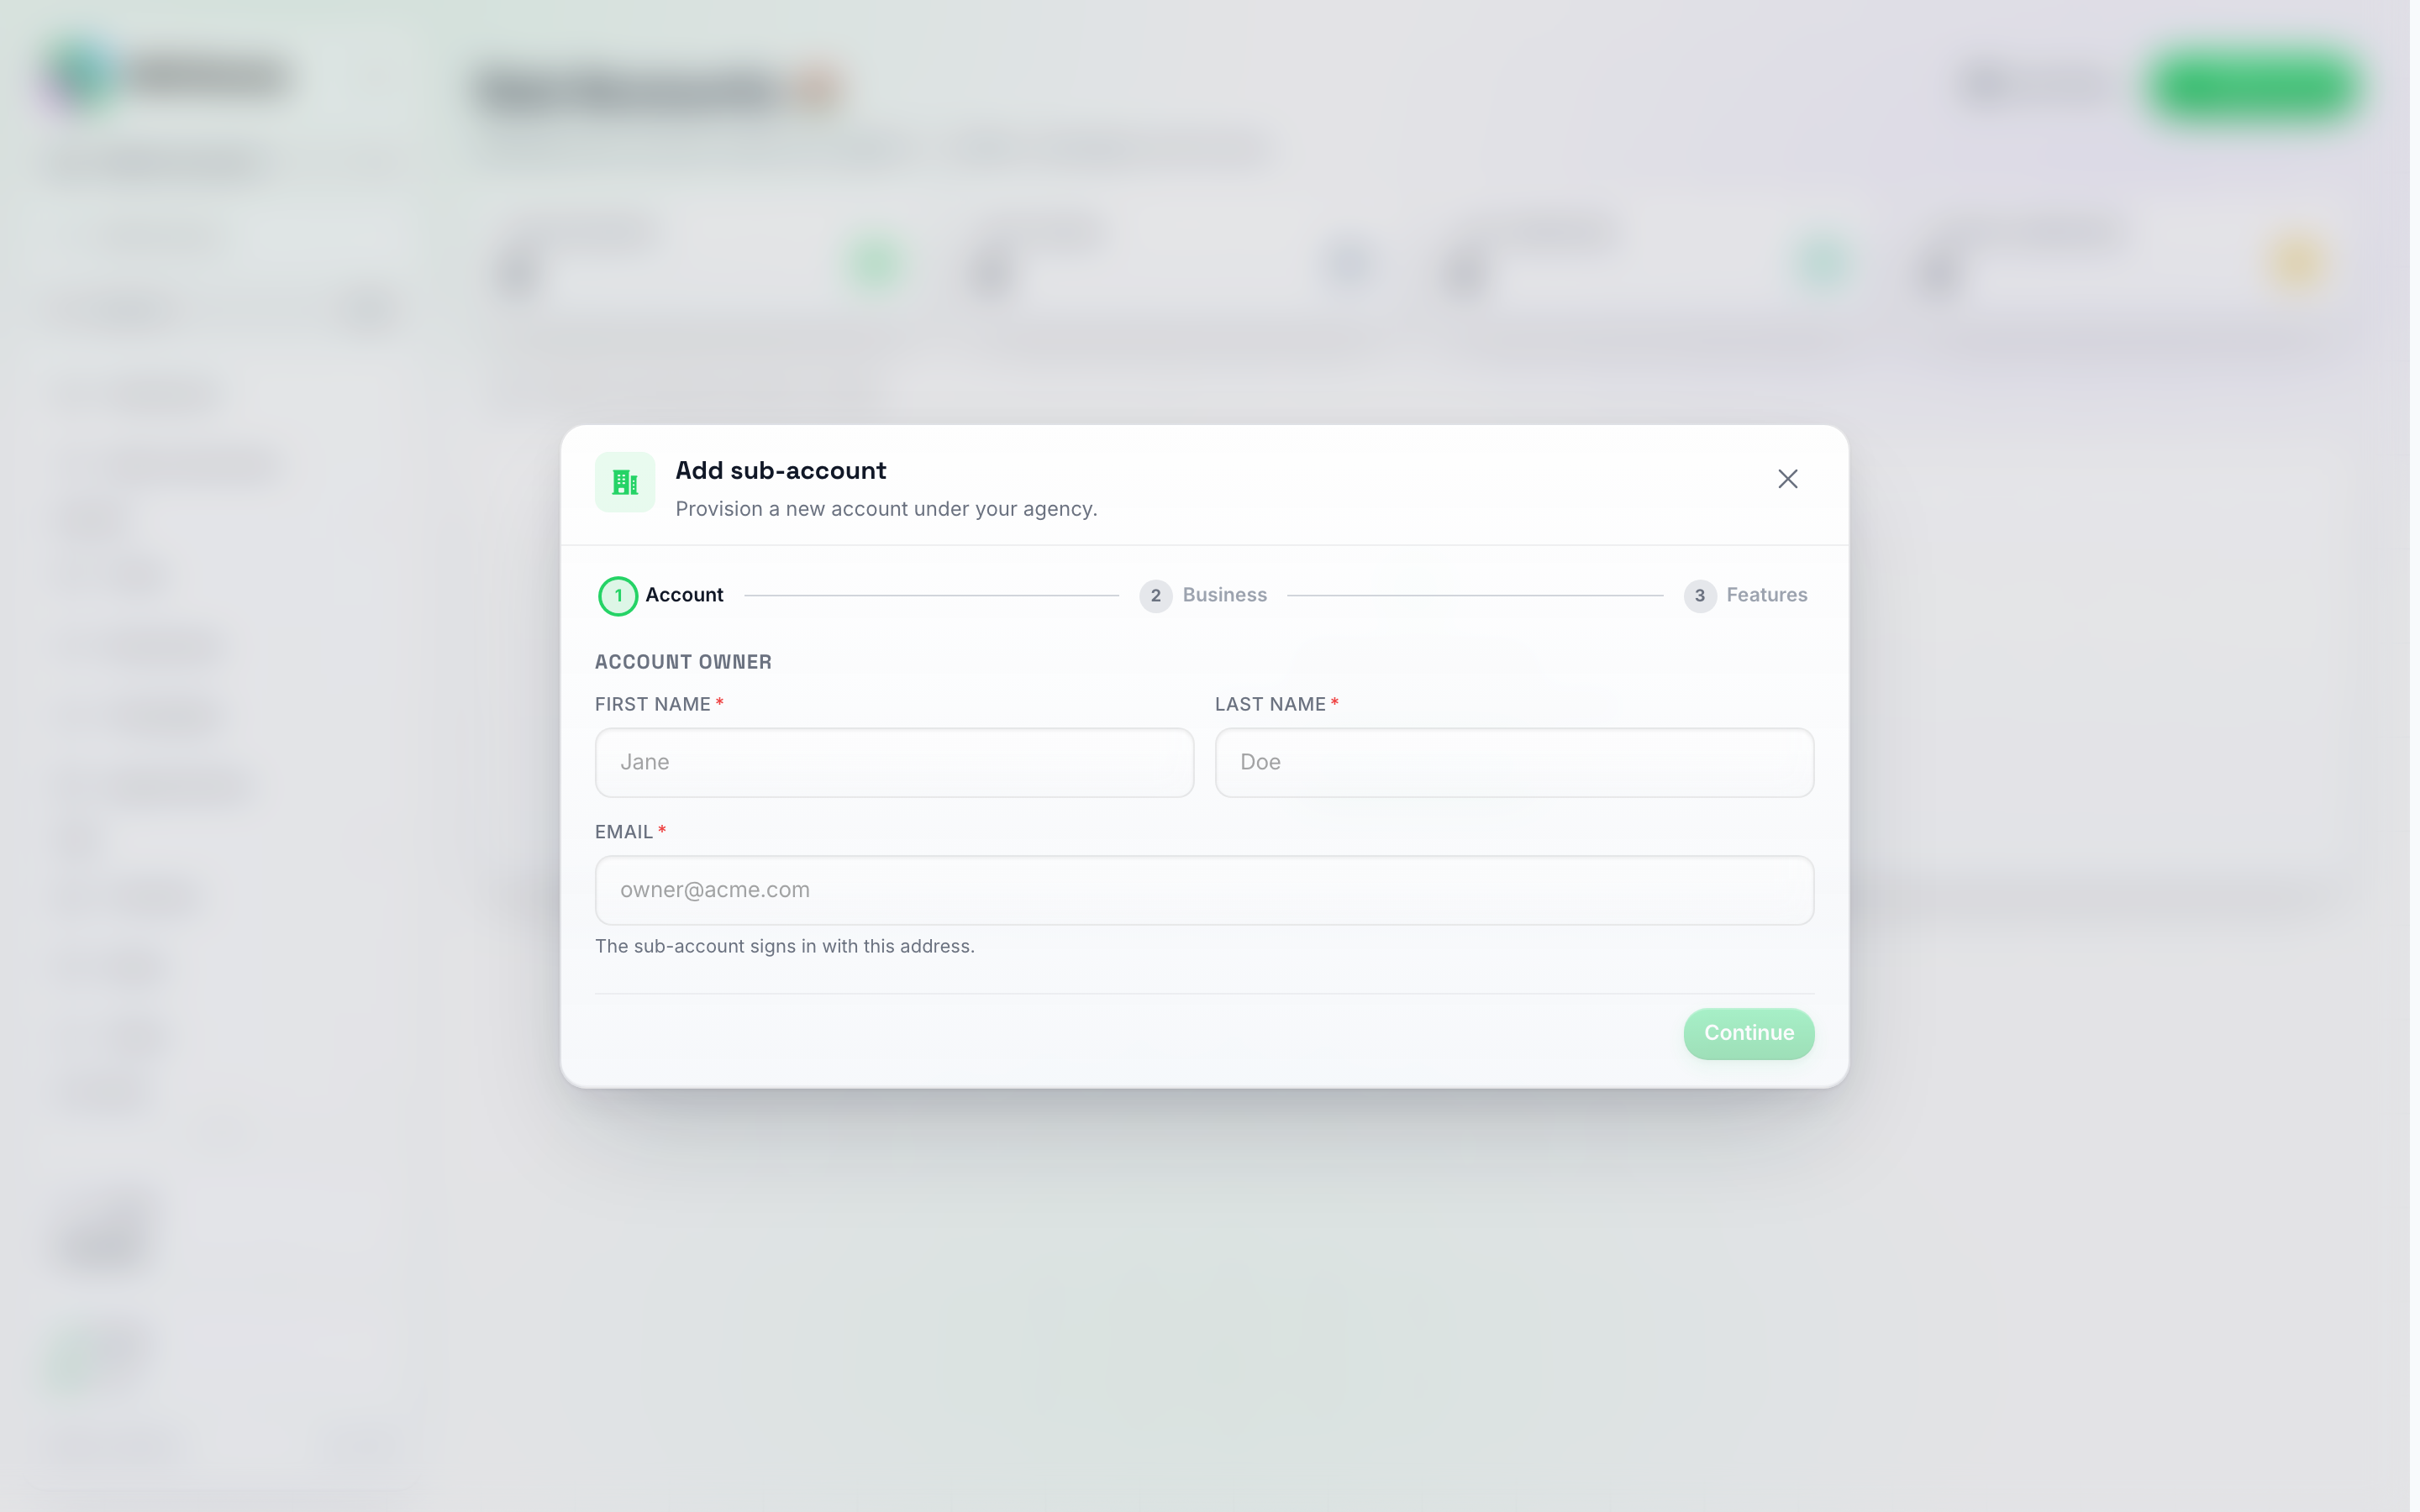
The Add sub-account modal. Three steps: Account → Business → Features. The email you enter becomes the client's login address.
- Click Create Account.
A confirmation screen shows the generated login password — copy it before closing. Whether the client also gets it by email is up to you: the Send account info to the sub-account toggle on the Features step (under Welcome email) is on by default and emails the client their login. Turn it off and only you get the password, by email and once on screen, so you can hand it over yourself. Full walkthrough: Sub-Account Management — Creating a Sub-Account.
Showing a Prospective Client a Live Demo
Before a client signs up, you can give them a live preview of the chat assistant running on their own website — with no install required on their end. Use the Client demo link.
How it works: you paste the client’s website address, and the platform generates a shareable link. When the client opens that link, they see their own website with your chat widget floating on top — fully live and ready to chat. Nothing changes on their actual website, and they don’t need to touch any code. The preview lives entirely at your link.
How to get there: open Settings → Channels → Channels, click Manage on the Website chat widget card, scroll to Channels & Embed, type or paste the client’s website address (for example theirbusiness.com) in the Client demo link field, and click Create link. The link is copied for you and added to the list under the field. Then send that link to the client however you like — email, WhatsApp, a message, anywhere.
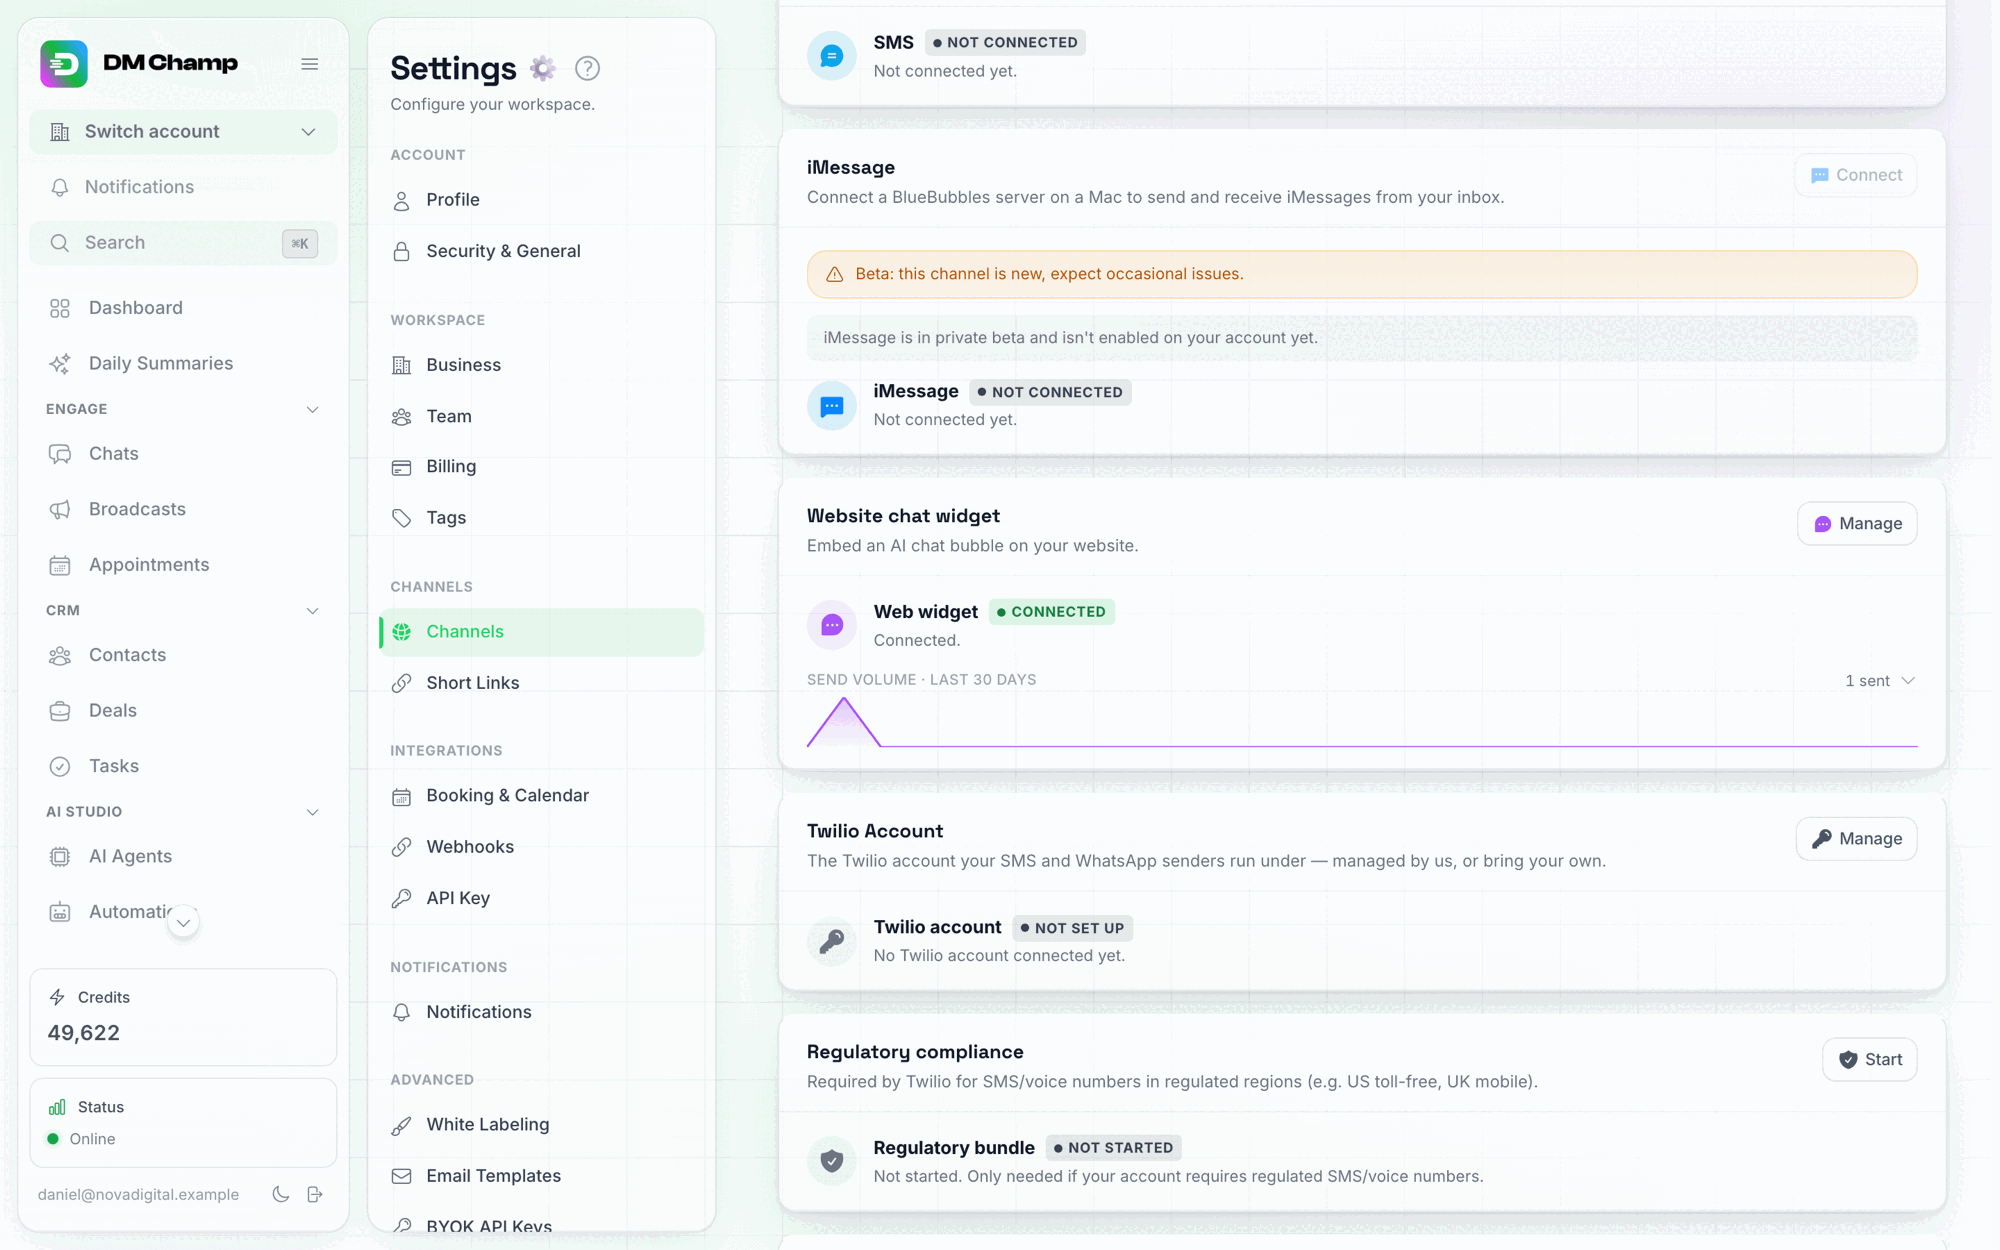
Settings → Channels → Channels: the Website chat widget card is the entry point into the widget's setup.
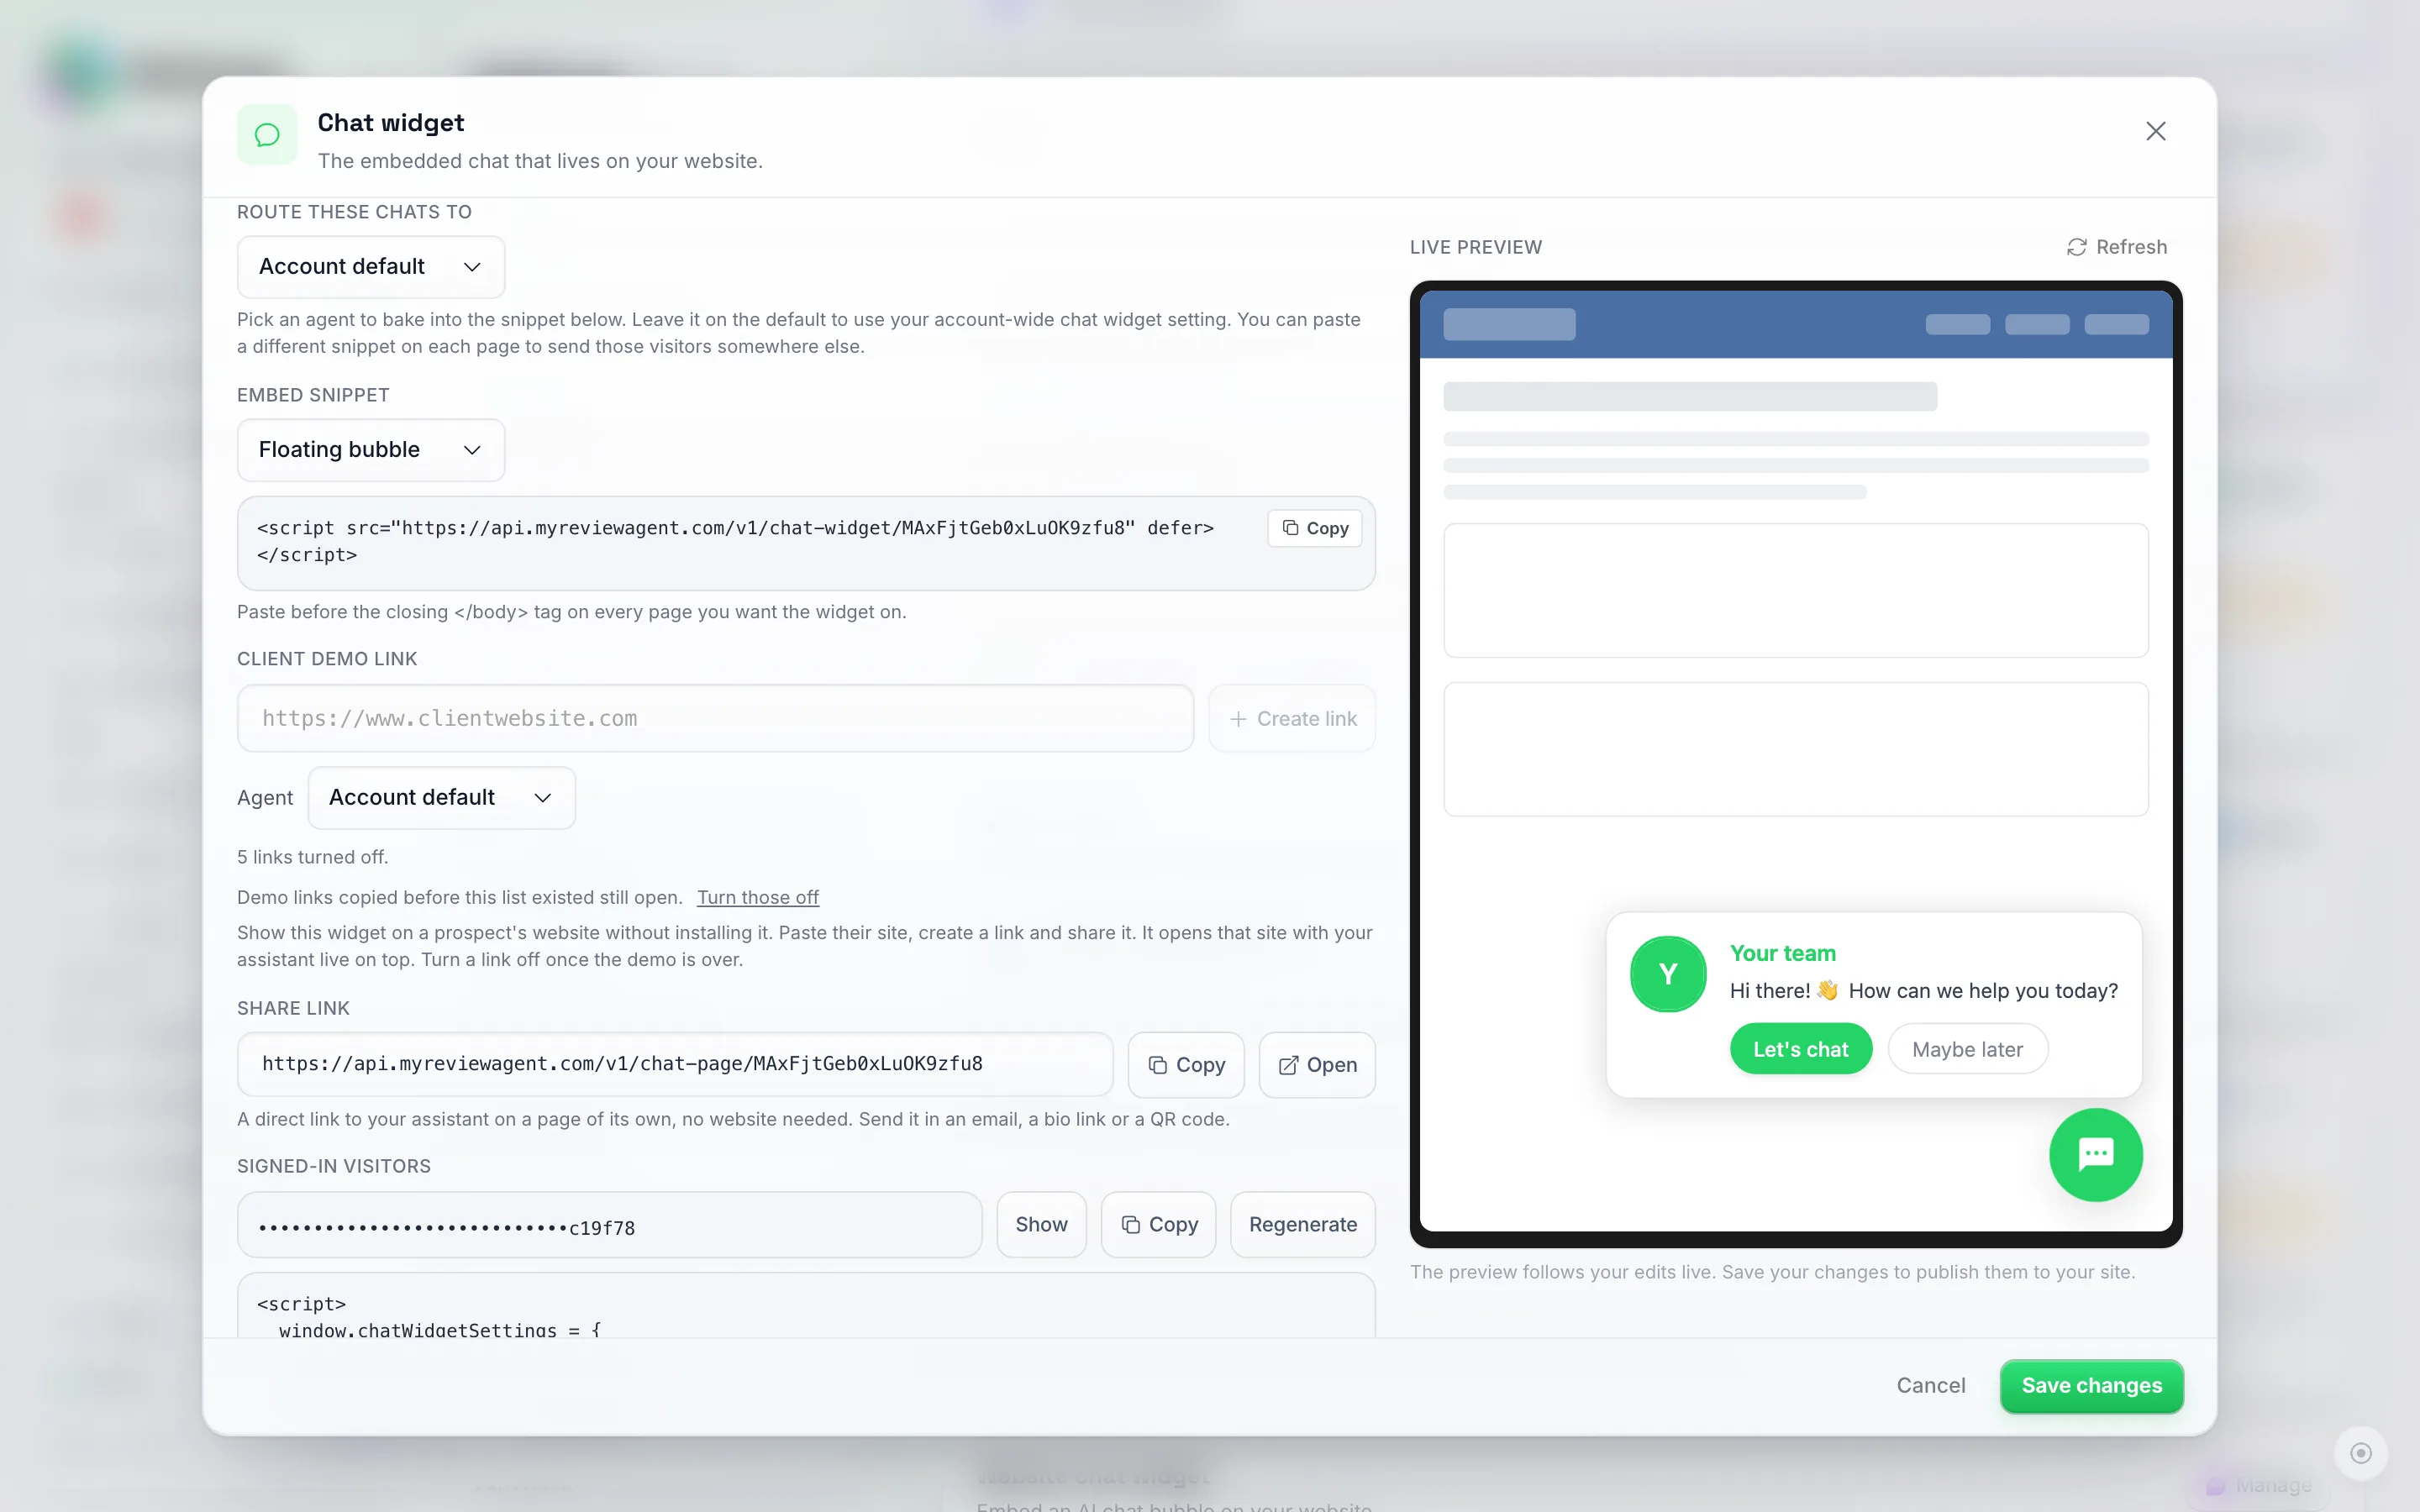
The Client demo link field sits in the Channels & Embed section of the Manage panel, under the install snippet. Type the client's address and the shareable link appears underneath.
A couple of things to know:
- Some websites don’t allow themselves to be shown inside another page (a security setting on their end). When that happens, the demo link still works — it shows a clean preview frame with the website address, and the chat assistant is still fully live to try. The conversation experience is identical; only the website backdrop differs.
- The demo uses your real widget configuration, so any messages the client sends while testing come through to you like any other chat widget conversation.
- A demo link does not remember an agent: the link belongs to your chat widget, and demo chats always go to whatever agent is your widget’s default at that moment. You can have several links live at once, but they all show that same agent, so switching the default changes every open demo. For two tailored demos at the same time, build the second one in a sub-account. Deleting a demo agent does not switch a link off.
- Once the demo is over, click Turn off next to the link in the list. Anyone opening it after that sees a page saying the link was turned off, and your widget keeps working everywhere else. Links copied before September 25, 2026 are not in the list; Turn those off under the list switches all of them off at once.
Client Login Credentials
When you create a sub-account:
- The client receives an email and password they can use to log in to their own account, at your white-labeled sign-in page.
- Giving clients login access is optional — you can manage everything on their behalf if you prefer.
- If the client logs in, they see their own dashboard with their AI agents, contacts, and chats. They do not see your agency dashboard or other sub-accounts.
- Credit balance is hidden from sub-accounts since you manage the shared credit pool.
Switching Between Sub-Accounts
There are two ways to switch into a client’s account:
The account switcher, from anywhere:
- At the top of the sidebar, click Switch account.
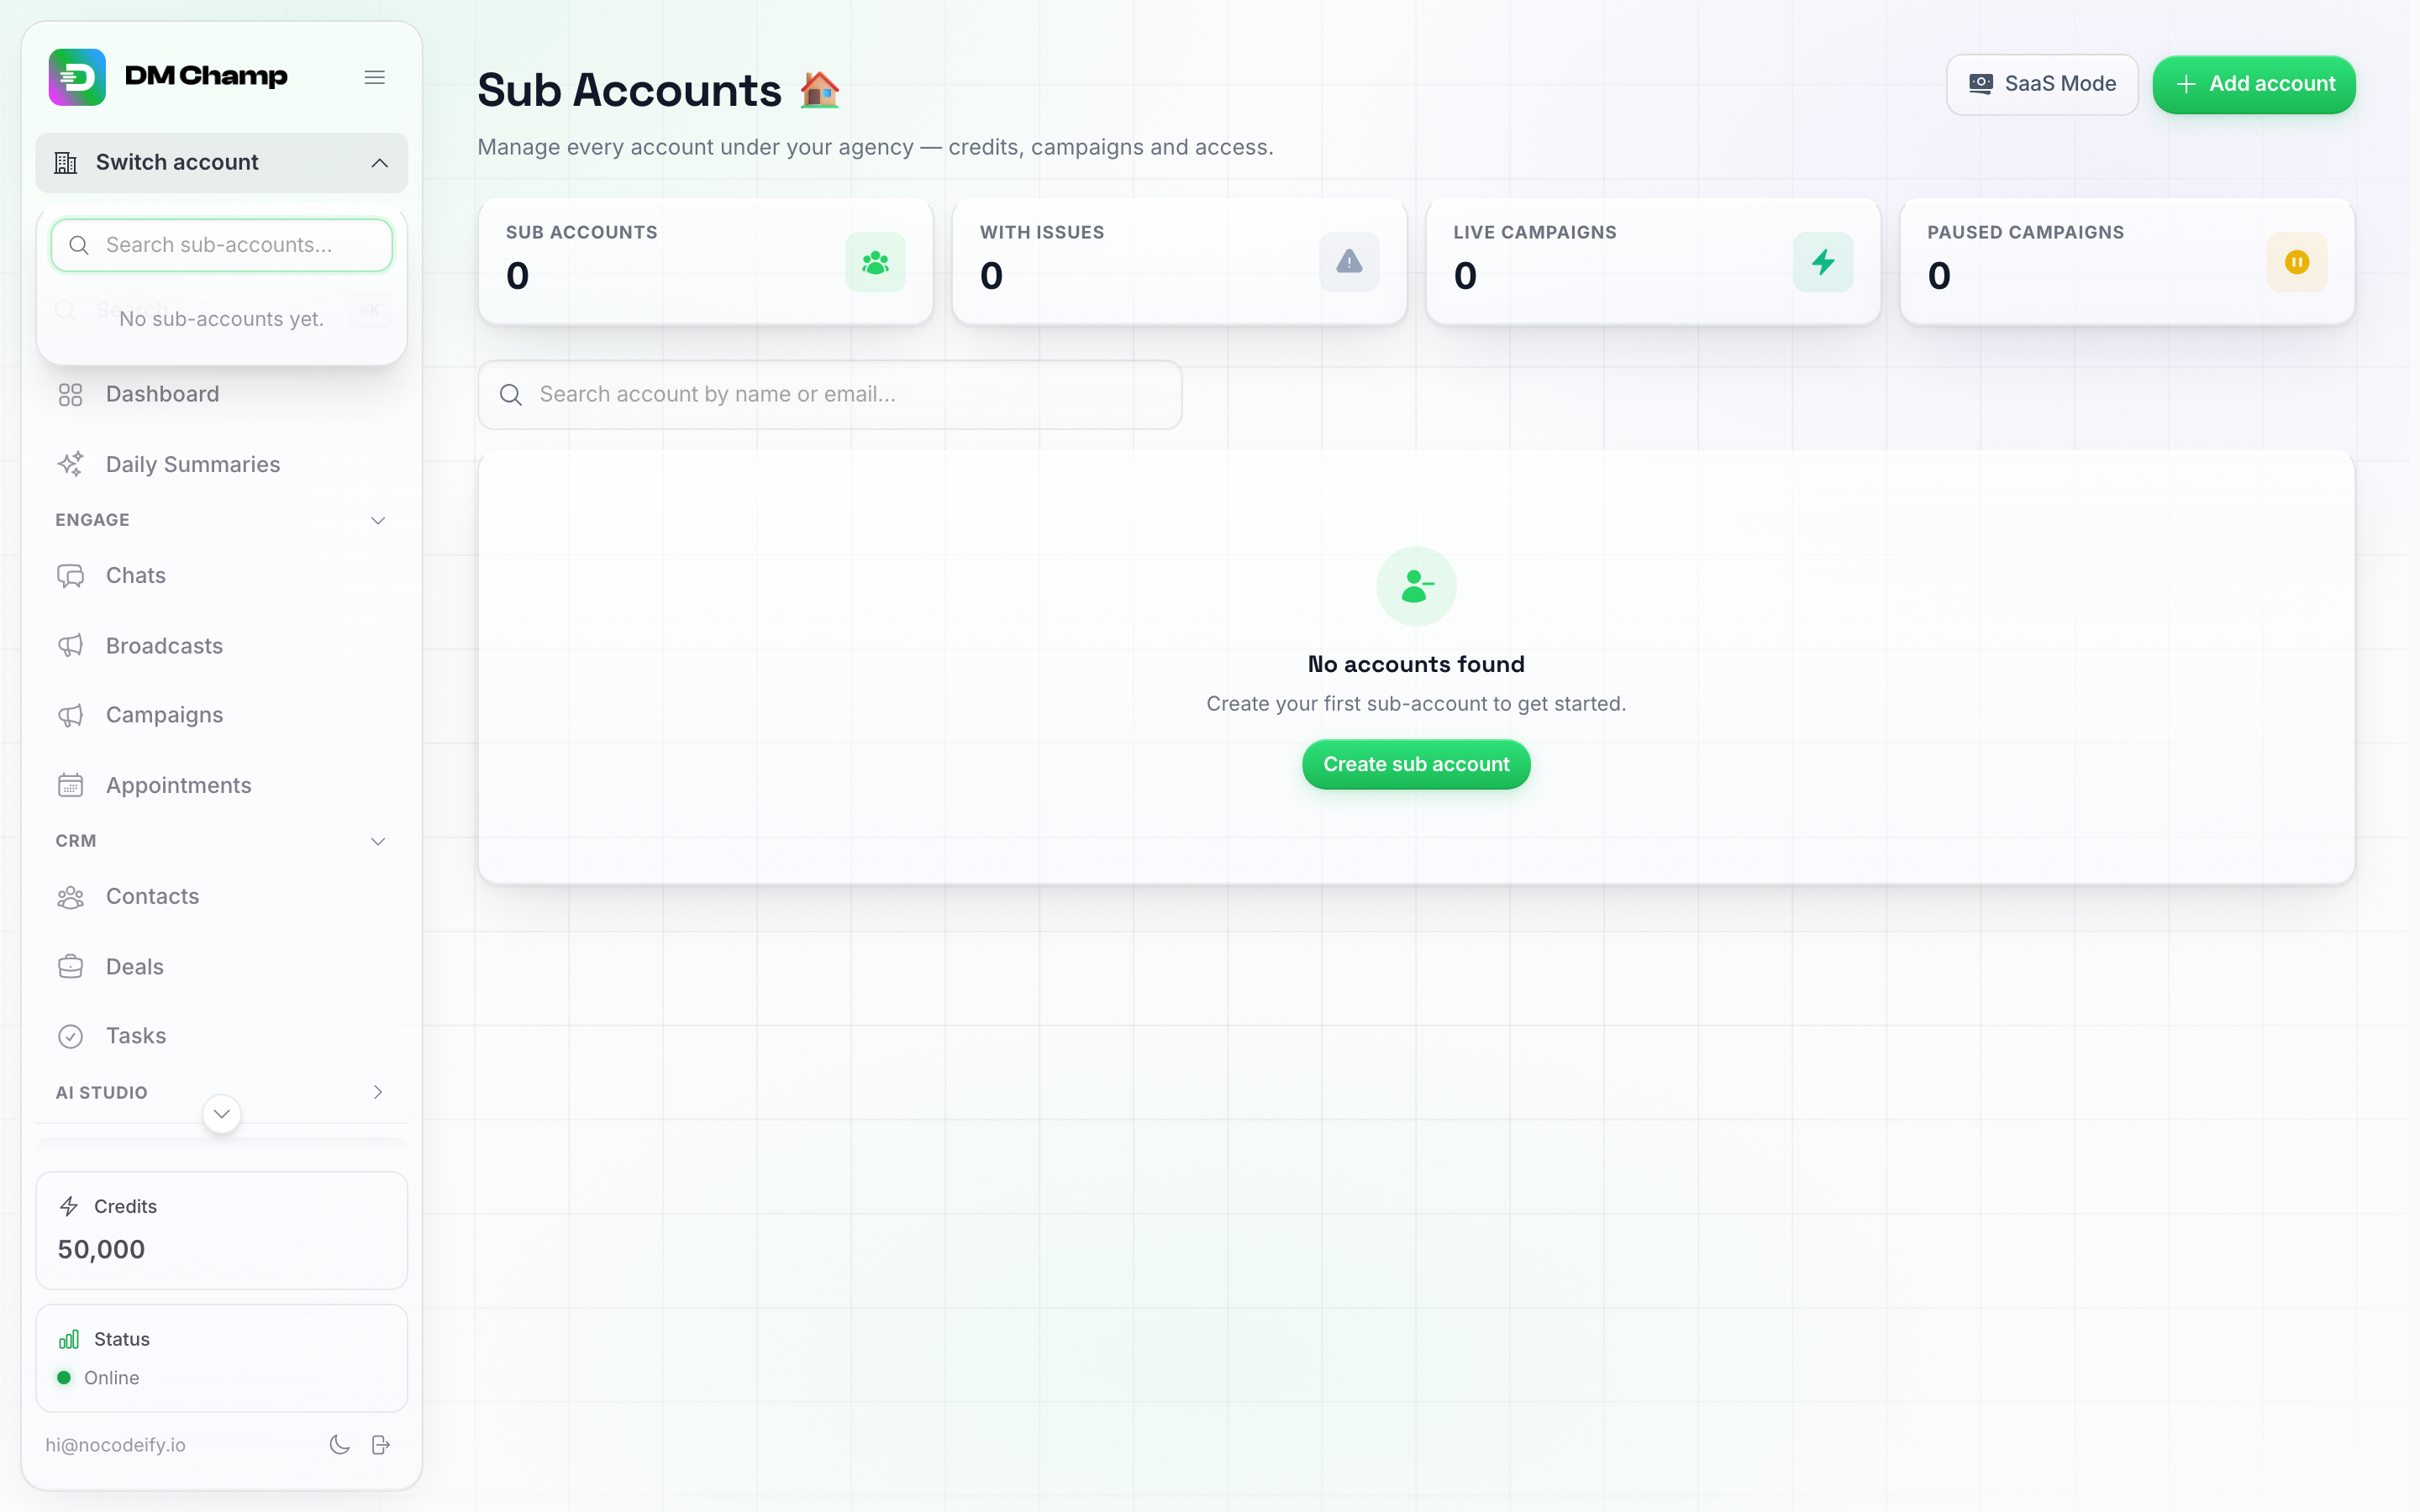
The Switch account dropdown, opened from anywhere in the sidebar. This agency has no sub-accounts yet, so the list is empty — once you create one it appears here, searchable by name or email.
- Search for the sub-account by name or email, or scroll the list.
- Click it. The dashboard reloads under that sub-account’s identity.
From the Sub Accounts page:
- In the sidebar, click Sub Accounts.
- Find the sub-account in the list. On that row, click the More menu (three-dot icon at the far right).
- Click Sign in as user.
Either way, while you’re inside a sub-account the switcher pill in the sidebar turns amber and shows Assisting:
If the client has two-factor authentication turned on, you are not asked for their code: you already signed in as yourself, and the code would go to the client, not to you.
Credit Usage Tracking
As an agency, you can track how credits are being consumed across all sub-accounts:
- Stat tiles on the Sub Accounts page — how many client agents are on and off, and how many sub-accounts have issues.
- Per-sub-account tracking — how many credits each sub-account is using, from that row’s More menu.
- Credit usage details — a dedicated per-sub-account view showing purchased credits, consumed credits, remaining balance, usage by reason, the Top agents spend list, and a filterable transaction table.
The stat tiles at the top of the Sub Accounts page — a fleet-wide read on how many client AI Agents are switched on and off, plus how much of your credit pool the clients' spending limits already claim (Allocated to clients / Unallocated). The More menu on each row (not shown — needs at least one sub-account) is where per-account credit tracking and Credit usage details live.
This visibility helps you understand your costs, identify high-usage clients, and set appropriate pricing for your services.
Credit Reselling (aka SaaS Mode)
Credit reselling lets you sell credits to your sub-accounts at your own pricing, creating a revenue stream for your agency. This whole area lives under its own sidebar page called SaaS Mode — the same feature you may know as “Credit Reselling,” under its industry-standard name. It’s available on the Agency plan and is gated behind the white-labeling feature flag. If your plan includes white labeling — which every lifetime deal tier that lists it does — reselling is already yours: you are not limited to managing the app for clients, you can sell plans under your own brand, at your own prices, through your own Stripe or PayPal. Nothing extra to buy.
How It Works
- Open SaaS Mode — click its entry in the main sidebar (it sits beside Sub Accounts, near the bottom of the menu), or click the SaaS Mode pill at the top of the Sub Accounts page.
- Turn on credit reselling for a sub-account in its Edit modal (Sub Accounts page → row More menu → Edit → Credit Management) by switching the mode from Manual to Reselling. Reselling is only offered once your agency has white-labeling on its plan.
- Set your pricing — define credit packages and per-credit pricing that your sub-accounts see when they purchase credits.
- Minimum pricing enforcement — the platform enforces a minimum credit price to ensure sustainable pricing across the platform.
- Sub-accounts purchase credits through your custom checkout, powered by whichever payment provider you connect — Stripe, PayPal, or both. Payments go directly to your own account with that provider.
- Credits are delivered automatically to the sub-account after purchase. The credits land in the client’s own purchased balance, and the same number of credits is deducted from your agency pool — that deduction is your cost of the sale, while the client’s payment goes to your own payment account.
Credit economics
When a client buys credits, those credits are added to the client’s own purchased balance, and the same number of credits is deducted from your agency pool. The client’s money goes to your Stripe account; the pool deduction is your platform cost for the sale. Your profit is the difference between the price you set and what those credits cost you — which is also why the minimum price per credit exists (you can’t price a pack below the platform’s own credit cost).
Keep your pool covered: checkout requires your agency pool to hold at least as many credits as the pack being bought. The same goes for your public sign-up link: a plan that gives the buyer 1,000 credits only sells while your pool holds at least 1,000 (for a plan with a free trial, the trial’s credits). When it does not, the buyer sees “Signups are temporarily unavailable. Please contact (your business name) to complete your purchase.” and nobody is charged; top up your credits under Settings → Billing and the same link works again. Each time a buyer or one of your clients is turned away this way, you get an alert by email, in the app and as a push notification saying how many credits the purchase needed and what your balance was, at most once every 6 hours, so you can top up or turn on auto-recharge before the next buyer arrives. If at payment time your pool still can’t cover the purchase, the platform automatically charges your agency’s card on file to top it up — and if that auto-charge fails, the client’s payment is refunded and no credits are delivered.
Example: You sell 150 credits for $25. The 150 credits land in the client’s purchased balance, the $25 goes to your Stripe account, and 150 credits are deducted from your agency pool. If those pool credits cost you $15, your margin on the sale is $10.
Purchased credits cover everything the client spends — AI replies, tools, follow-ups, and the non-AI WhatsApp costs too (number rent and, from 1 October 2026, the per-message carrier fees). All of it draws from the client’s purchased balance first; your agency pool only covers whatever that balance can’t. The WhatsApp costs pass through at cost unless you mark them up per client: the WhatsApp fee markup row in a sub-account’s Edit → Action pricing section is a multiplier on them, and the difference is credited back to your pool (see Marking up a client’s WhatsApp costs). The Client rate field is separate and only re-prices Max and Mini AI actions. SMS is not one of them: SMS always runs on a Twilio account you connect yourself, so Twilio bills you for it directly and no credits are involved.
What happens when a client’s balance reaches zero
A reselling client’s spend stays isolated to the credits they bought as long as their monthly allowance is zero. With no allowance, the moment their purchased balance reaches zero the AI bot stops responding for that sub-account — it does not fall back to your agency pool — and the client buys another plan or credit pack through your checkout to resume. That is the hard cut-off that keeps one client’s usage from draining your agency balance.
If the sub-account still has a Monthly allowance set (see Credit management modes), that allowance keeps landing every month and is spent from your pool exactly as in manual mode, so the client carries on after their purchased credits run out. Set the allowance to zero on the sub-account’s Edit modal if you want the pure pay-to-play behaviour. (SMS is billed to you by Twilio directly either way, so there is no credit charge involved.)
The Self-Serve Sign-Up Flow
The goal of credit reselling is that you do not manage sign-ups by hand. The flow looks like this:
- You publish a payment link (in an email, on your website, in an ad).
- A new client clicks it, pays, and a sub-account is created automatically. (If the plan has a free trial, they start it without paying anything — the charge happens automatically when the trial runs out.)
- The client gets a login email with a temporary password.
- They sign in, get onboarded, and take it from there.
You only step in if they need help — billing top-ups, payment retries, etc. all run on autopilot.
There are three ways to wire this up: Stripe (recommended, fully built-in), PayPal (also fully built-in, and the usual answer when Stripe isn’t available where you are), or a Custom Payment Provider (any other system you already use — requires a bit of integration work).
Setting Up Credit Reselling
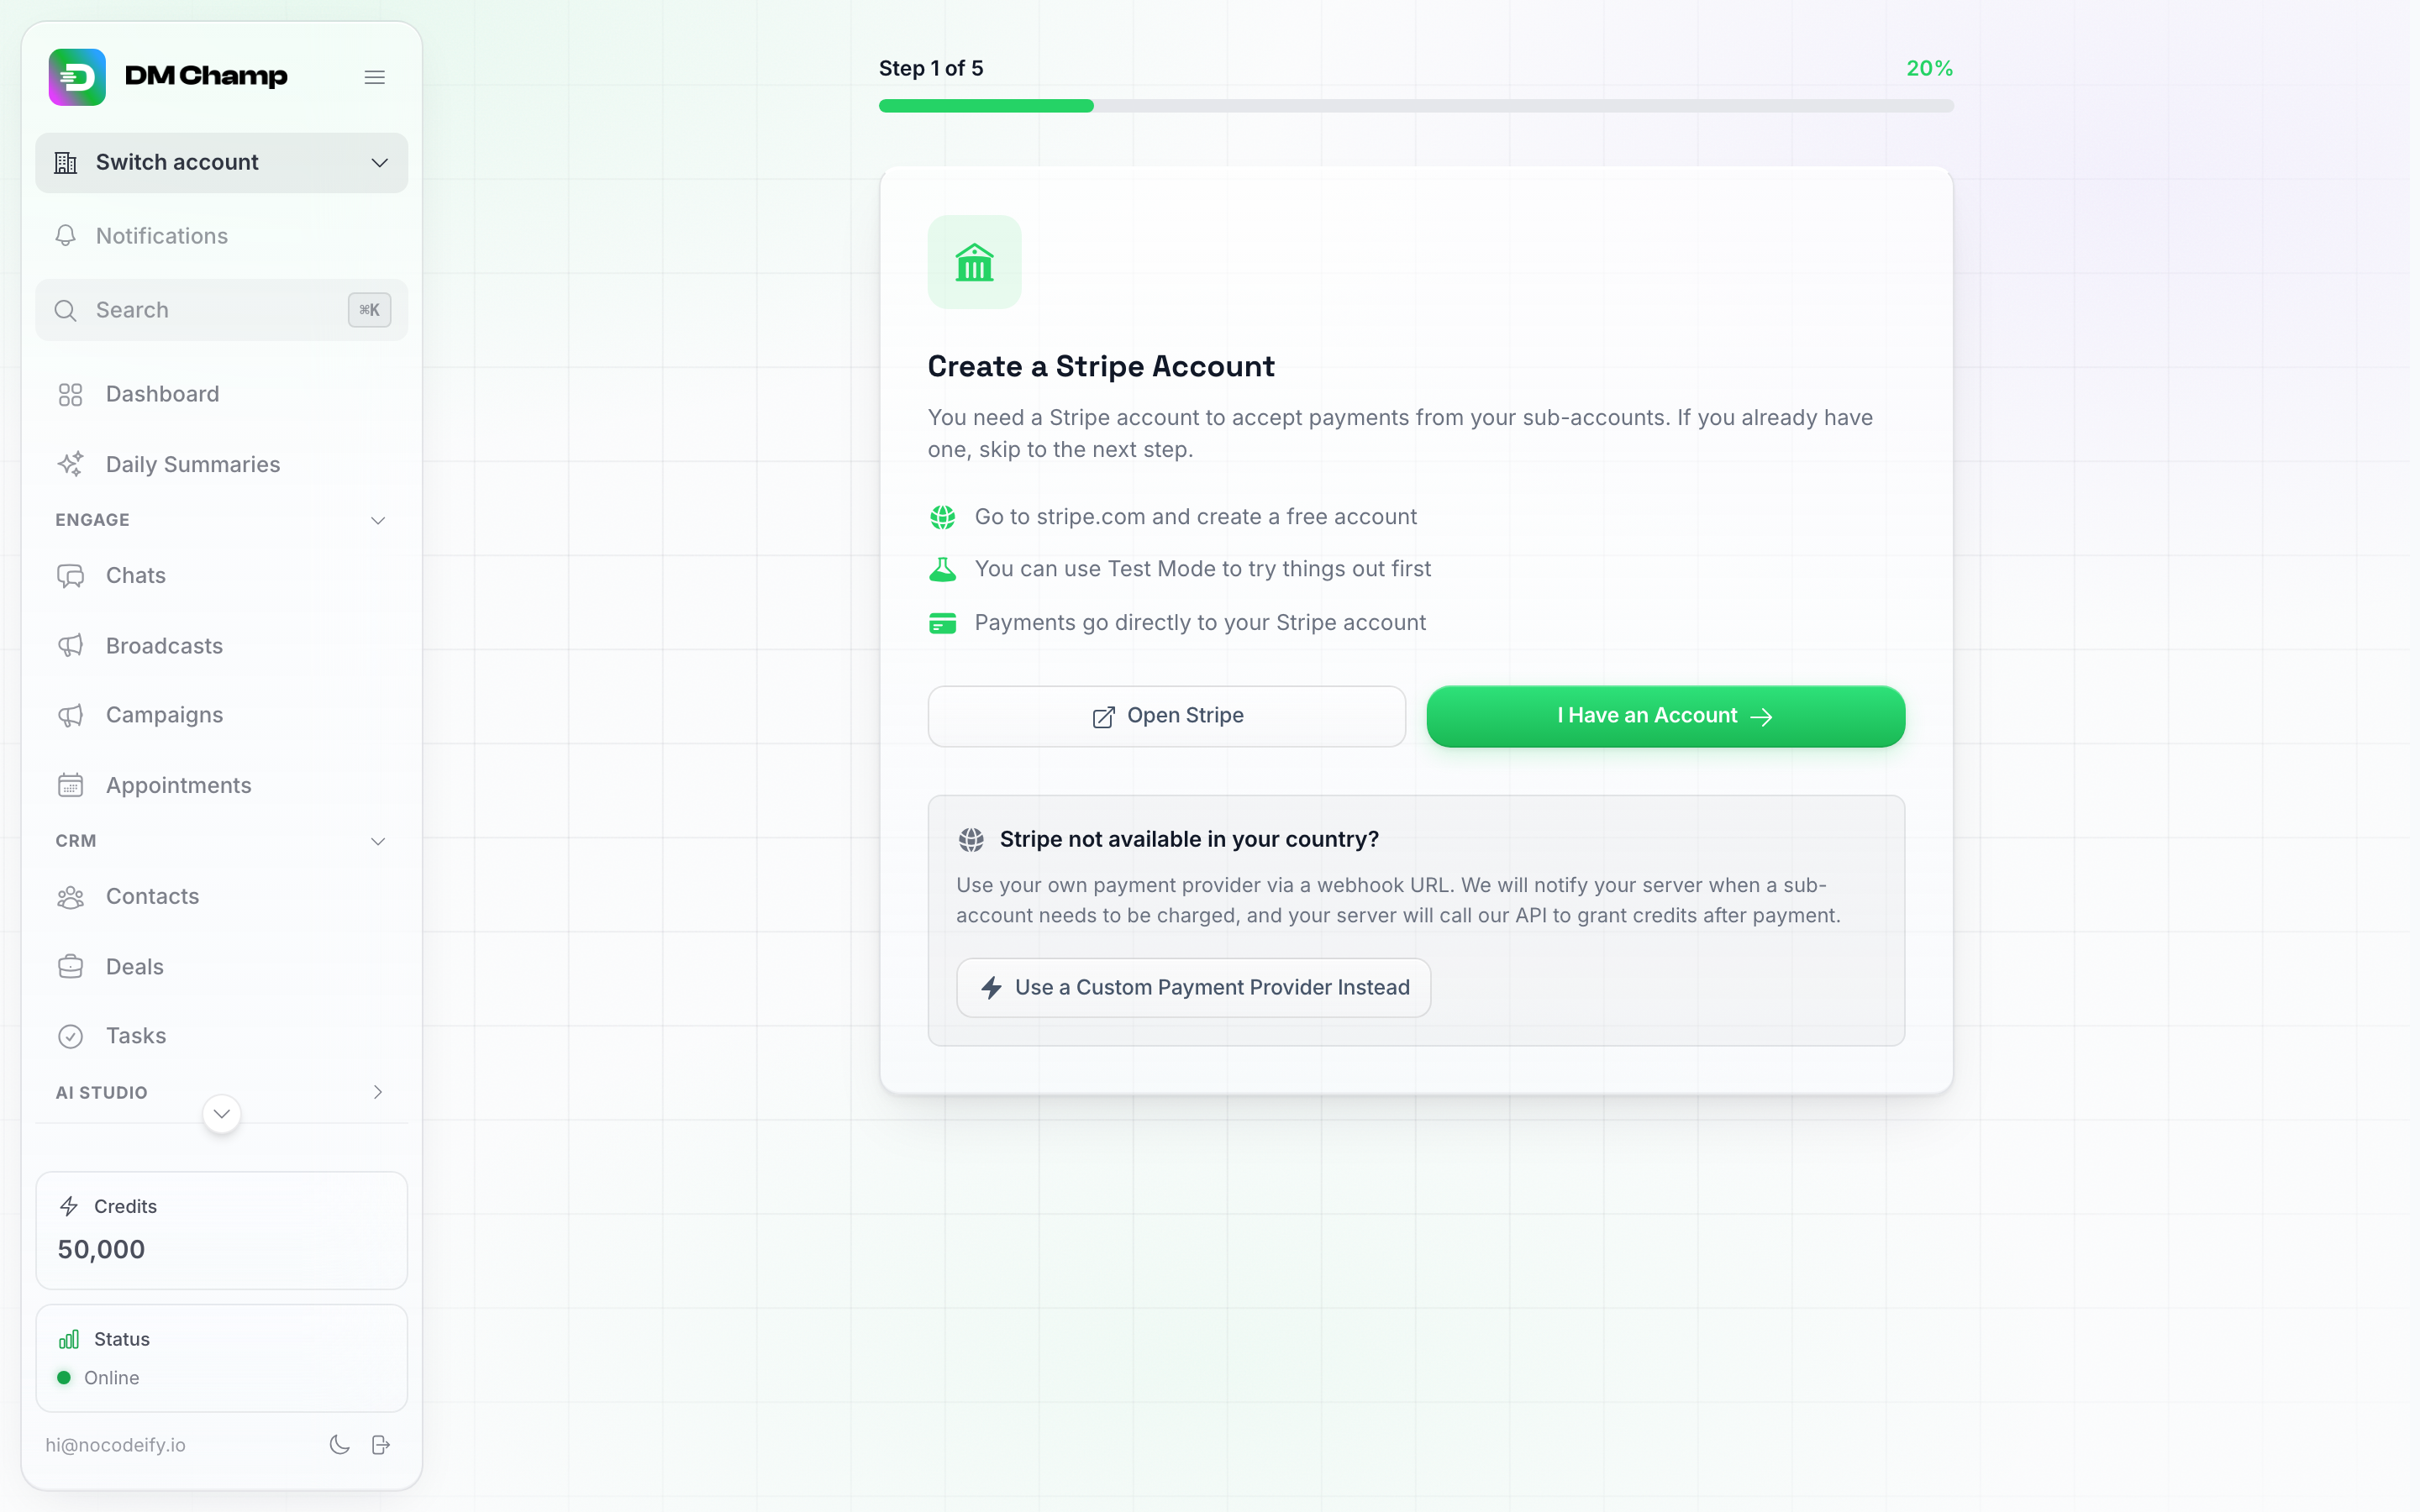
The SaaS Mode setup wizard (step 1 of 5). Stripe is the standard path; the box at the bottom offers the custom-payment-provider route if Stripe isn't available in your country.
- Click SaaS Mode in the main sidebar.
- If this is your first time here, you land in the setup wizard. Pick one of the three paths:
- I Have an Account / Connect Stripe — recommended. See Option 1: Connect Stripe below.
- Use a Custom Payment Provider Instead — for any other payment provider you want to drive yourself. See Option 2: Custom Payment Provider below.
- Connect PayPal instead — built-in like Stripe, with the money landing in your PayPal Business account. See Option 3: Connect PayPal below.
Stripe is the path of least resistance. If Stripe isn’t available in your country, or your clients simply prefer PayPal, connect PayPal — it is just as built-in and needs no integration work. Keep the custom payment provider route for a billing system you already have and want to keep (Mollie, Paddle, GoCardless, your own backend, etc.).
You can connect Stripe and PayPal at the same time. Your clients then get a button for each and pick whichever they prefer.
Option 1: Connect Stripe
This is the recommended path. The platform handles the checkout, account creation, and credit delivery for you — you just hand Stripe the keys.
Step 1 — Create a restricted Stripe API key
- In the SaaS Mode wizard, you’ll be prompted for your Stripe Secret Key.
- Open your Stripe dashboard in a new tab → Developers → API keys → Create restricted key.
- Give the key a name (e.g. DM Champ Reselling) and grant these permissions:
- Checkout Sessions → Write
- Products → Write
- Prices → Write
- Subscriptions → Write (tags each client’s subscription so renewals — and free trials converting to paid — credit the right account, and lets the platform check a tier for active subscribers before you delete it)
- Customers → Write, Setup Intents → Read and Customer portal → Write (used when a client saves a card for auto-recharge or manages their subscription)
- Account → Read
- Webhook Endpoints → Write (lets the platform check that your webhook is registered with the right events and fix it for you if it isn’t — see Webhook health check below)
- Click Create key, then copy the key.
Already connected with fewer permissions? You don’t need a new key. In Stripe open Developers → API keys, click your existing restricted key, tick the missing permissions and save — the platform picks them up on the next request. The tell-tale symptom of a key missing Subscriptions is the error “Could not verify if this tier has active subscribers” when you try to delete a pricing tier.
- Paste it into the wizard and click Save & Continue.
Switching to a different Stripe account later? Save the new account’s key the same way (SaaS Mode → the reconfigure wizard), register the webhook on the new account and recreate your plans there. Clients who bought from you before the switch keep their credits and their plan status here, but their billing record and any card they saved for auto-recharge lived in your old Stripe account, so those are forgotten automatically: their next purchase creates a fresh customer in the new account, and a client on auto-recharge is asked to save a card again. Clients who never bought anything are not affected.
Step 2 — Register the Stripe webhook
- The wizard shows you a webhook URL. Copy it.
- In Stripe → Developers → Webhooks → Create an event destination (older Stripe dashboards call this Add endpoint). When Stripe asks for the endpoint type, choose Your account (an Account endpoint), not Connected accounts: you connected your own Stripe account, so there is no Connect application involved.
- Paste the webhook URL as the Endpoint URL.
- For the events, select
checkout.session.completed(initial purchases),invoice.paid(renewals, and the first charge after a free trial ends — without it, a client’s renewal is charged in Stripe but their credits are not topped up),customer.subscription.updated(plan switches made in the Stripe customer portal — without it, a client who upgrades keeps their old allowance until you fix it by hand) andcustomer.subscription.deleted(cancellations — without it, a client who cancels in Stripe keeps showing as subscribed here). - For the Payload style (or payload format), choose Snapshot, not Thin. A thin destination sends only a reference to the event, without the purchase details, and is not visible to the platform’s webhook check: the wizard then warns that no webhook endpoint was found and client purchases are not credited. If you already created a thin one, delete it and create a new destination with Snapshot.
- Stripe shows a signing secret for the new webhook. Copy it and paste it into the wizard, then click Save & Continue.
Test mode is ignored
Stripe sends test-mode events to the same endpoint, and the platform ignores every one of them: a test checkout creates no client account, grants no credits and costs you nothing from your credit pool. To try your own sign-up flow end to end, run it in live mode with a 100% off coupon instead.
Webhook health check
As soon as you save the signing secret, and once a day after that, the platform uses your Stripe key to check that your webhook endpoint is enabled and subscribed to all four events. If events are missing and your key has the Webhook Endpoints → Write permission, they are added for you automatically. If the platform can’t fix it (no endpoint found, endpoint disabled, the key lacks the permission, or Stripe rejects the key because it expired or was revoked), the SaaS Mode dashboard shows a “Webhook needs attention” warning telling you exactly what to do. Fix it promptly: while the warning is up, your clients’ renewals are still charged in Stripe but their credits are not topped up.
You don’t have to open the dashboard to find out: the same problems, plus a rejected Stripe key anywhere in the platform and a webhook that has gone quiet (Stripe has sent renewals or checkouts that never arrived), also send you a Stripe Connection Problems alert by email and under the notification bell, at most once a day per problem. See Notifications.
Step 3 — Set up pricing tiers
- Define the credit packages your clients can buy (up to 20 tiers — e.g. Starter — 1,000 credits / $29, Pro — 5,000 credits / $99), and optionally the features each tier unlocks. The developer items a tier leaves out (API access, MCP servers, Webhooks and CRM & ERP integrations) are hidden from the client’s Settings, so a client only sees what their plan includes. Untick CRM & ERP integrations and clients on that plan no longer see Settings → CRM & ERP, where business systems such as Odoo are connected. Plans you created before this option existed have it switched on, so nothing changes for your current clients until you untick it.
- A plan can have 0 credits if it includes Bring Your Own API Key. Tick Bring Your Own API Key in the plan’s features and set the credits to 0: the client pays your plan price for the platform and their AI runs on their own API key, which they add in their own settings, so the plan takes nothing from your credit pool. Their AI replies only start once that key is added. On any plan without Bring Your Own API Key the credits must be at least 1, and saving 0 shows an error. A 0-credit plan’s payment link and plans list show the price only, without a credits line.
- Need the same plan on two billing cadences — say monthly and yearly? Set it up once, then click the Duplicate icon (next to the trash icon on the tier) instead of building it again. The copy carries every setting of the original — credits, price, features, limits, trial — with (copy) added to its label, and is not published yet: switch its Billing to Yearly, adjust the price and label, then save, and it gets its own Stripe product and price. The copy is always added at the end of your Plans list on purpose: your payment links and embed code point at plans by their position in the list (see Step 4 — Share your payment links), so nothing you have already put on your website moves.
- Choose how the plan bills with the Billing selector: Monthly, Yearly or Every N weeks. On Monthly nothing changes — the price you enter is charged every month. On Yearly, the price you enter is the price for a whole year, while the Credits per month field still means exactly that — the credits the client gets per month. So 1,000 credits / $290 / Yearly is a client paying you $290 once a year and receiving 1,000 credits every month. Their allowance is granted month by month — the first month when they buy, then automatically each month after, with the count resetting at every yearly renewal — rather than twelve months of credits dropped in on day one. That matters for your pool: a yearly sale doesn’t take a year’s worth of credits out of it at once. If the client cancels, the monthly grants stop. Every N weeks is for any other cadence: pick it and enter the Weeks between payments (1 to 52) — every 4 weeks, say, which is 13 payments a year instead of 12. On a weekly-style plan the price and the credits both apply per billing period: a 1,000 credits / $29 / every 4 weeks plan charges $29 every four weeks and grants 1,000 credits every four weeks. Changing a saved plan’s billing cadence creates a new price in your Stripe, so existing subscribers stay on what they signed up for.
- Give the plan a free trial if you want one. Free trial (days) takes anything from 1 to 90 — leave it at 0 for no trial — and Trial credits sets how many credits the client starts with (it defaults to the plan’s monthly credits, and you can lower it — to a minimum of 1, because a trial account with no credits at all couldn’t finish its own setup). With a trial set, a new client is not charged at signup: they get the trial credits on day one and can use the plan straight away. When the trial period ends, Stripe charges the plan price automatically and the client moves onto the full monthly allowance from then on. A few things to keep in mind:
- Trial credits come out of your agency pool, exactly like any other plan credits: they are deducted the moment the trial starts and land in the client’s balance, rather than drawn from your pool as the client spends them (the same goes for a paid plan’s credits at each payment). A generous trial on a plan you promote widely is a real cost, so set the number deliberately rather than leaving it at the full monthly allowance.
- A trial is for new signups. A signup through your payment link or embedded checkout gets the trial exactly as configured on the plan. A sub-account that already exists — created by you, previously subscribed, or already trialled — buying from its own Billing page is charged straight away, no second trial. A client who cancels during the trial is never charged and keeps whatever trial credits are left.
- Unused trial credits stay when the trial converts. The first charge after the trial adds the plan’s full monthly credits on top of whatever trial credits the client has left; the balance is not reset. The one exception is a plan with an Unused credits limit (item 9 below), which trims the carried-over balance at that first charge exactly as it does at every renewal.
- Card or no card — your call. By default the trial still asks the client for a card at signup, and Stripe charges it when the trial ends. Switch off Require card to start trial and the checkout skips the card entirely: the client starts with just an email. If they haven’t added a card by the time the trial runs out, the plan simply ends — their sub-account is marked cancelled, no more credits are granted, and they keep what’s left of the trial credits. A no-card trial converts less automatically than a card-on-file one, so it pays to remind the client to add their card before the end.
- Hard expiry after trial — take the unused credits back. Next to the card switch sits Hard expiry after trial: when the trial ends without an upgrade, unused trial credits come back to your pool and the client’s account is locked until they subscribe. Leave it off (the default) and nothing changes from the paragraph above — the plan is cancelled, no further credits are granted, and the client keeps whatever trial credits are left, so their AI carries on answering until those run out. Switch it on and, the moment a trial ends without an upgrade, the unused trial credits go back into your agency pool and the client’s account is locked: sending and AI replies stop and they see “Your free trial has ended. Contact your provider to continue.” Only what they didn’t spend comes back — a trial they actually used costs you what they used. The lock lifts by itself as soon as they buy any plan, and you can lift or change it yourself from the sub-account’s Edit modal, using the same block controls as for a client who falls behind on payments. (A block you had already placed by hand is never touched by any of this — your reason for it outranks ours.) Hard expiry works on card-required and no-card trials alike; on a no-card trial the checkout tells the buyer up front that their plan and any remaining trial credits end automatically after the trial unless they add a payment method.
- The Channels group carries the plan’s Channel limit — a number, not a toggle, working exactly like team seats and the AI Agent limit. Pick Not set (the default — the plan doesn’t manage the number, so whatever the account already has stays as it is), Unlimited, or Custom with the exact number of messaging channels clients on this plan can have connected at once — including 0, for plans where you connect and manage the channels yourself. The limit is applied when a client subscribes and refreshed on every renewal, and a limit you’ve set by hand on one specific sub-account (in its Edit modal) is never overwritten by a renewal. It controls how many channels, not which ones — that’s the next group. The count is per connection, not per channel type: every WhatsApp number takes one slot of its own (WhatsApp Web and the Business API alike), while Instagram and Messenger arrive through the same Meta page connection and together occupy a single slot. A client at their limit sees a clear message when they try to connect another channel; reconnecting one they already have is never blocked.
- Inside each tier’s feature list you’ll also find a Channel Types group listing the channel types a client can be given — Chat Widget, WhatsApp Business API, WhatsApp Web, Instagram, Facebook Messenger, Telegram, LINE, Viber, Email, SMS, and iMessage. Channel types are switched on by default unless you turn some off, so you can reserve specific channels for higher tiers — say, a widget-only starter plan and WhatsApp Business API from your Pro tier up. Clients on a tier that excludes a channel see it locked on their Channels page with a note to upgrade.
- The feature list also carries a Team group, so each plan can define its own team-seat allowance. One picker, Team seats, decides both whether clients on the plan get team members at all and how many: pick Not included (the default — clients on this plan can’t invite teammates), one of the presets (3 / 5 / 10 / Unlimited), or Custom with any exact number — Starter with 3 seats, Professional with 10, Enterprise unlimited, or whatever fits your pricing. The allowance is applied automatically when a client subscribes and refreshed on every renewal, so there’s nothing to set by hand per client. Two things to know: Not set means team members are included but the plan doesn’t manage the number — whatever seat limit the account already has is left alone — and a seat limit you’ve set manually on one specific sub-account (in its Edit modal or via the API) is never overwritten by a renewal, so one-off exceptions survive billing cycles. There’s also a Productivity group (Tasks, Daily Summaries, AI Media Library) if you want to reserve those for higher plans. The same group carries the two client assistant switches: Client assistant shows your branded assistant to clients on the plan, and Client assistant can make changes also lets it change their account for them after they confirm. Both are off by default.
- The Contacts & AI Agents group carries the plan’s AI Agent limit — a number, not a toggle, working exactly like team seats. Pick Not set (the default — the plan doesn’t manage the number, so whatever the account already has stays as it is), Unlimited, or Custom with the exact number of AI agents clients on this plan can have — including 0, for plans where you build and manage the agents yourself and clients shouldn’t create their own. The limit is applied when a client subscribes and refreshed on every renewal, and a limit you’ve set by hand on one specific sub-account (in its Edit modal) is never overwritten by a renewal. A client at their limit sees a clear message when they try to create or duplicate an agent; copying an agent into a sub-account from your agency side is never blocked by it.
- Under the AI Agent limit, the same Contacts & AI Agents group carries an AI models row deciding which AI models clients on the plan may run their agents on: Pro, Max and Mini switches, the same three as the AI models this client may use row in a sub-account’s Edit modal. Leave every switch off (the default) and the plan does not manage models: clients pick any model their account allows. Switch on one or more and every client on the plan is locked to exactly those models, applied when they subscribe and refreshed at every renewal, so there is nothing to set by hand per client. The models you leave off disappear from the client’s AI Quality cards, and the lock is enforced on our side, not just hidden. A lock you have set by hand on one specific sub-account (in its Edit modal or over the API) is never overwritten by the plan. Most agencies switch on Max and Mini only: Pro costs 1 credit per reply against 0.25 on Max without answering better, and a client who reads the price list as a quality ranking will pick it by reflex. See Locking a client to one AI model.
- The Unused credits group decides what happens to a client’s leftover credits when the plan renews. Keep at most is how many months of allowance a client on this plan may carry: at each renewal their unused balance is trimmed to at most that many times the monthly allowance, and then the new credits land on top —
1keeps one month’s worth,0.5half a month,0carries nothing over. Expire unused credits after is a number of days: credits that have sat unused that long are dropped at the first renewal after they reach that age, and because spending always comes off the oldest credits first, a client who uses their allowance every month never loses any. Leave both empty — the default, and what every plan you already sell keeps — and nothing is capped or expired. They are worth setting on a cheap or trial-priced plan, where a client who barely uses the product otherwise builds up a balance your pool is on the hook for. A value set on one specific sub-account beats the plan’s, so you can still make an exception for a single client. See Capping what rolls over. - Set the per-credit price — this is what clients pay for ad-hoc top-ups.
- Click Save & Continue.
Contacts are a yes/no feature, not a number. The same Contacts & AI Agents group carries Unlimited Contacts as a simple on/off item, and there is deliberately no field to type a contact number into. Switching it off does not give you a contact cap to set — so unless you have a specific reason, leave it on. The three limits you can express as an actual number are Channel limit, AI Agent limit and Team seats, each with Not set / Unlimited / Custom.
Let clients use what you build, without building their own. The Contacts & AI Agents group also carries three switches: Create & Edit Automations, Send Broadcasts and Create Smart Lists. All three are on by default, and every plan and client you already have was given them, so nothing changes until you switch one off. With a switch off, clients on that plan can still see and use everything you set up for them (from a snapshot, a saved package or the agency API), and it keeps running. They just cannot create new ones, edit them or delete them. For broadcasts that also means they cannot launch, pause, resume or duplicate one. For smart lists, plain lists stay allowed and so does renaming a smart list; changing its rules does not. The client sees a message that their plan does not include it. You are never restricted yourself: working inside the client’s account (assist or log in as the client) or through your agency API key, you can still build and change all three. This is different from the Automations switch, which hides the whole Automations section from the client. To set it for one client instead of the whole plan, use the same switches in that client’s Edit modal, or the features endpoint of the agency API.
There is no per-plan cap on broadcasts. Agents are the thing to limit if you want to keep a starter tier small — use the AI Agent limit above.
Tiers are subscriptions, not one-time purchases. Each pricing tier is a recurring subscription — charged every month, once a year, or every N weeks depending on its Billing selector — and it runs until the client cancels. Monthly and yearly plans grant the credit allowance every month; a weekly-style plan grants it every billing period. For one-off top-ups, use the per-credit custom-amount option instead. Because tiers are live subscriptions, a tier that still has active subscribers cannot be deleted — cancel or migrate those clients first.
⚠️ The tier’s feature list wins at every renewal. When a client subscribes to a tier, and again each time it renews, their features are reset to exactly what that tier includes. So if you switch an extra feature on for one client from Edit Sub Account, add it to their tier as well — otherwise it drops off at their next renewal. (Custom one-off credit purchases don’t touch features.)
Selling a plan on a specific white label domain
If you run more than one white label domain, each tier gets a Sold on picker (it only appears once you have two or more domains). Leave it on Main domain and nothing changes. Pick one of your other domains — say, your Lead Finder domain — and:
- That tier’s checkout carries the domain’s branding, and after paying the buyer lands on that domain, not your main one.
- The buyer’s sub-account is assigned to that domain automatically, so their emails and login branding follow it from day one (the same assignment you can set by hand on the sub-account’s White label picker).
- Clients signed in on that domain see a Plans card on their Credits page listing only the plans sold there, with an upgrade button — so a client on your Lead Finder domain can subscribe without ever seeing your main brand.
Plans sold on your main domain never show up on your other domains, and the other way around.
If you later make another domain your main one, every plan that was on Main domain is pinned to the domain it was actually selling on, so nothing changes for the clients buying there.
You’ll land on a You’re All Set! screen with a checklist (Stripe account connected, pricing tiers configured, webhook registered) and a tip to test with Stripe’s test card 4242 4242 4242 4242. From there, View Dashboard takes you to the SaaS Mode dashboard.
Clients switching plans
If you let clients manage their own subscription from the Stripe customer portal, they can move between your plans themselves. Here is what that does to their credits.
- Upgrading mid-cycle tops them up straight away. A client on Starter (100 credits a month) who moves to Professional (1,000 a month) on day 10 receives the difference — 900 credits — right away, and the full 1,000 from their next renewal onwards. Stripe charges the price difference for the rest of the period; the credits come out of your pool, as always.
- Downgrading never takes credits back. Whatever the client has already been given stays with them, and nothing returns to your pool. The smaller allowance applies from their next renewal.
- Switching up and down repeatedly can’t earn the allowance twice. The platform remembers the highest allowance the client’s current period has already been funded with, so Starter → Professional → Starter → Professional inside one month hands over the 900-credit difference once, not twice.
- Plan features, seats and limits follow the new plan immediately, in both directions.
Three things to get right in your Stripe customer portal settings (Stripe dashboard → Settings → Billing → Customer portal):
- Save the portal settings at all, with “Cancel subscriptions” enabled. Stripe only serves a customer portal once its settings have been saved in your dashboard. Until then the Open billing portal button on your clients’ Billing page fails with “Couldn’t open the billing portal”, and a portal saved without the cancel option leaves clients with no way to end their plan — see How a client cancels their plan.
- Keep “customers can change quantity” switched off. Quantity multiplies what the client is charged but never the credits they receive — a client who sets quantity to 3 pays three times the price and still gets one plan’s allowance.
- Scheduling downgrades for the end of the billing period is the sensible default on the money side. A downgrade that takes effect immediately puts the client on a smaller plan for a period they already paid the higher price for, and none of the credits already granted come back to you.
Step 4 — Share your payment links
The dashboard’s Payments tab lists your payment links. Opened from the main app address, the links and the embed code use your own white-label domain once it is connected and reachable: a plan sold on a specific domain gets that domain, every other plan gets your main one. Opened from one of your own domains, the links use that domain. If none of your domains is reachable, the links use the address you’re signed in on. The checkout page itself is always white-labeled with your logo and brand.
There’s also Copy Embed Code on the same tab if you want to drop the pricing cards directly onto your own website.
Running Meta ads? The embed code also forwards Meta’s ad click ID (fbclid) from your page onto the checkout buttons, and a plain payment link accepts it too (...&fbclid=...). Together with a Meta Pixel ID on your white-label domain, that lets Meta attribute the signup to the ad. See Tracking Meta ads conversions.
Want to know which campaign a client came from? Add UTM tags to a payment link, for example ...&utm_source=facebook&utm_medium=paid&utm_campaign=spring_sale (also utm_content and utm_term). When someone buys through that link, the new client account keeps the tags, and the Sub Accounts page shows them under the client as Source: facebook / paid / spring_sale. The tags also land in the checkout’s metadata in your own Stripe account. The embed code does this for you: when a visitor arrives on your page with UTM tags in the address, the pricing buttons carry them to checkout, even if the visitor clicks around your site first. It works on both Stripe and PayPal links. Only these five tags are kept, each up to 200 characters, and only on a brand new client account; an existing client who buys again keeps the source they first came from.
If you have PayPal connected as well, each plan carries a PayPal link next to its Stripe one, and the embed code puts one button per connected payment method on each pricing card.
Each payment link points at a plan by its position in your Plans list (the first plan is tier=0, the second tier=1, and so on). If you delete a plan, the plans after it move up one position — so re-copy your links and embed code from the Payments tab after deleting a plan, otherwise a button on your website can end up pointing at the wrong plan or at one that no longer exists. Plans are shown to your clients in the order they appear in your Plans list.
What buyers can enter at checkout. Besides the card, Stripe’s checkout page asks for the buyer’s email, phone number and billing address, and offers an optional Business Name field plus an “I’m purchasing as a business” checkbox where they can add their VAT / tax ID. The business name and tax ID are stored on the customer in your Stripe account, so you can pick them up for your own invoicing.
The phone number is asked for by default, and you can switch it off. On the Payments tab, under Checkout Fields, turn off Ask for a phone number at checkout and buyers only enter their email, card and billing address. It applies to your payment links and your embedded checkout straight away — no need to re-copy anything — and accounts that sign up with it off simply have no phone number on file, which changes nothing else about how they work.
Checkout in your buyer’s language. The Business Name field and the line above the pay button (“Complete your purchase from” and your business name) are shown in the buyer’s language, together with the rest of Stripe’s page. The language comes from the link (add lang=fr, for example), then the client’s own account language, then the buyer’s browser, then your default language, and English when none of those is known.
Your own line above the pay button. On the same Payments tab, under Checkout Fields, fill in Checkout note and click Save note to replace “Complete your purchase from …” with your own sentence, for example a money-back guarantee. It is shown exactly as you type it and is not translated, so write it in the language your buyers use. Leave it empty to go back to the default line. If the plan has a free trial, the trial sentence is still added after your note.
Charging VAT or sales tax. On the same Payments tab, under Checkout Fields, Calculate tax automatically hands the tax question to Stripe: it works out the right VAT or sales tax for each buyer from the country they’re in and the tax ID they enter, adds it to the checkout, and applies reverse charge for EU business buyers who give a valid VAT number, so those clients pay the plan price with no VAT on top. It is off unless you turn it on.
Two things to get right first. The switch needs Stripe Tax active in your own Stripe account, and it refuses to turn on until that is the case, so set Stripe Tax up in Stripe before coming back. And in your Stripe Tax settings, set Include tax in prices to No if you want tax added on top of your plan price. That setting is Stripe’s, not ours, and for prices in euros Stripe otherwise treats your plan price as already containing the tax, which quietly lowers what you keep.
Turning it on changes new checkouts only. Clients who are already subscribed keep paying exactly what they pay now.
Making buyers accept your terms and conditions. Some countries (France, for example) require buyers to accept your terms before they pay. On the same Payments tab, under Terms acceptance, turn on Require a terms checkbox at checkout. From then on every Stripe checkout page (payment links, embedded checkout, and the plan and top-up purchases a client starts from their own Billing page) shows a checkbox, and the pay button does not work until the buyer ticks it.
The checkbox links to the Terms of Service URL saved in your own Stripe account, so add it there first: in Stripe, open Settings, then Business, then Public details, and fill in Terms of service. The switch checks this and refuses to turn on until the URL is there.
By default the checkbox reads “I agree to the Terms of Service” in the buyer’s checkout language. To use your own wording, type it under Text for every language and click Save text. You can add a link in the text like this: [Terms and Conditions](https://yoursite.com/terms). To show a different text per language, click Add a language version, pick the language and type that version, for example French: J'accepte les [Conditions Générales de Vente](https://yoursite.com/cgv) de Votre Agence. A buyer whose checkout is in a language you added sees that version; everyone else sees the text for every language.
PayPal checkouts do not show this checkbox.
Promotions and discount codes. Every checkout page (payment links, embedded checkout, and the plan and top-up purchases a client starts from their own Billing page) has an Add promotion code field. The codes are your own: create them in your Stripe dashboard under Product catalog → Coupons (set the amount or percentage off, then add a promotion code the client can type, with an optional expiry or redemption limit) and share the code however you like. The discount changes what the client pays you; the credits they receive stay exactly what the plan says, so a discounted plan costs you the same from your pool as a full-price one. A coupon on a subscription plan follows Stripe’s coupon duration (once, a number of months, or forever). Nothing to set up on the platform side.
⚠️ Do not delete the products that the platform creates inside your Stripe account. When you set up pricing tiers, the platform automatically creates matching Stripe products and prices. Deleting them in Stripe will break your payment links. Manage your pricing from the SaaS Mode dashboard, not from inside Stripe.
Option 2: Custom Payment Provider
Pick this path if Stripe is not an option. The platform gives you a single webhook URL field — you’re responsible for the rest of the plumbing. There are two things you need to wire up yourself:
- Initial sign-up — when a new customer pays your payment link, you call the platform’s API to create the sub-account.
- Auto top-ups — when a sub-account’s credits run low, the platform calls your webhook so you can charge the card and grant more credits.
What you build yourself
- Products / payment links in your own payment provider (Stripe outside Stripe Connect, Mollie, Paddle, GoCardless, manual invoicing, etc.).
- A workflow that runs on successful payment, which calls the platform’s API to:
- Create the sub-account (POST
/v1/sub-accounts). - Optionally email the client their temporary password.
- Create the sub-account (POST
- A workflow that handles auto-recharge webhooks from the platform: charge the saved card on file, then call the platform’s API to add credits.
You don’t have to code this from scratch — Zapier, Make, n8n, or any low-code tool can call the platform’s REST API and your payment provider’s API in sequence.
Step 1 — Find the API reference
The full API documentation lives at help.dmchamp.com → API Reference → Sub Accounts.
Open
help.dmchamp.comdirectly, not your white-label docs URL. The API reference is filtered out of white-label documentation so your clients don’t see it.
The Sub Accounts section shows the create-sub-account endpoint, the response shape (including the temporary password you can use in your welcome email), and the available feature flags you can pass when creating an account.
Step 2 — Configure the auto-recharge webhook
- In the SaaS Mode wizard, choose Use a Custom Payment Provider Instead.
- Enter your webhook URL — the endpoint on your server (or Zapier / Make / n8n) that will handle low-balance events.
- Click Send Test Event to verify the endpoint is reachable. The result panel shows the HTTP status your server returned, the round-trip latency, the response body, and the exact JSON payload sent — so you can build and debug your handler end-to-end without waiting for a real client to run low. Test events have
test: truein the payload so your server can short-circuit before charging anyone. - Click Save Webhook URL.
Once configured, whenever a sub-account’s credit balance drops below their auto-recharge threshold:
- The platform sends a notification to your webhook URL with the sub-account’s details and how many credits they need.
- Your server processes the payment however you like (charge the client’s card, create an invoice, deduct from a prepaid balance, etc.).
- After payment is confirmed, your server calls the API to grant the credits to the sub-account.
For the technical details on the webhook payload and API call, see Sub-Account Auto-Recharge (Custom Payment Provider).
Option 3: Connect PayPal
Pick this path if Stripe isn’t available in your country, or if your clients would rather pay with PayPal. It is built-in exactly like Stripe — the platform runs the checkout, creates the sub-account and delivers the credits — and the money goes straight into your own PayPal Business account. You need a PayPal Business account with a REST app created in it; there is nothing to build.
Connecting PayPal doesn’t replace Stripe. If you have both, your clients get both buttons, on their Billing page and on your pricing cards.
Step 1 — Connect your PayPal app
- In the SaaS Mode wizard, choose Connect PayPal instead.
- In a new tab, open your PayPal developer dashboard and create a REST app on your Business account.
- Copy the app’s Client ID and Secret and paste them into the wizard.
- Pick the environment: Live for real payments, or Sandbox if you want to test the whole flow first with PayPal’s test buyers. The Client ID and Secret must come from the same environment you pick, and Sandbox payments are not real money — switch the connection to Live before you share your links.
- Click Save & Continue. The platform checks the credentials with PayPal right away; if PayPal rejects them, nothing is saved and you can paste them again.
Step 2 — Register the PayPal webhook
The webhook is how your PayPal account tells the platform that a payment went through, a subscription renewed, or a payment was refunded. Without it, your clients pay but their credits are not delivered.
- The wizard shows you a webhook URL. Copy it.
- In the same PayPal REST app, add a webhook with that URL and subscribe it to these events:
CHECKOUT.ORDER.APPROVEDPAYMENT.CAPTURE.COMPLETED,PAYMENT.CAPTURE.DENIED,PAYMENT.CAPTURE.REFUNDED,PAYMENT.CAPTURE.REVERSEDPAYMENT.SALE.COMPLETED,PAYMENT.SALE.REFUNDEDBILLING.SUBSCRIPTION.ACTIVATED,BILLING.SUBSCRIPTION.CANCELLED,BILLING.SUBSCRIPTION.SUSPENDED,BILLING.SUBSCRIPTION.EXPIRED,BILLING.SUBSCRIPTION.PAYMENT.FAILEDVAULT.PAYMENT-TOKEN.DELETED
- PayPal gives the new webhook an ID. Copy it, paste it into the wizard and click Save.
Your plans are the same plans either way — set them up once as in Step 3 — Set up pricing tiers and they are sold through whichever payment methods you have connected.
What your clients see
- Top-ups — a Pay with PayPal button on their Billing page, next to the card option, at the same per-credit price you set.
- Plans — every tier gets a PayPal checkout link alongside its Stripe one on the Payments tab, and Copy Embed Code emits one button per connected payment method, so a pricing card on your website can offer card and PayPal side by side.
- Automatic top-ups — see below.
Automatic top-ups on PayPal
One setting, Automatic top-ups charge, decides which of your connected methods handles automatic top-ups: Stripe, PayPal or your own webhook. Only one of them can do it at a time, even when you have Stripe and PayPal both connected — everything else (manual top-ups, plan checkout) keeps offering both.
Set it to PayPal and each client connects their own PayPal account once, from the Auto recharge card on their Billing page. From then on, whenever their balance falls below their threshold, the platform charges that saved PayPal account for the top-up at your per-credit price and delivers the credits automatically, exactly as the Stripe card flow does. A client who hasn’t connected PayPal yet is simply not charged — their balance runs down until they connect one or buy credits by hand — and if PayPal declines a charge, no credits are delivered and the platform tries again the next time the balance dips below the threshold. Clients can remove their PayPal account from the same card whenever they want.
If you later disconnect PayPal in SaaS Mode and it was the one handling automatic top-ups, they fall back to Stripe if you have it connected, or to your own webhook if you configured one.
Good to know about PayPal
- A plan always asks the client for a PayPal account, even on a free trial. Trials still work — nothing is charged until the trial ends — but PayPal requires the buyer to approve with an account up front, so the plan’s Require card to start trial switch makes no difference on a PayPal checkout. If you rely on no-account trials, sell that plan through Stripe.
- Prices are charged exactly as you set them. PayPal adds no separate tax line at checkout, so put whatever tax you owe into the price of your plans and your per-credit price.
- Switching plan means cancelling and re-subscribing. A client on a PayPal subscription can’t move to another tier in place: they cancel the current one and buy the new plan through its own link. (Clients paying by card can still switch in the Stripe customer portal — see Clients switching plans.)
- A refund doesn’t take the credits back. If you refund a PayPal payment from your PayPal account, the refund is recorded here, but credits already delivered stay on the client’s balance — the same as with Stripe.
Pricing Configuration
- Pricing tiers — define credit packages your clients can purchase (up to 20, e.g., “Starter Pack: 100 credits for $15”), configured on SaaS Mode’s Plans tab. Each plan bills monthly, yearly or every N weeks (a yearly price still grants its credits month by month; a weekly-style plan grants them every billing period) and can carry a free trial of 1–90 days with its own trial credit amount, with or without asking for a card up front, and with or without hard expiry (unused trial credits back to your pool, account locked, if the trial ends without an upgrade). See Step 3 — Set up pricing tiers. Each plan gets its own payment link on the Payments tab — a Stripe one, a PayPal one, or both, depending on what you have connected. Each plan can also cap what a client carries between renewals: the Unused credits group sets Keep at most (months of allowance kept) and Expire unused credits after (days), applied to every client on the plan — see Capping what rolls over. You can also manage all of this from code — see Manage your pricing tiers over the API.
- Per-credit pricing — set a custom price per credit for flexible top-ups. Custom (ad-hoc) credit purchases must be between 10 and 10,000 credits per transaction. Tier subscriptions cover fixed amounts; the custom amount handles anything in between. An optional note (up to 200 characters) is shown to clients directly under the price on their Billing page — useful when you price in one currency but charge in another, e.g. “USD 0.25 per credit at our reference rate”. The price and the note can also be read and changed from code — see Set your per-credit price over the API.
- Currencies — plans and the per-credit price can be set in USD, EUR, GBP, CAD, AUD, CHF, SEK, NOK, DKK, SGD, HKD, MXN, BRL, COP, GTQ, VND, ILS, OMR, THB, MYR, NZD, PLN, PHP, ZAR, AED, KWD or QAR. Plans also accept JPY. The Kuwaiti dinar (KWD) and Omani rial (OMR) use 3 decimals, and their prices are rounded to the nearest 0.010 because card payments in those currencies only accept amounts in steps of 10 fils or baisa. This list is separate from the display currency in Settings → Profile → Preferences, which offers more options.
- Minimum credit pricing — the platform enforces a minimum price per credit to maintain platform sustainability. You can set your price at or above this minimum.
Sub-Account Credit Dashboard
Each sub-account’s Credit usage details (from its row’s More menu on the Sub Accounts page) shows:
- Credits purchased and total spend
- Credits consumed and remaining balance
- Usage trends over time, broken down by reason and by the Top agents list
What the dashboard shows. When a sub-account uses your agency’s API key, the dashboard shows their credit usage but hides the underlying dollar cost. Usage totals count only credits actually consumed — promotional bonuses, monthly renewals, and plan adjustments are excluded so the “credits used” figure reflects real activity.
Agent Copying to Sub-Accounts
You can copy a proven AI Agent from your agency account into one or more sub-accounts at once. Its instructions, FAQs and knowledge base, custom functions and connected tools, media, active hours, tag rules and follow-up settings all come across, so you don’t have to rebuild it by hand. The copy arrives switched off, and a few account-specific things (the client’s channels and WhatsApp templates) are set up on each sub-account.
Start from the Sub Accounts page: open a row’s More menu and choose Copy agent here, or use the Copy this agent into a sub-account icon on the agent’s row on the AI Agents page. To hand a client a whole set-up in one go rather than a single Agent, use a Snapshot. See Snapshots.
For the full step-by-step, what gets copied, and what to redo, see Copy an AI Agent to a Sub-Account.
Sign-In Mode (acting as a sub-account)
You can enter a sub-account’s dashboard directly from your agency account, as if you were the client. This is the same feature some platforms call “assist” or “impersonate” — here the action is labelled Sign in as user.
- In the sidebar, click Sub Accounts.
- Find the sub-account in the list. On that row, click the More menu (three-dot icon at the far right).
- Click Sign in as user.
- The dashboard reloads as that sub-account — full access to their AI agents, contacts, chats, and settings.
- When finished, click the amber Assisting:
pill at the top of the sidebar and choose Back to my agency.
This is especially useful for providing hands-on support to clients without asking them to share their login credentials.
Managing Sub-Account Features
Depending on your agency tier, you can control which features each sub-account has access to. Feature allocation is managed per sub-account and through your pricing tiers.
From a sub-account’s Edit modal you can fine-tune it individually: toggle which features it has, hide specific pages from its side menu and settings, choose who receives its alert emails (see Notification Routing), set a monthly cap on its own-API-key spend, and turn its Max AI tier on or off.
The feature editor includes a Channel Types group that decides which messaging channels the client can connect — Chat Widget, WhatsApp Business API, WhatsApp Web, Instagram, Facebook Messenger, Telegram, LINE, Viber, Email, SMS, and iMessage. Channel types are switched on by default unless you turn some off; a channel you’ve switched off shows as locked on the client’s Channels page, with a note that it isn’t included on their current plan.
Two switches in the Productivity group control your client assistant for this client:
- Client assistant shows your branded assistant inside this client’s account, once you have switched it on in White Labeling.
- Client assistant can make changes lets the assistant change the client’s account for them (agents, knowledge, contacts, settings) after they confirm. Without it, the assistant answers and shows where to click.
If the client is on a paid tier, put the feature in the tier too. Toggles you set here are replaced by the tier’s own feature list every time that client’s subscription renews. Use the Edit modal for one-off adjustments, and the pricing tier for anything the client should keep.
Max AI tier and your own API key. If your agency runs on its own API key, enabling Max for a client changes that client’s AI usage from “free via your key” to 0.25 credits per action billed to your agency pool. The same goes for the Mini tier, which comes with Max: 0.15 credits per action, never on your key. If your agency holds a Champions Circle membership, your pool pays the Insider Rate instead: 0.20 per Max action and 0.12 per Mini action.
Need Help?
If you have questions about agency accounts or sub-account management, reach out via our email support.